") 投稿 | 基于IAR搭建RA MCU 串口打印
投稿 | 基于IAR搭建RA MCU 串口打印

RA MCU 生態(tài)工作室致力于構建一個完善的 RA 生態(tài),這將會是一個好玩有趣的開放社區(qū),也提供各種RA相關問題的解決方法。
1.概述
通過RASC創(chuàng)建一個串口工程,具體配置如下,用戶可以根據(jù)自己定義來配置串口相關的基本參數(shù)。
2.創(chuàng)建工程
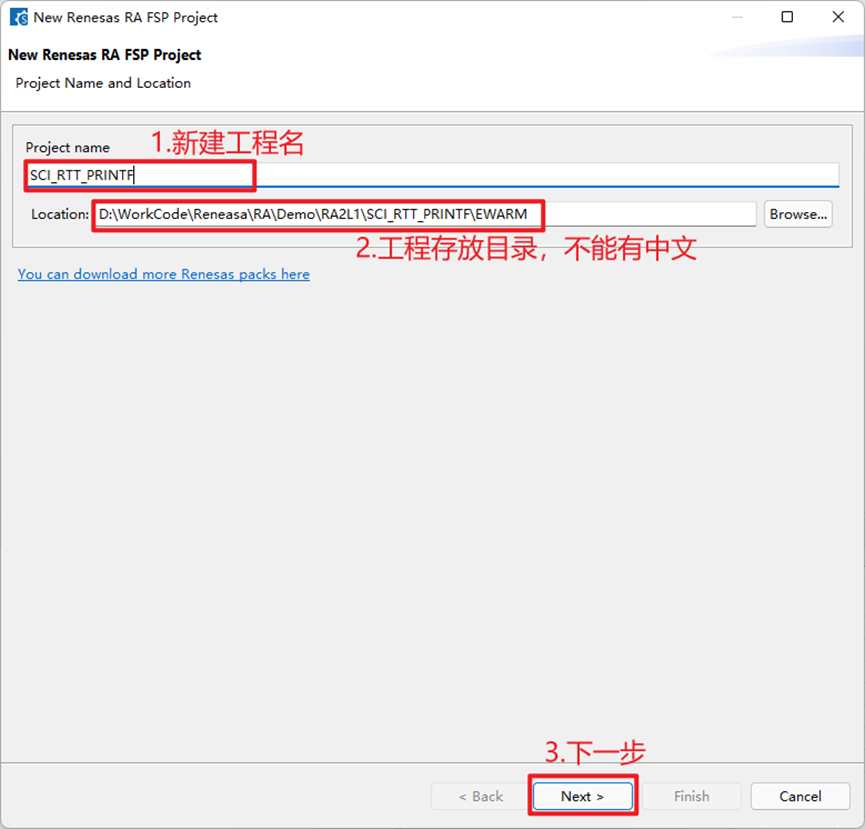
STEP1:RASC創(chuàng)建工程
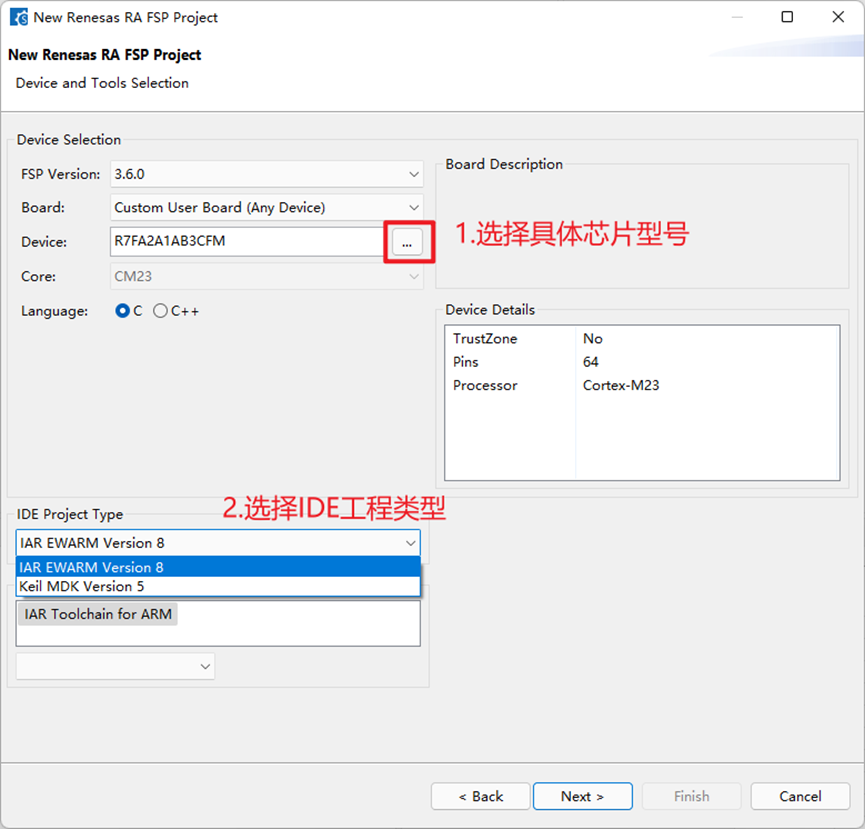
STEP2:選芯片型號跟IDE類型
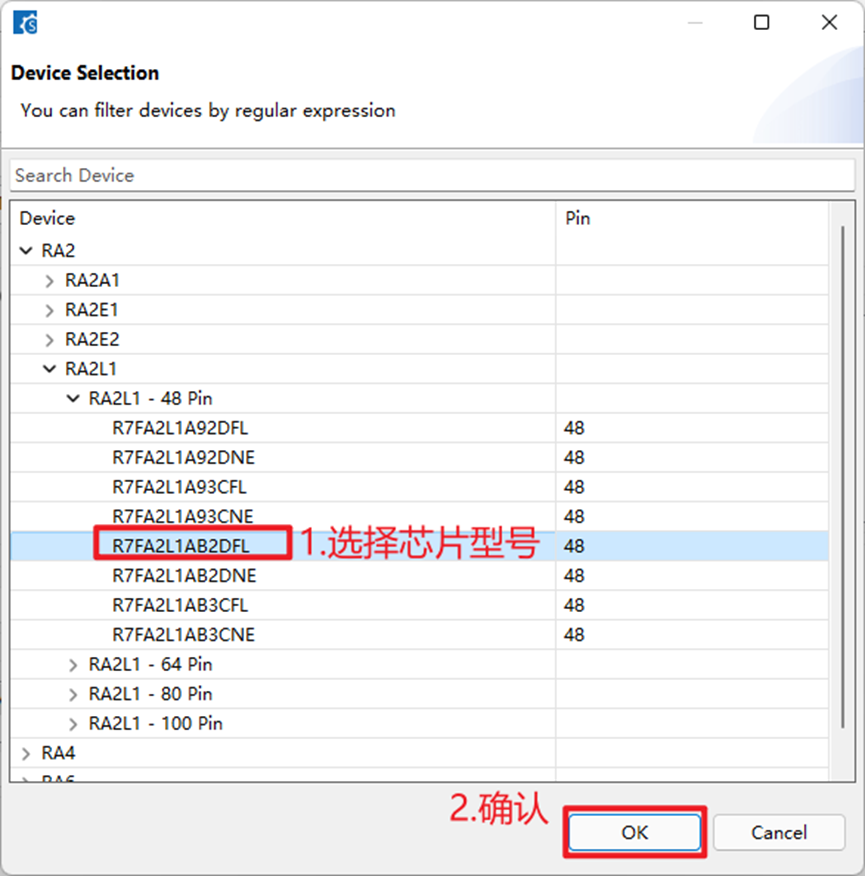
STEP3:選擇芯片型號
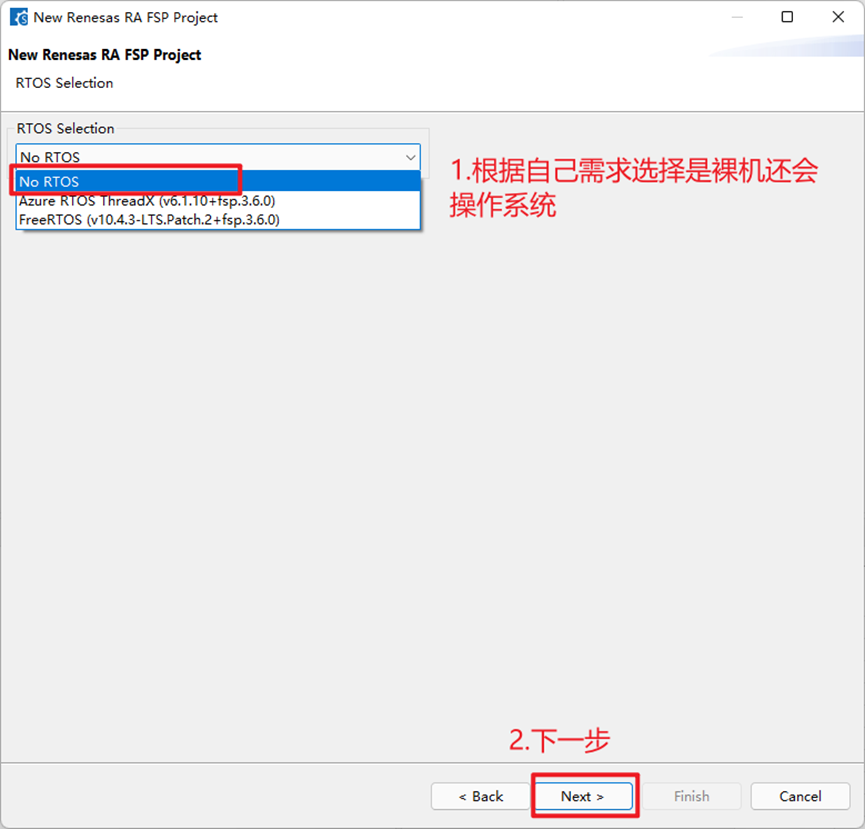
STEP4:選擇無操作系統(tǒng)
STEP5:勾選確認工程

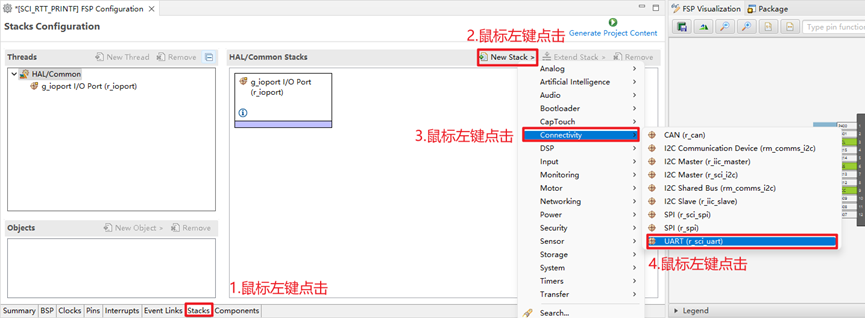
STEP6:配置串口號跟IO口

STEP7:添加串口驅(qū)動
STEP8:配置串口
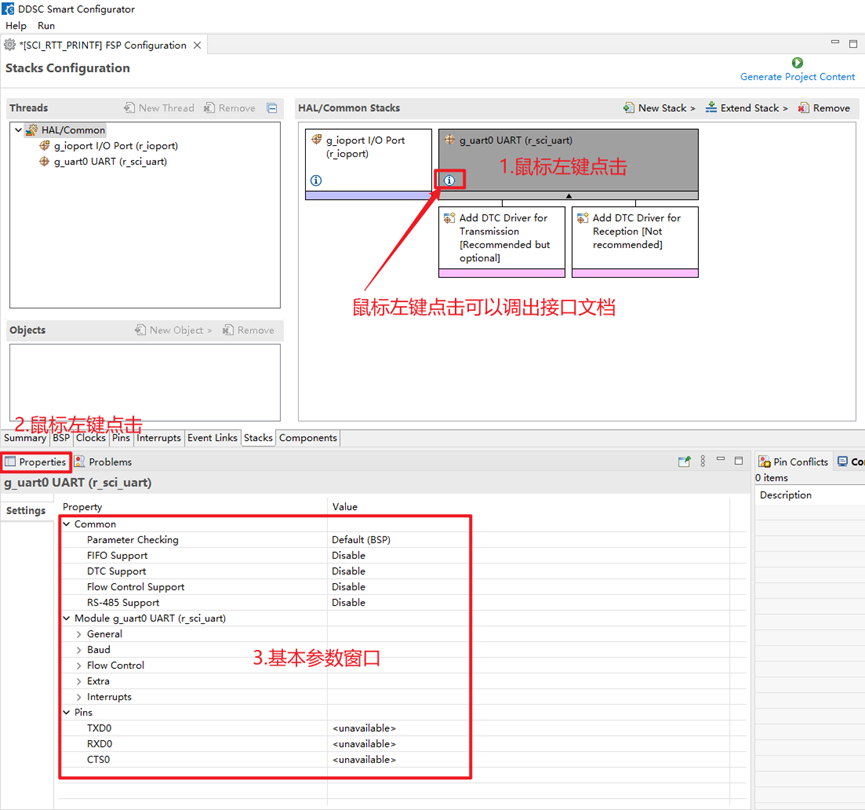
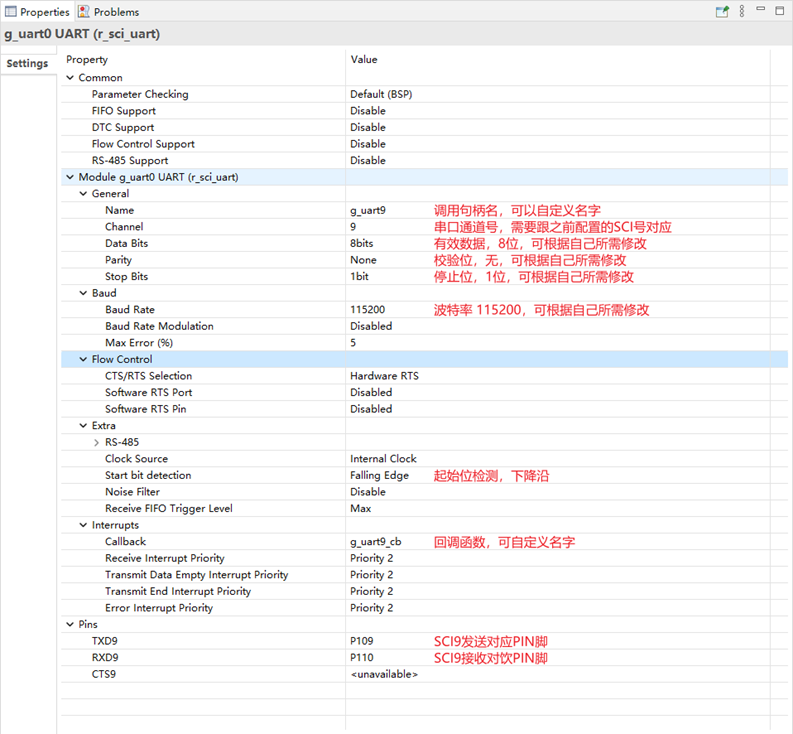
STEP9:配置串口基本屬性
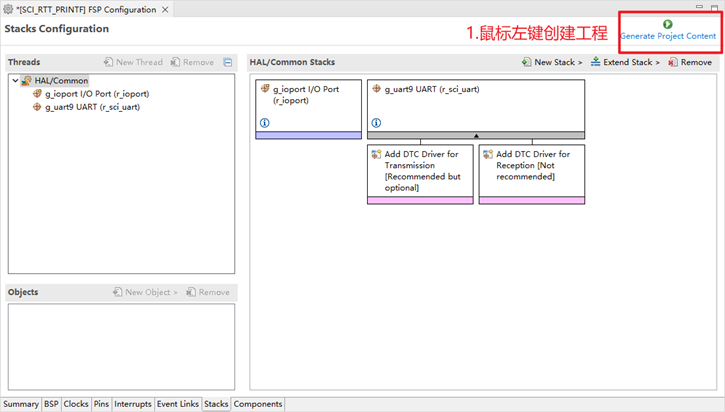
STEP10:生成工程
3.代碼
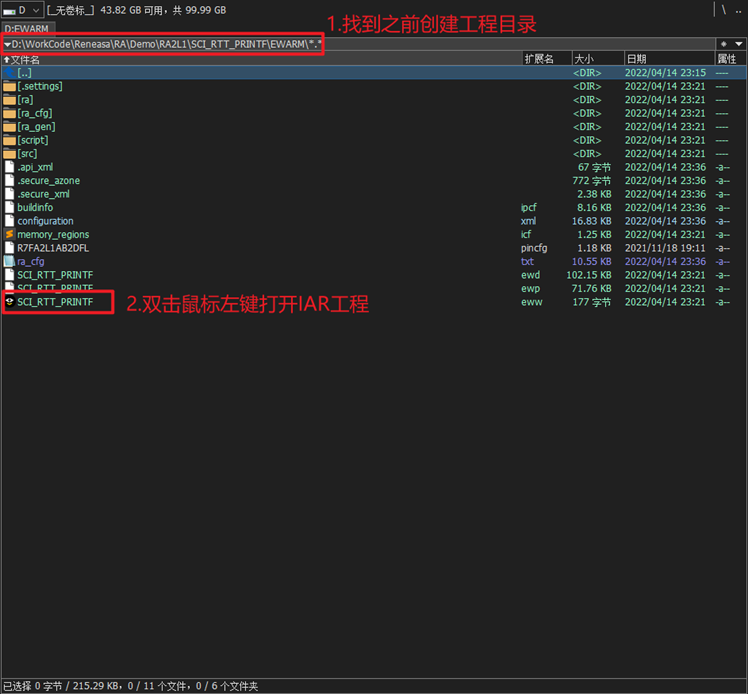
STEP11:打開工程
STEP12:添加代碼
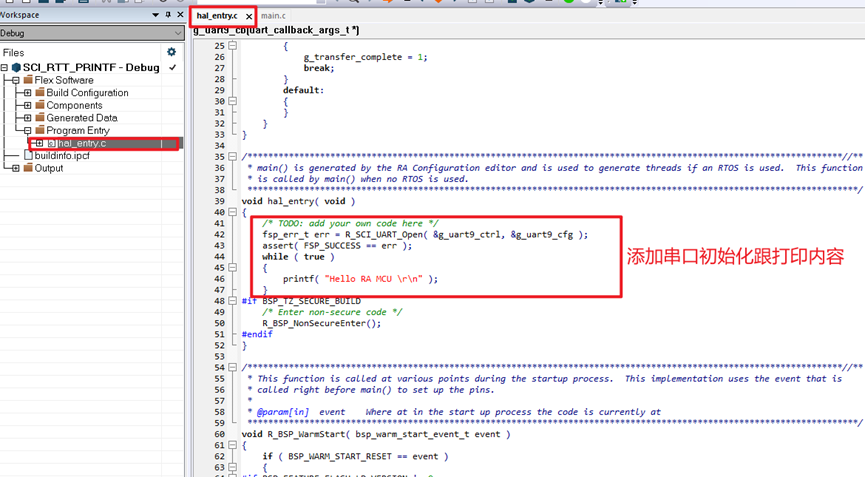
STEP13:具體代碼如下
void hal_entry( void )
{
    /* TODO: add your own code here */
    fsp_err_t err = R_SCI_UART_Open( &g_uart9_ctrl, &g_uart9_cfg );
    assert( FSP_SUCCESS == err );
    while ( true )
    {
        printf( "Hello RA MCU \r\n" );
    }
#if BSP_TZ_SECURE_BUILD
    /* Enter non-secure code */
    R_BSP_NonSecureEnter();
#endif
}STEP14:添加頭文件跟串口回調(diào)函數(shù)
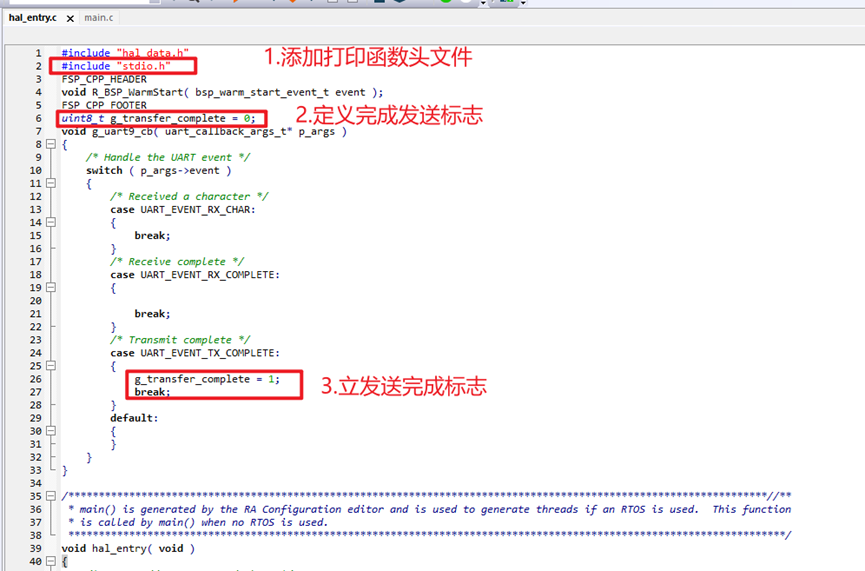
STEP15:具體代碼如下
#include "hal_data.h"
#include "stdio.h"
FSP_CPP_HEADER
void R_BSP_WarmStart( bsp_warm_start_event_t event );
FSP_CPP_FOOTER
uint8_t g_transfer_complete = 0;
void g_uart9_cb( uart_callback_args_t* p_args )
{
    /* Handle the UART event */
    switch ( p_args->event )
    {
        /* Received a character */
        case UART_EVENT_RX_CHAR:
        {
            break;
        }
        /* Receive complete */
        case UART_EVENT_RX_COMPLETE:
        {

            break;
        }
        /* Transmit complete */
        case UART_EVENT_TX_COMPLETE:
        {
            g_transfer_complete = 1;
            break;
        }
        default:
        {
        }
    }
}STEP16:添加打印接口重定向代碼,具體如下
/*******************
*
* Copyright 1998-2017 IAR Systems AB.
*
* This is a template implementation of the "__write" function used by
* the standard library. Replace it with a system-specific
* implementation.
*
* The "__write" function should output "size" number of bytes from
* "buffer" in some application-specific way. It should return the
* number of characters written, or _LLIO_ERROR on failure.
*
* If "buffer" is zero then __write should perform flushing of
* internal buffers, if any. In this case "handle" can be -1 to
* indicate that all handles should be flushed.
*
* The template implementation below assumes that the application
* provides the function "MyLowLevelPutchar". It should return the
* character written, or -1 on failure.
*
********************/
#include
#pragma module_name = "?__write"
int MyLowLevelPutchar(int x)
{
R_SCI_UART_Write(&g_uart9_ctrl, (uint8_t *)&x, 1);
while(g_transfer_complete == 0);
g_transfer_complete = 0;
return x;
}
/*
* If the __write implementation uses internal buffering, uncomment
* the following line to ensure that we are called with "buffer" as 0
* (i.e. flush) when the application terminates.
*/
size_t __write(int handle, const unsigned char * buffer, size_t size)
{
/* Remove the #if #endif pair to enable the implementation */
#if 1
size_t nChars = 0;
if (buffer == 0)
{
/*
* This means that we should flush internal buffers. Since we
* don't we just return. (Remember, "handle" == -1 means that all
* handles should be flushed.)
*/
return 0;
}
/* This template only writes to "standard out" and "standard err",
* for all other file handles it returns failure. */
if (handle != _LLIO_STDOUT && handle != _LLIO_STDERR)
{
return _LLIO_ERROR;
}
for (/* Empty */; size != 0; --size)
{
if (MyLowLevelPutchar(*buffer++) < 0)
{
return _LLIO_ERROR;
}
++nChars;
}
return nChars;
#else
/* Always return error code when implementation is disabled. */
return _LLIO_ERROR;
#endif
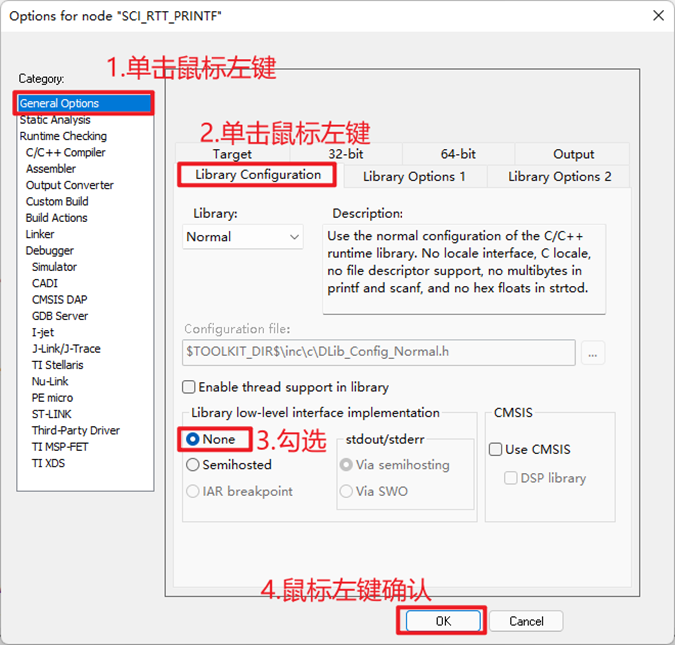
}4.工程配置
STEP17:工程配置
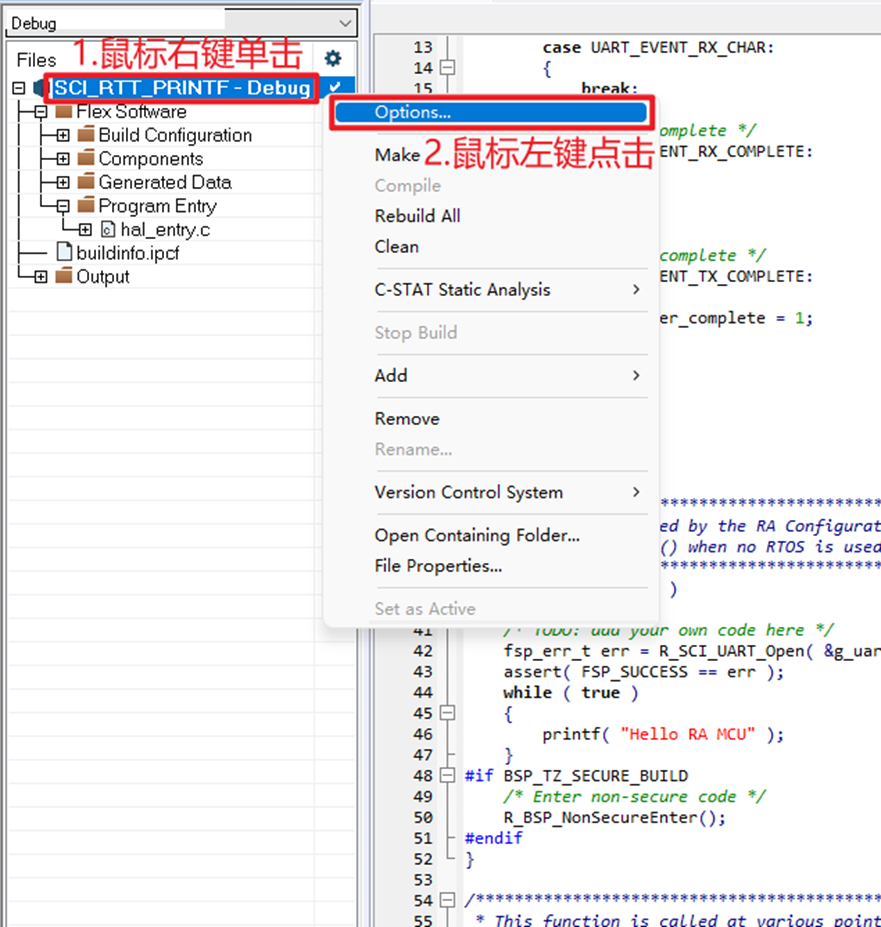
STEP18:彈出如下窗口
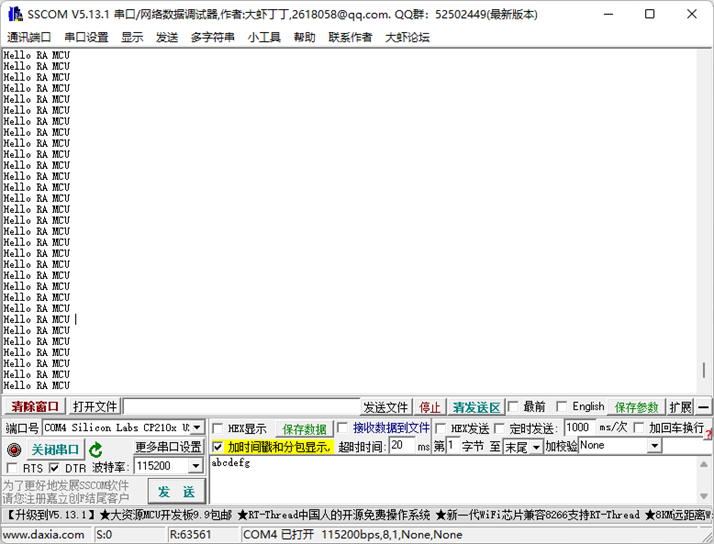
5.結果
STEP19:接上串口工具,打印如下
聲明:本文內(nèi)容及配圖由入駐作者撰寫或者入駐合作網(wǎng)站授權轉(zhuǎn)載。文章觀點僅代表作者本人,不代表電子發(fā)燒友網(wǎng)立場。文章及其配圖僅供工程師學習之用,如有內(nèi)容侵權或者其他違規(guī)問題,請聯(lián)系本站處理。
舉報投訴
-
mcu
+關注
關注
146文章
17984瀏覽量
367184
發(fā)布評論請先 登錄
相關推薦
熱點推薦
【RA-Eco-RA6M4開發(fā)板評測】——2.串口打印
上次講了LED點亮流水燈,這次來講解串口打印,首先打開原理圖
由圖可知,用到的串口是109和110
打開LED工程,直接在上面添加串口功能
生成代碼
打開KEIL
先編譯一遍
發(fā)現(xiàn)錯
發(fā)表于 07-16 13:20
【RA4L1-SENSOR】+ RA4L1-SENSOR開發(fā)版之使用Jlink的RTT打印功能代替串口
上一篇帖子中我已經(jīng)實現(xiàn)了板子上的串口USART9進行輸出打印,這篇帖子我采用另外一種串口打印來實現(xiàn),這是瑞薩官網(wǎng)實現(xiàn)的最主要打印調(diào)試手段,那
發(fā)表于 06-09 09:03
【RA4L1-SENSOR】+ RA4L1-SENSOR開發(fā)版串口打印功能printf實現(xiàn)
很高興收到瑞薩RA生態(tài)工作室給與試用的RA4L1-SENSOR開發(fā)板,本期就來講解使用RA4L1-SENSOR開發(fā)板實現(xiàn)串口打印功能!
1。
發(fā)表于 06-08 15:01
【RA-Eco-RA4M2開發(fā)板評測】使用Jlink的RTT來實現(xiàn)串口打印功能
使用RTT代替UART,把你的JLink變成串口調(diào)試助手,不知道大家在單片機開發(fā)中是如何打印調(diào)試信息的,大多數(shù)應該是用串口調(diào)試打印吧,在大多數(shù)的情況下,一般在制板和寫代碼時都會預留
發(fā)表于 04-30 12:19
【RA-Eco-RA4M2開發(fā)板評測】RA-Eco-RA4M2 串口通信
的電平不同,因此要想MCU和PC通信,需要以USB轉(zhuǎn)串口的芯片,板載的芯片是CH340G,連接是MCU的SCI9。
3 串口發(fā)送實現(xiàn)
3.1 RA
發(fā)表于 04-27 23:23
【RA-Eco-RA4M2開發(fā)板評測】RA-Eco-RA4M2 Keil 開發(fā)環(huán)境搭建
開發(fā)環(huán)境:
IDE:MKD 5.38a
Renesas RA Smart Configurator:v5.1.0
開發(fā)板:RA-Eco-RA4M2
MCU:R7FA4M2AD3CFP
瑞薩電子
發(fā)表于 04-27 22:54
【RA-Eco-RA4M2開發(fā)板評測】1 RA4M2開發(fā)環(huán)境搭建
開發(fā)環(huán)境:
IDE:MKD 5.38a
Renesas RA Smart Configurator:v5.1.0
開發(fā)板:RA-Eco-RA4M2
MCU:R7FA4M2AD3CFP
瑞薩電子
發(fā)表于 04-25 22:38
HSE FW AB分區(qū)作后如何控制 MCU 串口打印 HSE 狀態(tài)?
HSE FW AB 分區(qū)作后如何控制 MCU 串口打印 HSE 狀態(tài)
如下圖所示。
發(fā)表于 03-26 06:39
瑞薩RA8快速上手指南:Cortex-M85內(nèi)核瑞薩RA8開發(fā)環(huán)境搭建 并點亮一個LED
因為Cortex-M內(nèi)核,瑞薩RA8系列單片機支持多種市面上常見的開發(fā)環(huán)境,像Keil MDK、IAR EWARM等,而本文講述的是瑞薩自家官方的IDE(e2 studio)。

【瑞薩RA2L1入門學習】02. 串口打印 ADC 檢測電壓
\");就會在串口輸出Hello RA MCU!當然了,在這之前需要做一些配置才能打印,這里就不過多介紹了。可以看到串口
發(fā)表于 03-07 11:52
基于瑞薩RA0E1開發(fā)板的ThreadX實時操作系統(tǒng)串口回顯測試
感謝立創(chuàng)提供測試機會,學到RA0及瑞薩MCU的相關使用。使用瑞薩FSP庫和配置工具大大簡化了開發(fā)過程。掌握相關函數(shù)的功能,如打開串口、設置串口參數(shù)、讀取和寫入

【RA-Eco-RA4E2-64PIN-V1.0開發(fā)板試用】串口打印功能
剛剛點燈完畢,現(xiàn)在來實現(xiàn)RA4E2的串口打印功能,先打開原理圖,我們看到
串口使用的是P109和P110兩個IO口,然后我們來進行配置
先打開
RA
發(fā)表于 12-13 13:08
【RA-Eco-RA2E1-48PIN-V1.0開發(fā)板試用】(第二篇)串口打印+SPI_OLED顯示
串口打印
想要使用微庫就必須將主堆棧設置大于0x1000(4K),就是這個東西,之前沒有注意一直編譯報錯[難過]
通過手冊可以得知R7FA2E1A72DFL并沒有獨立的UART,而是使用的SCI
發(fā)表于 11-09 01:30
【RA-Eco-RA2E1-48PIN-V1.0開發(fā)板試用】使用Jlink RTT完成printf打印功能
很榮幸收到瑞薩的RA2E1超低功耗開發(fā)板,現(xiàn)在開始寫第一篇相關的試用報告,看到別人已經(jīng)用RA2E1的串口實現(xiàn)了printf打印功能,我就不重復了,下面我就使用Jlink自帶的RTT來實
發(fā)表于 10-31 21:00
【GD32 MCU 入門教程】一、GD32 MCU 開發(fā)環(huán)境搭建(2)使用 IAR 開發(fā) GD32
GD32系列為通用型MCU,所以開發(fā)環(huán)境也可以使用通用型的IDE,目前使用較多的是KEIL、IAR、 GCC和Embedded Builder,客戶可以根據(jù)個人喜好來選擇相應的開發(fā)環(huán)境。


 工商網(wǎng)監(jiān)
評論