 如何寫一個簡短的Python腳本做一個換臉程序
在這篇文章中我將介紹如何寫一個簡短(200行)的 Python 腳本,來自動地將一幅圖片的臉替換為另一幅圖片的臉。
這個過程分四步:
檢測臉部標記。
旋轉、縮放、平移和第二張圖片,以配合第一步。
調整第二張圖片的色彩平衡,以適配第一張圖片。
把第二張圖像的特性混合在第一張圖像中。
1.使用dlib提取面部標記
該腳本使用dlib的 Python 綁定來提取面部標記:
Dlib 實現了 Vahid Kazemi 和 Josephine Sullivan 的《使用回歸樹一毫秒臉部對準》論文中的算法。算法本身非常復雜,但dlib接口使用起來非常簡單:
PREDICTOR_PATH = "/home/matt/dlib-18.16/shape_predictor_68_face_landmarks.dat"
detector = dlib.get_frontal_face_detector()
predictor = dlib.shape_predictor(PREDICTOR_PATH)
defget_landmarks(im):
rects = detector(im,1)
iflen(rects) >1:
raiseTooManyFaces
iflen(rects) == 0:
raiseNoFaces
returnnumpy.matrix([[p.x,p.y]forpinpredictor(im,rects[0]).parts()])
get_landmarks()函數將一個圖像轉化成numpy數組,并返回一個68×2元素矩陣,輸入圖像的每個特征點對應每行的一個x,y坐標。
特征提取器(predictor)需要一個粗糙的邊界框作為算法輸入,由一個傳統的能返回一個矩形列表的人臉檢測器(detector)提供,其每個矩形列表在圖像中對應一個臉。
2.用 Procrustes 分析調整臉部
現在我們已經有了兩個標記矩陣,每行有一組坐標對應一個特定的面部特征(如第30行的坐標對應于鼻頭)。我們現在要解決如何旋轉、翻譯和縮放第一個向量,使它們盡可能適配第二個向量的點。一個想法是可以用相同的變換在第一個圖像上覆蓋第二個圖像。
將這個問題數學化,尋找T,s和R,使得下面這個表達式:
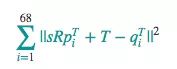
結果最小,其中R是個2×2正交矩陣,s是標量,T是二維向量,pi和qi是上面標記矩陣的行。
事實證明,這類問題可以用“常規 Procrustes 分析法”解決:
deftransformation_from_points(points1,points2):
points1 = points1.astype(numpy.float64)
points2 = points2.astype(numpy.float64)
c1 = numpy.mean(points1,axis=0)
c2 = numpy.mean(points2,axis=0)
points1 -= c1
points2 -= c2
s1 = numpy.std(points1)
s2 = numpy.std(points2)
points1 /= s1
points2 /= s2
U,S,Vt = numpy.linalg.svd(points1.T * points2)
R = (U * Vt).T
returnnumpy.vstack([numpy.hstack(((s2 / s1) * R,
c2.T - (s2 / s1) * R * c1.T)),
numpy.matrix([0.,0.,1.])])
代碼實現了這幾步:
1.將輸入矩陣轉換為浮點數。這是后續操作的基礎。
2.每一個點集減去它的矩心。一旦為點集找到了一個最佳的縮放和旋轉方法,這兩個矩心c1和c2就可以用來找到完整的解決方案。
3.同樣,每一個點集除以它的標準偏差。這會消除組件縮放偏差的問題。
4.使用奇異值分解計算旋轉部分。可以在維基百科上看到關于解決正交 Procrustes 問題的細節。
5.利用仿射變換矩陣返回完整的轉化。
其結果可以插入 OpenCV 的cv2.warpAffine函數,將圖像二映射到圖像一:
defwarp_im(im,M,dshape):
output_im = numpy.zeros(dshape,dtype=im.dtype)
cv2.warpAffine(im,
M[:2],
(dshape[1],dshape[0]),
dst=output_im,
borderMode=cv2.BORDER_TRANSPARENT,
flags=cv2.WARP_INVERSE_MAP)
returnoutput_im
對齊結果如下:
3.校正第二張圖像的顏色
如果我們試圖直接覆蓋面部特征,很快會看到這個問題:
這個問題是兩幅圖像之間不同的膚色和光線造成了覆蓋區域的邊緣不連續。我們試著修正:
COLOUR_CORRECT_BLUR_FRAC = 0.6
LEFT_EYE_POINTS = list(range(42,48))
RIGHT_EYE_POINTS = list(range(36,42))
defcorrect_colours(im1,im2,landmarks1):
blur_amount = COLOUR_CORRECT_BLUR_FRAC * numpy.linalg.norm(
numpy.mean(landmarks1[LEFT_EYE_POINTS],axis=0) -
numpy.mean(landmarks1[RIGHT_EYE_POINTS],axis=0))
blur_amount = int(blur_amount)
ifblur_amount % 2 == 0:
blur_amount += 1
im1_blur = cv2.GaussianBlur(im1,(blur_amount,blur_amount),0)
im2_blur = cv2.GaussianBlur(im2,(blur_amount,blur_amount),0)
# Avoid divide-by-zero errors.
im2_blur += 128 * (im2_blur <= 1.0)
return(im2.astype(numpy.float64) * im1_blur.astype(numpy.float64) /
im2_blur.astype(numpy.float64))
結果如下:
此函數試圖改變 im2 的顏色來適配 im1。它通過用 im2 除以 im2 的高斯模糊值,然后乘以im1的高斯模糊值。這里的想法是用RGB縮放校色,但并不是用所有圖像的整體常數比例因子,每個像素都有自己的局部比例因子。
用這種方法兩圖像之間光線的差異只能在某種程度上被修正。例如,如果圖像1是從一側照亮,但圖像2是被均勻照亮的,色彩校正后圖像2也會出現未照亮一側暗一些的問題。
也就是說,這是一個相當簡陋的辦法,而且解決問題的關鍵是一個適當的高斯核函數大小。如果太小,第一個圖像的面部特征將顯示在第二個圖像中。過大,內核之外區域像素被覆蓋,并發生變色。這里的內核用了一個0.6 *的瞳孔距離。
4.把第二張圖像的特征混合在第一張圖像中
用一個遮罩來選擇圖像2和圖像1的哪些部分應該是最終顯示的圖像:
值為1(顯示為白色)的地方為圖像2應該顯示出的區域,值為0(顯示為黑色)的地方為圖像1應該顯示出的區域。值在0和1之間為圖像1和圖像2的混合區域。
這是生成上圖的代碼:
LEFT_EYE_POINTS = list(range(42,48))
RIGHT_EYE_POINTS = list(range(36,42))
LEFT_BROW_POINTS = list(range(22,27))
RIGHT_BROW_POINTS = list(range(17,22))
NOSE_POINTS = list(range(27,35))
MOUTH_POINTS = list(range(48,61))
OVERLAY_POINTS = [
LEFT_EYE_POINTS + RIGHT_EYE_POINTS + LEFT_BROW_POINTS + RIGHT_BROW_POINTS,
NOSE_POINTS + MOUTH_POINTS,
]
FEATHER_AMOUNT = 11
defdraw_convex_hull(im,points,color):
points = cv2.convexHull(points)
cv2.fillConvexPoly(im,points,color=color)
defget_face_mask(im,landmarks):
im = numpy.zeros(im.shape[:2],dtype=numpy.float64)
forgroup inOVERLAY_POINTS:
draw_convex_hull(im,
landmarks[group],
color=1)
im = numpy.array([im,im,im]).transpose((1,2,0))
im = (cv2.GaussianBlur(im,(FEATHER_AMOUNT,FEATHER_AMOUNT),0) >0) * 1.0
im = cv2.GaussianBlur(im,(FEATHER_AMOUNT,FEATHER_AMOUNT),0)
returnim
mask = get_face_mask(im2,landmarks2)
warped_mask = warp_im(mask,M,im1.shape)
combined_mask = numpy.max([get_face_mask(im1,landmarks1),warped_mask],
axis=0)
我們把上述過程分解:
get_face_mask()的定義是為一張圖像和一個標記矩陣生成一個遮罩,它畫出了兩個白色的凸多邊形:一個是眼睛周圍的區域,一個是鼻子和嘴部周圍的區域。之后它由11個像素向遮罩的邊緣外部羽化擴展,可以幫助隱藏任何不連續的區域。
這樣一個遮罩同時為這兩個圖像生成,使用與步驟2中相同的轉換,可以使圖像2的遮罩轉化為圖像1的坐標空間。
之后,通過一個element-wise最大值,這兩個遮罩結合成一個。結合這兩個遮罩是為了確保圖像1被掩蓋,而顯現出圖像2的特性。
最后,使用遮罩得到最終的圖像:
output_im = im1 * (1.0 - combined_mask) + warped_corrected_im2 * combined_mask
完整代碼(link):
importcv2
importdlib
importnumpy
importsys
PREDICTOR_PATH = "/home/matt/dlib-18.16/shape_predictor_68_face_landmarks.dat"
SCALE_FACTOR = 1
FEATHER_AMOUNT = 11
FACE_POINTS = list(range(17,68))
MOUTH_POINTS = list(range(48,61))
RIGHT_BROW_POINTS = list(range(17,22))
LEFT_BROW_POINTS = list(range(22,27))
RIGHT_EYE_POINTS = list(range(36,42))
LEFT_EYE_POINTS = list(range(42,48))
NOSE_POINTS = list(range(27,35))
JAW_POINTS = list(range(0,17))
# Points used to line up the images.
ALIGN_POINTS = (LEFT_BROW_POINTS + RIGHT_EYE_POINTS + LEFT_EYE_POINTS +
RIGHT_BROW_POINTS + NOSE_POINTS + MOUTH_POINTS)
# Points from the second image to overlay on the first. The convex hull of each
# element will be overlaid.
OVERLAY_POINTS = [
LEFT_EYE_POINTS + RIGHT_EYE_POINTS + LEFT_BROW_POINTS + RIGHT_BROW_POINTS,
NOSE_POINTS + MOUTH_POINTS,
]
# Amount of blur to use during colour correction, as a fraction of the
# pupillary distance.
COLOUR_CORRECT_BLUR_FRAC = 0.6
detector = dlib.get_frontal_face_detector()
predictor = dlib.shape_predictor(PREDICTOR_PATH)
classTooManyFaces(Exception):
pass
classNoFaces(Exception):
pass
defget_landmarks(im):
rects = detector(im,1)
iflen(rects) > 1:
raiseTooManyFaces
iflen(rects) == 0:
raiseNoFaces
returnnumpy.matrix([[p.x,p.y]forpinpredictor(im,rects[0]).parts()])
defannotate_landmarks(im,landmarks):
im = im.copy()
foridx,point inenumerate(landmarks):
pos = (point[0,0],point[0,1])
cv2.putText(im,str(idx),pos,
fontFace=cv2.FONT_HERSHEY_SCRIPT_SIMPLEX,
fontScale=0.4,
color=(0,0,255))
cv2.circle(im,pos,3,color=(0,255,255))
returnim
defdraw_convex_hull(im,points,color):
points = cv2.convexHull(points)
cv2.fillConvexPoly(im,points,color=color)
defget_face_mask(im,landmarks):
im = numpy.zeros(im.shape[:2],dtype=numpy.float64)
forgroup inOVERLAY_POINTS:
draw_convex_hull(im,
landmarks[group],
color=1)
im = numpy.array([im,im,im]).transpose((1,2,0))
im = (cv2.GaussianBlur(im,(FEATHER_AMOUNT,FEATHER_AMOUNT),0) > 0) * 1.0
im = cv2.GaussianBlur(im,(FEATHER_AMOUNT,FEATHER_AMOUNT),0)
returnim
deftransformation_from_points(points1,points2):
"""
Return an affine transformation [s * R | T] such that:
sum ||s*R*p1,i + T - p2,i||^2
is minimized.
"""
# Solve the procrustes problem by subtracting centroids, scaling by the
# standard deviation, and then using the SVD to calculate the rotation. See
# the following for more details:
# https://en.wikipedia.org/wiki/Orthogonal_Procrustes_problem
points1 = points1.astype(numpy.float64)
points2 = points2.astype(numpy.float64)
c1 = numpy.mean(points1,axis=0)
c2 = numpy.mean(points2,axis=0)
points1 -= c1
points2 -= c2
s1 = numpy.std(points1)
s2 = numpy.std(points2)
points1 /= s1
points2 /= s2
U,S,Vt = numpy.linalg.svd(points1.T * points2)
# The R we seek is in fact the transpose of the one given by U * Vt. This
# is because the above formulation assumes the matrix goes on the right
# (with row vectors) where as our solution requires the matrix to be on the
# left (with column vectors).
R = (U * Vt).T
returnnumpy.vstack([numpy.hstack(((s2 / s1) * R,
c2.T - (s2 / s1) * R * c1.T)),
numpy.matrix([0.,0.,1.])])
defread_im_and_landmarks(fname):
im = cv2.imread(fname,cv2.IMREAD_COLOR)
im = cv2.resize(im,(im.shape[1] * SCALE_FACTOR,
im.shape[0] * SCALE_FACTOR))
s = get_landmarks(im)
returnim,s
defwarp_im(im,M,dshape):
output_im = numpy.zeros(dshape,dtype=im.dtype)
cv2.warpAffine(im,
M[:2],
(dshape[1],dshape[0]),
dst=output_im,
borderMode=cv2.BORDER_TRANSPARENT,
flags=cv2.WARP_INVERSE_MAP)
returnoutput_im
defcorrect_colours(im1,im2,landmarks1):
blur_amount = COLOUR_CORRECT_BLUR_FRAC * numpy.linalg.norm(
numpy.mean(landmarks1[LEFT_EYE_POINTS],axis=0) -
numpy.mean(landmarks1[RIGHT_EYE_POINTS],axis=0))
blur_amount = int(blur_amount)
ifblur_amount % 2 == 0:
blur_amount += 1
im1_blur = cv2.GaussianBlur(im1,(blur_amount,blur_amount),0)
im2_blur = cv2.GaussianBlur(im2,(blur_amount,blur_amount),0)
# Avoid divide-by-zero errors.
im2_blur += 128 * (im2_blur <= 1.0)
return(im2.astype(numpy.float64) * im1_blur.astype(numpy.float64) /
im2_blur.astype(numpy.float64))
im1,landmarks1 = read_im_and_landmarks(sys.argv[1])
im2,landmarks2 = read_im_and_landmarks(sys.argv[2])
M = transformation_from_points(landmarks1[ALIGN_POINTS],
landmarks2[ALIGN_POINTS])
mask = get_face_mask(im2,landmarks2)
warped_mask = warp_im(mask,M,im1.shape)
combined_mask = numpy.max([get_face_mask(im1,landmarks1),warped_mask],
axis=0)
warped_im2 = warp_im(im2,M,im1.shape)
warped_corrected_im2 = correct_colours(im1,warped_im2,landmarks1)
output_im = im1 * (1.0 - combined_mask) + warped_corrected_im2 * combined_mask
cv2.imwrite('output.jpg',output_im)
-
代碼
+關注
關注
30文章
4891瀏覽量
70384 -
python
+關注
關注
56文章
4825瀏覽量
86397
原文標題:小 200 行 Python 代碼做了一個換臉程序
文章出處:【微信號:magedu-Linux,微信公眾號:馬哥Linux運維】歡迎添加關注!文章轉載請注明出處。
發布評論請先 登錄
python寫一個建模的腳本-微帶天線的模型建立與仿真的過程搞定了
module 概述以及如何寫一個module
一個python腳本看透Linux程序對庫的依賴

如何寫一個會講笑話的Python程序


如何寫一個Linux設備驅動程序
來練習一個寫Redis部署的腳本

如何寫一個簡單的裝飾器


 工商網監
工商網監
評論