 如何在樹莓派 AI HAT+上進行YOLO目標檢測?

大家好,接下來會為大家開一個樹莓派5和YOLO的連載專題。
內容包括四個部分:
在樹莓派5上使用YOLO進行物體和動物識別-入門指南
在樹莓派5上開啟YOLO姿態估計識別之旅!
如何在樹莓派 AIHAT+上進行YOLO目標檢測?
如何在樹莓派 AI HAT+上進行YOLO姿態估計?
今天是第三部分:如何在樹莓派 AI HAT+上進行YOLO目標檢測?
如果大家對這個專題感興趣,記得關注樹莓派開發者,這樣你將會第一時間收到我們的內容更新通知。
在本指南中,我們將探討如何使用樹莓派AI HAT設置YOLO目標檢測,更重要的是,學習如何在Python項目中應用它。我們將了解如何安裝所需的硬件和固件,以及如何設置和使用目標檢測Python管道。通過本指南,您將掌握整個設置過程,并獲得我們編寫的三個不同示例腳本。一個腳本在檢測到特定對象時“執行某些操作”,另一個在檢測到特定數量的對象時執行操作,最后一個在特定位置檢測到對象時執行操作。
像我們其他大多數計算機視覺指南一樣,本指南也很有趣,讓我們開始吧!
目錄:
所需材料
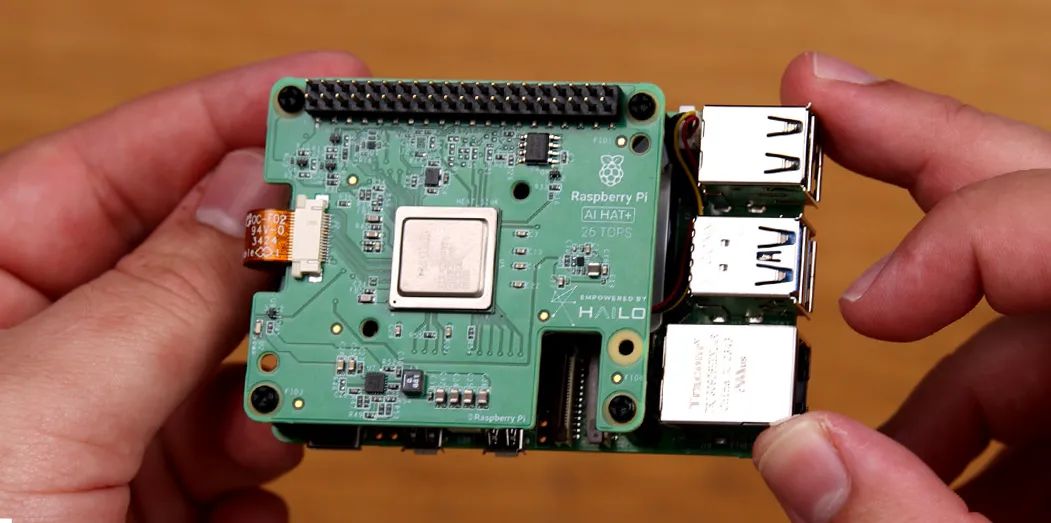
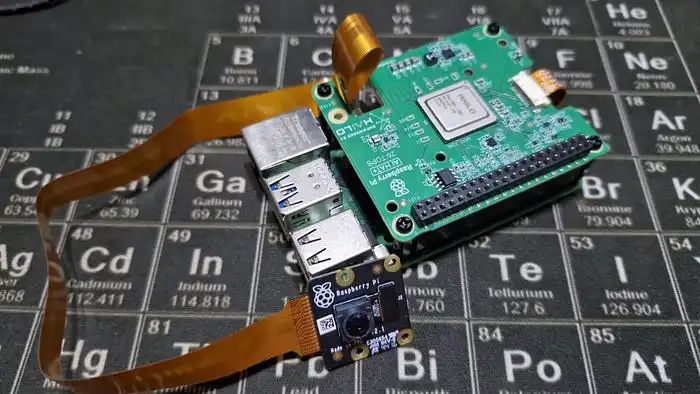
硬件組裝
安裝樹莓派操作系統
安裝AI HAT軟件和Python管道
運行目標檢測演示
示例代碼1:目標檢測
示例代碼2:計數對象
示例代碼3:對象定位
運行其他YOLO模型
接下來做什么?
所需材料
要跟隨本指南操作,您需要:
樹莓派5 - 2GB或更大內存的型號均可。
AI HAT+板 - 本指南適用于13 TOPS和26 TOPS版本。TOPS是衡量AI加速器速度的指標,因此26 TOPS版本的AI HAT+速度大約是13 TOPS版本的兩倍。這意味著它可以以更高的FPS運行更復雜、更強大的模型,比13 TOPS版本更出色。
引腳擴展器(可選) - AI HAT+附帶了一個樹莓派引腳擴展器,但通常它們不夠長,無法完全穿過HAT。如果您打算將硬件插入樹莓派或以其他方式使用引腳,則需要一個這樣的擴展器來訪問它們。
樹莓派攝像頭模塊 - 我們使用的是攝像頭模塊V3,但幾乎任何官方攝像頭模塊都可以使用。
攝像頭適配器線 - 樹莓派5使用的CSI攝像頭線尺寸與之前的型號不同,您的攝像頭可能附帶的是舊的更寬的線,因此值得仔細檢查一下。攝像頭模塊V3肯定需要一條適配器線。您還可以選擇更長的線,如300mm和500mm!
散熱解決方案 - 對于樹莓派5本身,我們使用的是主動散熱器。雖然AI HAT+可以在沒有散熱器的情況下運行,但如果您長時間運行它,一個小型自粘散熱片可能是一項值得的投資。一點散熱措施可能大有裨益。
Micro SD卡 - 至少16GB容量。
顯示器和Micro-HDMI轉HDMI線
鼠標和鍵盤
*所需物品可以直接聯系我們進行購買。
硬件安裝
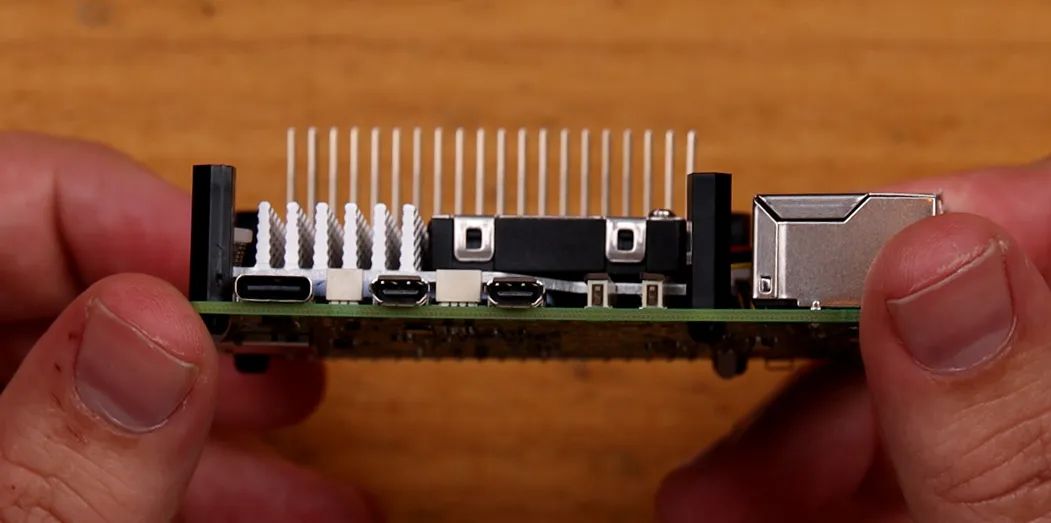
步驟1:安裝引腳擴展器

在樹莓派上安裝任何硬件之前,請確保已關閉電源并斷開與任何電源的連接。
首先將GPIO引腳擴展器安裝在樹莓派的引腳上。如果您使用的是更長的引腳擴展器,請在此處使用。注意不要彎曲這些引腳,因為它們很長,很容易彎曲。
如果您在樹莓派上使用散熱片或散熱器,現在是安裝的時候了。
步驟2:安裝支柱
安裝隨AI HAT附帶的4個支架。支架附帶4個長螺絲和4個短螺絲,使用哪一種都無妨。
步驟3:連接PCIe線
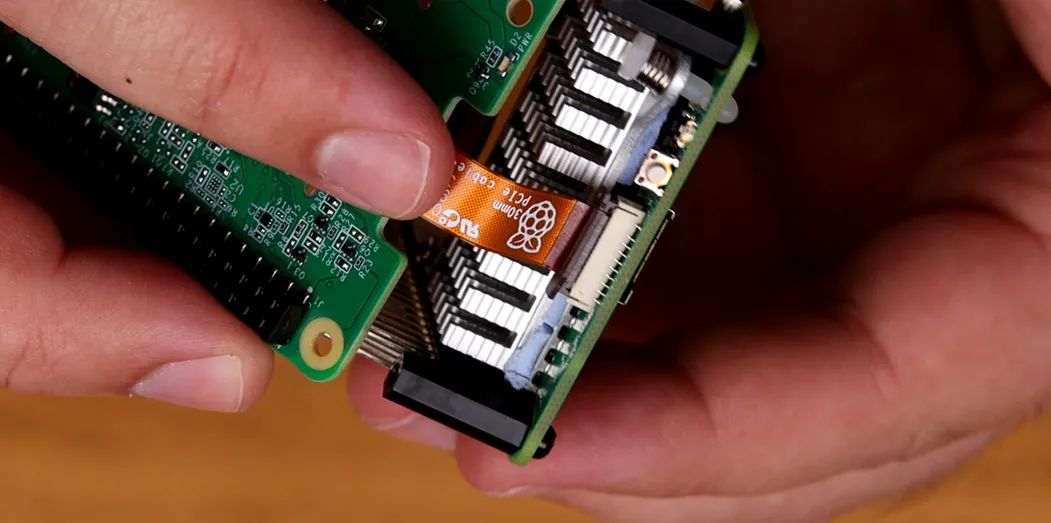
要將HAT上的PCIe電纜安裝到樹莓派上,請先抬起樹莓派PCIe插槽上的棕色卡扣。將電纜插入插槽,確保其牢固且垂直地固定在插槽內。然后將卡扣推回原位以固定電纜。
注意:避免過度彎曲或扭曲此電纜,因為它可能較為脆弱。
步驟4:放置AI HAT
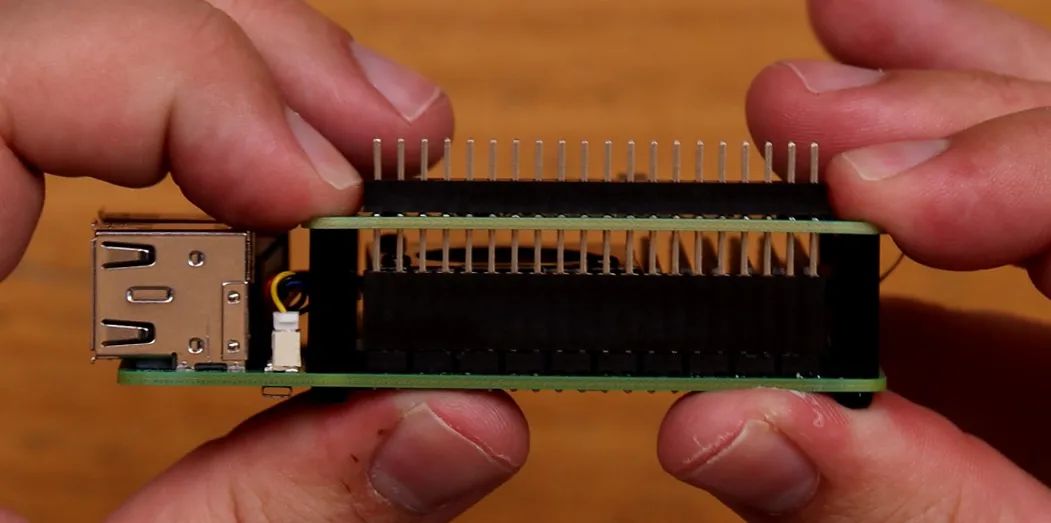
現在將HAT滑動到針腳延長器上,直到它平放在支架上。在此過程中請小心不要損壞PCIe電纜。
您的樹莓派在HAT下方可能會露出部分GPIO接口——這是正常現象。
步驟5:安裝攝像頭
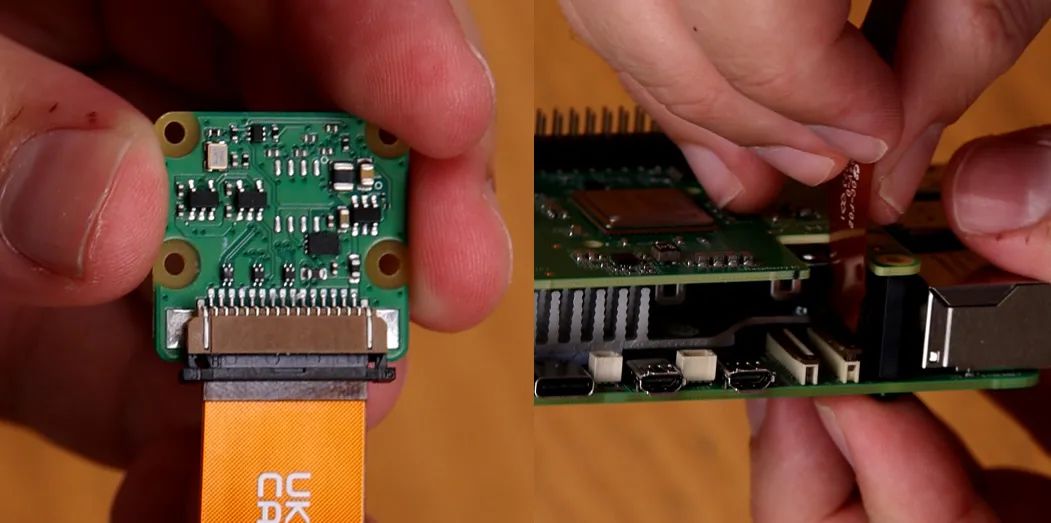
相機使用的連接器與PCIe連接器采用類似的卡扣式連接設計。在相機和樹莓派的連接器插槽上,先抬起卡扣,將電纜插入并確保其垂直對齊,然后將連接器按下固定到位。
步驟6:擰緊螺絲
最后,用剩下的4顆螺絲將HAT固定好。如果你選擇使用自粘式散熱片在AI HAT上,將其放置在電路板中央的銀色處理單元上。
就這樣,我們完成了!
安裝樹莓派操作系統
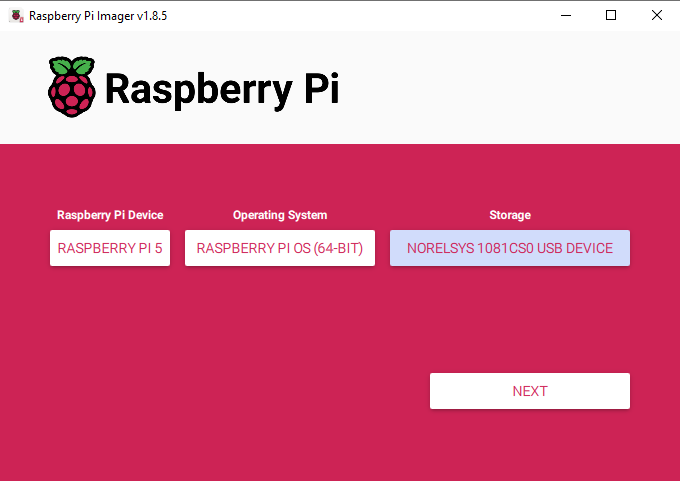
首先,我們需要將樹莓派操作系統安裝到Micro SD卡上。使用樹莓派Imager,選擇樹莓派5作為設備,選擇Raspberry Pi OS(64位)作為操作系統,并選擇您的MicroSD卡作為存儲設備。
注意:將樹莓派操作系統安裝到MicroSD卡上將擦除卡上的所有數據。
下載操作系統并安裝可能需要幾分鐘時間。安裝完成后,將其插入樹莓派并啟動。您的樹莓派將進行首次安裝,請確保將其連接到互聯網。
安裝AI HAT軟件和Python管道
讓我們開始安裝運行AI HAT所需的固件和軟件。打開一個新的終端窗口,首先使用以下命令更新您的樹莓派:
sudo aptupdate&&sudo aptfull-upgrade
在這些步驟中,系統可能會詢問您是否確認安裝某些內容,只需輸入“y”并回車即可。
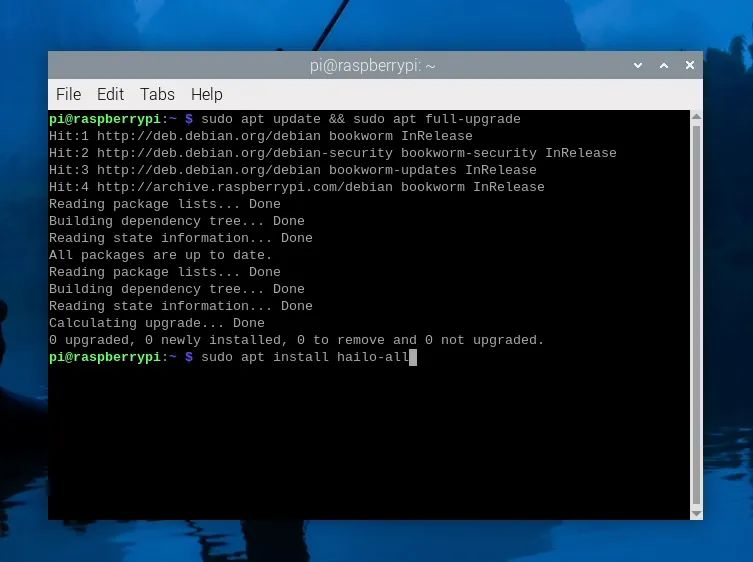
現在使用以下命令安裝HAT固件:
sudoapt install hailo-all
此安裝過程可能需要5到10分鐘才能完成。安裝完成后,重新啟動樹莓派。如果您想成為高級用戶,可以通過在終端中輸入以下命令來重新啟動:
reboot
現在我們將安裝Hailo的Python管道軟件和示例,但什么是管道呢?
與AI HAT硬件本身進行通信極其復雜,所需的代碼也相當復雜。我們將設置并安裝一個目標檢測管道,它只是一組代碼和軟件,使我們能夠更輕松地與HAT進行交互。它本質上會將我們更簡單、更易讀的代碼轉換為幕后所有的復雜操作,以使HAT運行。
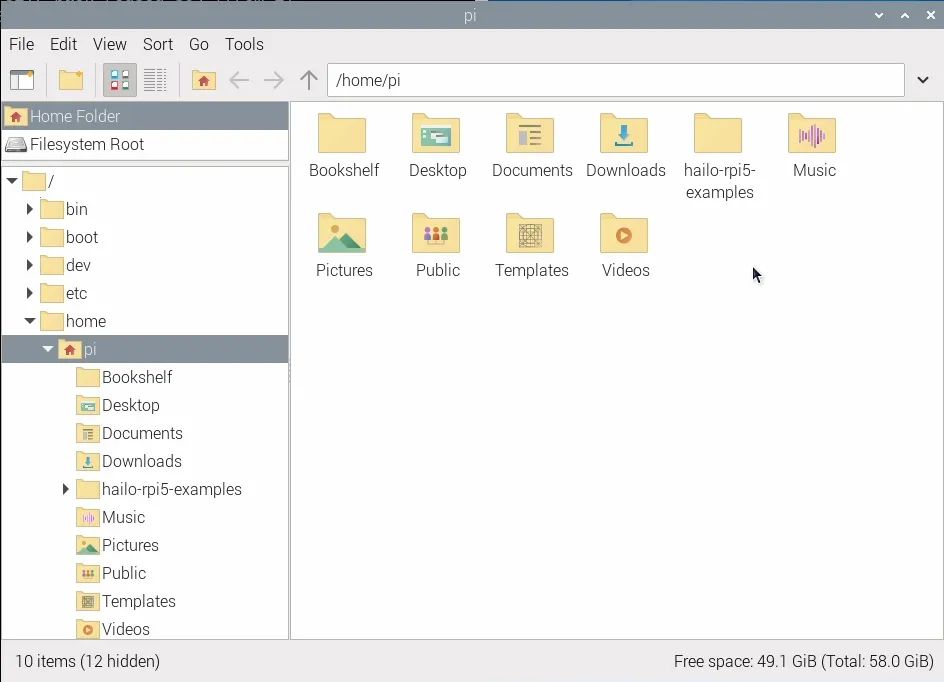
要安裝管道及其所需的庫,首先通過在終端中輸入以下命令來復制它們的GitHub存儲庫:
gitclonehttps://github.com/hailo-ai/hailo-rpi5-examples.git
這將在樹莓派的主文件夾中下載一個名為“hailo-rpi5-examples”的文件夾,這將是我們將要在其中工作的重要位置。
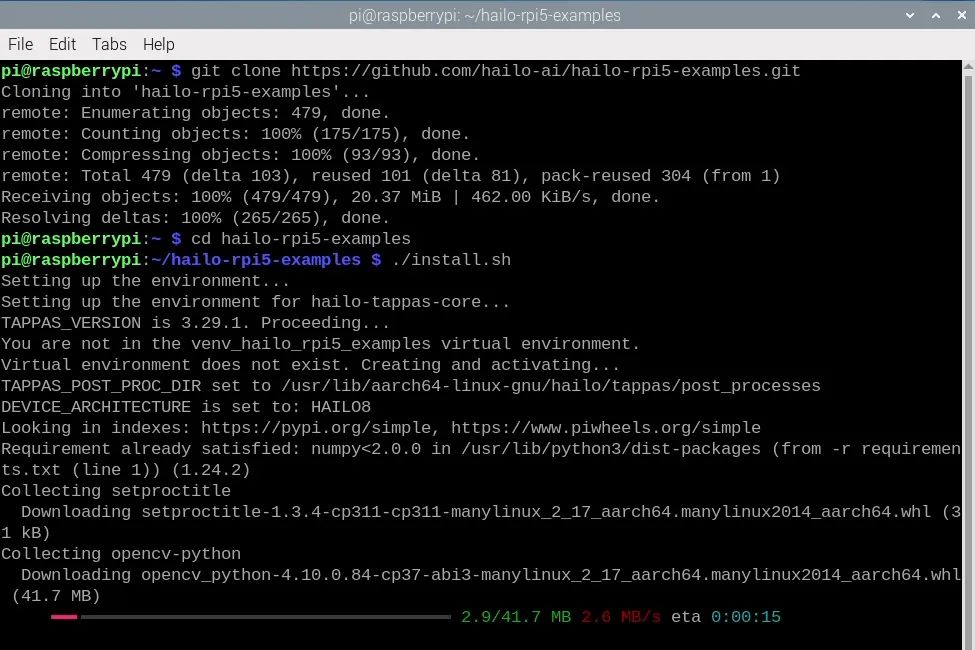
在安裝管道之前,我們需要告訴終端通過更改目錄命令從該文件夾中工作:
cdhailo-rpi5-examples
終端中帶有文件位置的藍色文本表示您已成功運行此命令。現在我們將運行shell腳本安裝程序:
./install.sh
此安裝過程可能需要10到20分鐘,因為它還會安裝我們將要使用的所有YOLO模型。
安裝完成后,再次重新啟動樹莓派。
運行目標檢測演示
讓我們運行一些示例代碼!在之前的步驟中,我們從Hailo下載了一些示例管道以及使用這些管道的示例Python腳本。在本教程中,我們將使用目標檢測管道 - 它被稱為“detection_pipeline.py”,位于hailo_rpi5-examples/basic_pipelines下。
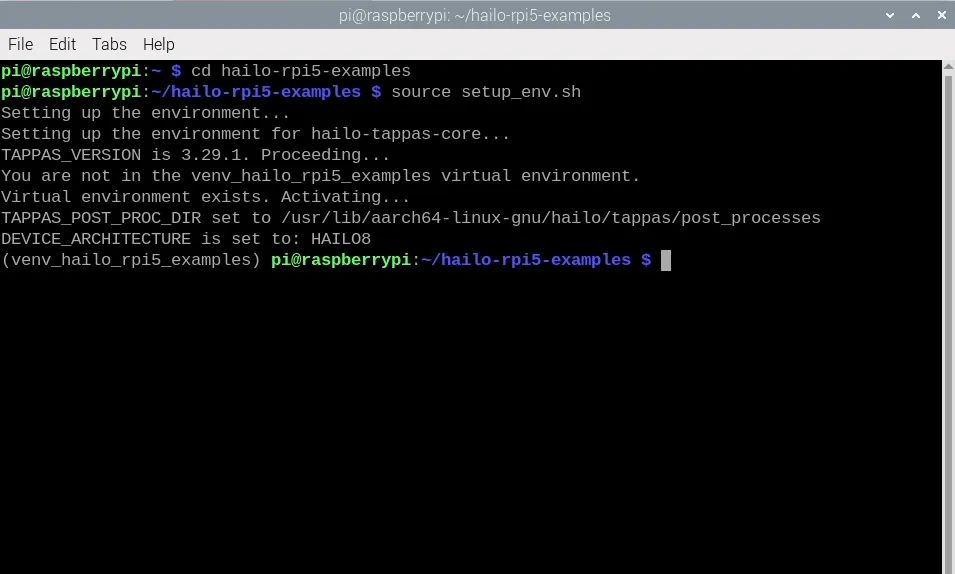
運行這些Python腳本的最簡單方法是通過終端。首先使用更改目錄命令更改終端的工作位置,這與我們之前使用的命令相同:
cdhailo-rpi5-examples
安裝步驟還創建了一個虛擬環境(也稱為Venv)。這本質上是一個隔離的虛擬工作空間,我們可以在其中安裝軟件包并進行實驗,而不會影響樹莓派操作系統的其他部分。我們需要使用的所有軟件包都已安裝在此Venv中,我們可以通過在終端中輸入以下命令來告訴終端進入該環境:
sourcesetup_env.sh
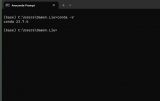
您可以通過查看右側圖像中括號內左側的名稱來確認您正在Venv中工作。如果您已進入Venv并且看到了更改目錄命令的藍色文本,那么您現在就可以運行Python腳本了。如果您關閉了終端或重新啟動了樹莓派,則需要再次運行這些命令以返回到此狀態。
我們將運行名為“detection.py”的演示Python代碼,該代碼位于“basic_pipelines”文件夾中,因此運行此代碼的命令將是:
python basic_pipelines/detection.py
您應該看到一個新窗口出現,顯示人們過馬路的視頻,以及YOLO目標檢測模型在幀中識別對象,如右側圖像所示。恭喜!您已成功在AI HAT上設置并運行了計算機視覺。
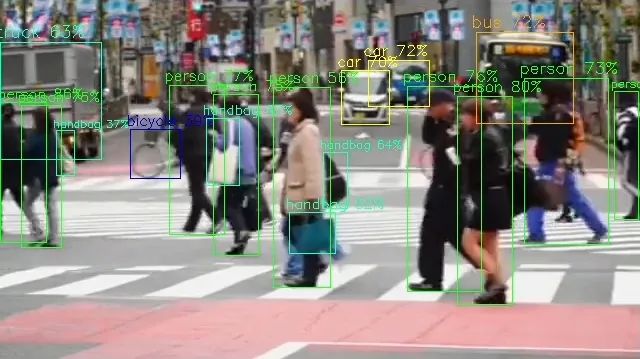
我們看到的這個視覺輸出很直觀。YOLO會嘗試在它認為對象所在的位置周圍繪制一個邊界框,然后標記它識別出的對象,并用百分比來評估識別的置信度。默認的YOLO模型是在COCO數據集上訓練的,該數據集僅包含81個可檢測的對象。
https://gist.github.com/AruniRC/7b3dadd004da04c80198557db5da4bda
這可能看起來不多,但其中許多是日常生活中常見的廣泛對象類別,如“運動球”和“瓶子”。
要以我們的攝像頭作為輸入視頻源來運行Python代碼,我們需要將其指定為一個參數或選項。我們可以通過輸入以下命令來獲取目標檢測管道的所有可用選項列表:
python basic_pipelines/detection.py --help

這里有一些有用的選項可供探索,您應該找個時間嘗試一下,但我們感興趣的是使用“--input”選項更改源。在這里我們可以看到,我們可以指定一個文件或攝像頭作為輸入,并且我們可以使用以下命令運行帶有攝像頭模塊的檢測腳本:
python basic_pipelines/detection.py --input rpi
現在我們的代碼已經運行并從攝像頭中檢測對象了,讓我們快速了解一下幕后發生了什么,以便我們學習如何在自定義項目中應用此目標檢測。這里有很多復雜的過程,有數千行代碼在運行,但其中大部分都是在管道中幕后運行的。這對我們來說很幸運,因為這意味著我們只需要與“detection.py”文件交互,該文件更加簡潔且易于人類閱讀(我們稱之為高級代碼)。
讓我們在Thonny中打開detection.py并探索其中發生了什么。代碼首先導入所有所需的軟件包和庫以運行,其中兩個是同一文件夾中的Python腳本,“detection_pipeline”和“hailo_rpi_common”。如果您希望修改此設置中不在detection.py中的更深層次的行為,它很可能位于這些文件中。如果您希望為項目導入任何庫或軟件包,請像往常一樣在此處添加。
importgigi.require_version('Gst','1.0')fromgi.repositoryimportGst,GLibimportosimportnumpyasnpimportcv2importhailofromhailo_apps_infra.hailo_rpi_commonimport( get_caps_from_pad, get_numpy_from_buffer, app_callback_class,)fromhailo_apps_infra.detection_pipelineimportGStreamerDetectionApp
然后,我們在腳本頂部定義了一個類,其中嵌套了一個名為“__init__”的函數。通常在編寫代碼時,我們將“初始化”代碼放在頂部,并且只運行一次。這個類就是放置此“初始化”代碼的地方。因此,如果我們想定義一個常量變量、設置一個引腳或聲明一個函數,則必須在此部分中完成。Hailo在此部分提供了一個創建變量和函數的示例:
classuser_app_callback_class(app_callback_class): def__init__(self): super().__init__() self.new_variable =42 # New variable example defnew_function(self): # New function example return"The meaning of life is: "
然后我們有一個名為“app_callback”的函數。每次AI HAT處理一幀時,此函數的內容都會運行,可以將其視為我們在代碼中通常使用的while true循環。此循環中的前十幾行代碼對我們來說興趣不大。它們主要是在管理管道,并在最后創建了一個名為“detections”的對象,該對象保存了來自YOLO模型的所有目標檢測信息。
defapp_callback(pad, info, user_data): # Get the GstBuffer from the probe info buffer = info.get_buffer() # Check if the buffer is valid ifbufferisNone: returnGst.PadProbeReturn.OK # Using the user_data to count the number of frames user_data.increment() string_to_print =f"Frame count:{user_data.get_count()}\n" # Get the caps from the pad format, width, height = get_caps_from_pad(pad) # If the user_data.use_frame is set to True, we can get the video frame from the buffer frame =None ifuser_data.use_frameandformatisnotNoneandwidthisnotNoneandheightisnotNone: # Get video frame frame = get_numpy_from_buffer(buffer,format, width, height) # Get the detections from the buffer roi = hailo.get_roi_from_buffer(buffer) detections = roi.get_objects_typed(hailo.HAILO_DETECTION)
現在我們到了這段代碼的核心部分,開始處理detections對象。在這個for循環內部是一系列步驟。對于每個檢測到的對象,它首先獲取其標簽(名稱)、邊界框的坐標(圍繞對象的框)和檢測的置信度。這三個信息片段是您的項目所需的關鍵拼圖,因為它們是攝像頭所看到內容的輸出。在此演示代碼中,它檢查檢測到的事物是否是人,然后將計數器增加1,并統計圖像中的人數(盡管它并沒有對此進行任何操作)。
detection_count=0 fordetection in detections: label= detection.get_label() bbox= detection.get_bbox() confidence= detection.get_confidence() iflabel =="person": string_to_print+= f"Detection: {label} {confidence:.2f}\n" detection_count+=1
這段代碼的其余部分使用openCV顯示相關信息,然后將檢測數據打印到shell。
ifuser_data.use_frame: #Note:using imshow will not work here, as the callback function is not running in the main thread # Let's print the detection count to the frame cv2.putText(frame, f"Detections: {detection_count}", (10,30), cv2.FONT_HERSHEY_SIMPLEX,1, (0,255,0),2) # Example of how to use the new_variable and new_function from the user_data # Let's print the new_variable and the result of the new_function to the frame cv2.putText(frame, f"{user_data.new_function()} {user_data.new_variable}", (10,60), cv2.FONT_HERSHEY_SIMPLEX,1, (0,255,0),2) # Convert the frame to BGR frame= cv2.cvtColor(frame, cv2.COLOR_RGB2BGR) user_data.set_frame(frame) print(string_to_print) returnGst.PadProbeReturn.OK
有了這個腳本,您現在就有了開始使用AI HAT進行自己的目標檢測項目的工具。對于一些創客來說,這可能已經足夠了,但我們還根據detection.py編寫了三個更精煉和健壯的示例代碼。這些腳本旨在讓您能夠啟動項目,同時還提供了更多關于如何根據需要修改detections.py的示例。
示例代碼1:目標檢測
此腳本的最終目標是在檢測到特定對象時“執行某些操作”。以下是完整代碼:
importgigi.require_version('Gst','1.0')fromgi.repositoryimportGst, GLibimportosimportnumpyasnpimportcv2importhailofromhailo_apps_infra.hailo_rpi_commonimport( get_caps_from_pad, get_numpy_from_buffer, app_callback_class,)fromhailo_apps_infra.detection_pipelineimportGStreamerDetectionAppfromgpiozeroimportAngularServo# Inheritance from the app_callback_classclassuser_app_callback_class(app_callback_class): def__init__(self): super().__init__()
# Initialize state variables for debouncing self.detection_counter =0 # Count consecutive frames with detections self.no_detection_counter =0 # Count consecutive frames without detections
# State tracking, is it active or not? self.is_it_active =False
self.servo = AngularServo(18, min_pulse_width=0.0006, max_pulse_width=0.0023)
defapp_callback(pad, info, user_data): # Get the GstBuffer from the probe info buffer = info.get_buffer() # Check if the buffer is valid ifbufferisNone: returnGst.PadProbeReturn.OK
# Using the user_data to count the number of frames user_data.increment()
# Get the caps from the pad format, width, height = get_caps_from_pad(pad) # If the user_data.use_frame is set to True, we can get the video frame from the buffer frame =None ifuser_data.use_frameandformatisnotNoneandwidthisnotNoneandheightisnotNone: frame = get_numpy_from_buffer(buffer,format, width, height)
# Get the detections from the buffer roi = hailo.get_roi_from_buffer(buffer) detections = roi.get_objects_typed(hailo.HAILO_DETECTION)
# Track if we've seen objects of interest this frame object_detected =False detection_string =""
# Parse the detections fordetectionindetections: label = detection.get_label() confidence = detection.get_confidence()
# Check for objects of interest with confidence threshold ifconfidence >0.4: # Adjust confidence threshold as needed iflabel =="person": object_detected =True detection_string +=f"Detection:{label}{confidence:.2f}\n" # Debouncing logic ifobject_detected: user_data.detection_counter +=1 user_data.no_detection_counter =0
# Only activate after given amount of consecutive frames with detections ifuser_data.detection_counter >=4andnotuser_data.is_it_active: # Move the Servo or do what ever you want to do user_data.servo.angle =90 # Update the is it active variable so this doesnt keep repeating user_data.is_it_active =True print("OBJECT DETECTED!") else: user_data.no_detection_counter +=1 user_data.detection_counter =0
# Only deactivate after 5 consecutive frames without detections ifuser_data.no_detection_counter >=5anduser_data.is_it_active: # Move the Servo or do what ever you want to do user_data.servo.angle =0 user_data.is_it_active =False print("Object Gone.") # Print detections if any ifdetection_string: print(detection_string, end='')
returnGst.PadProbeReturn.OKif__name__ =="__main__": # Create an instance of the user app callback class user_data = user_app_callback_class() app = GStreamerDetectionApp(app_callback, user_data) app.run()
要運行此代碼,請在同一個basic_pipelines文件夾中創建一個新的Python文件。對于此示例,我們將其命名為“watcher.py”。要運行代碼,命令與之前相同,但必須使用新名稱:
python basic_pipelines/watcher.py --input rpi
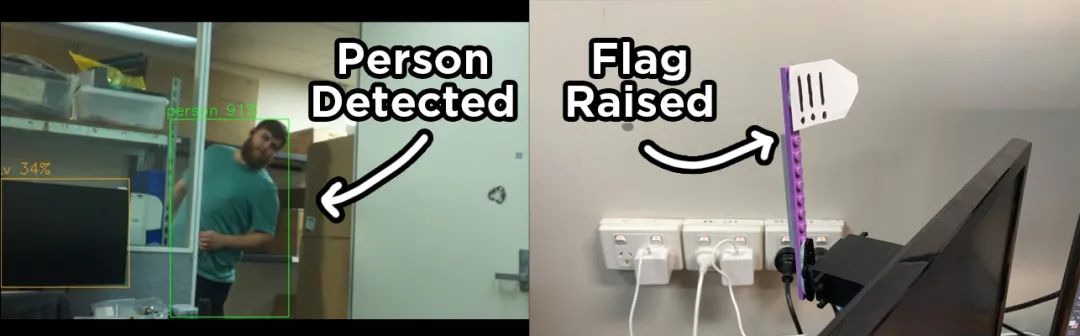
此代碼目前設置為在檢測到人時移動伺服。一個實際應用示例是解決辦公室里的一個實際問題。在我的辦公桌前,我經常戴著耳機,這使得當人們從我身后進入辦公室時很容易嚇到我。當這段代碼檢測到指向我身后門的攝像頭中有人時,它會旋轉一個伺服,創建一個視覺警報,表明有人進來了!
讓我們看看代碼的一些關鍵部分,了解我們添加了什么以及如何根據您的需求進行定制。
我們首先導入完全相同的庫,但添加了gpiozero庫,其中包含我們將使用的易于使用的伺服控制。
fromgpiozeroimportAngularServo
然后在只運行一次的類中,我們創建了幾個變量。有兩個用于去抖動的計數器變量,以及一個用于跟蹤伺服當前狀態的“is_it_active”變量。我們還設置了連接到引腳18的伺服。非常重要的一點是,當我們在這一部分創建變量時,必須使用“self.”前綴。如果我們希望一個變量在app_callback()(“while true循環”)中可訪問,我們需要有這個前綴。
classuser_app_callback_class(app_callback_class): def__init__(self): super().__init__() # Initialize state variables for debouncing self.detection_counter =0 # Count consecutive frames with detections self.no_detection_counter =0 # Count consecutive frames without detections # State tracking, is it active or not? self.is_it_active =False self.servo = AngularServo(18, min_pulse_width=0.0006, max_pulse_width=0.0023)
app_callback()的前半部分保持不變,因為它正在管理管道,我們不想更改它。之后,我們首先創建一個名為“object_detected”和“detection_string”的變量。由于我們是在循環內部創建它們,因此不需要“self.”前綴,但它們將在每個循環周期結束時被擦除。
# Track if we've seen objects of interest this frame object_detected =False detection_string ="" # Parse the detections fordetectionindetections: label = detection.get_label() confidence = detection.get_confidence() # Check for objects of interest with confidence threshold ifconfidence >0.4: # Adjust confidence threshold as needed iflabel =="person": object_detected =True detection_string +=f"Detection:{label}{confidence:.2f}\n"
然后我們進入for detections循環,遍歷當前幀中檢測到的每個對象。在這里,我們像往常一樣獲取標簽和置信度。然后,我們將檢查置信度是否大于0.4(40%),以及它是否被識別為人 - 您可以根據需要調整置信度和要檢測的對象。如果它是人且置信度足夠,我們將object_detected設置為true。在這一部分,我們基本上分析了攝像頭看到的每個對象,并檢查其中是否至少有一個人。
# Parse the detections fordetectionindetections: label = detection.get_label() confidence = detection.get_confidence() # Check for objects of interest with confidence threshold ifconfidence >0.4: # Adjust confidence threshold as needed iflabel =="person": object_detected =True detection_string +=f"Detection:{label}{confidence:.2f}\n"
接下來的這一部分真正使這段代碼變得健壯。如果我們檢測到了人,我們將detection_counter增加1,并將no_detection_counter重置為0,因為這個計數器是在計算我們有多少幀沒有看到人。非常重要的一點是,當我們使用在類部分中聲明的detection_counter時,必須使用“user_data.”前綴。因此,當我們在類部分上方創建變量時使用“self.” - 當我們想在app_callback()中使用它時,必須使用“user_data.”。
在下一行中,我們檢查detection_counter是否大于4,如果是,我們移動伺服(再次注意,當我們移動伺服時,必須使用“user_data.”)。在這里,您可以放置自定義代碼,以便在檢測到對象時“執行某些操作”。您可以發送電子郵件、打開燈、旋轉電機,任何您想要的操作!
但我們為什么要連續計算4幀后再執行操作呢?這是因為我們正在為按鈕添加類似去抖動的功能。假設這段代碼沒有去抖動,我們用它來監視房子外面,以便在檢測到狗時自動打開狗門。假設系統工作得很好,但有一天一只貓接近了門。Yolo會非常可靠地識別出它是一只貓 - 但計算機視覺并不完美。有一幀它可能會錯誤地將貓識別為狗,這會在我們不希望的時候打開狗門。大多數時候這不是問題,但我們在測試中發現,在某些極端情況下,這可能會成為一個相當大的問題。
這段去抖動代碼通過確保YOLO連續4次檢測到目標對象后再“執行某些操作”,有助于消除這個問題,您可以根據項目需求更改這個數字。
# Debouncing logic ifobject_detected: user_data.detection_counter +=1 user_data.no_detection_counter =0 # Only activate after given amount of consecutive frames with detections ifuser_data.detection_counter >=4and not user_data.is_it_active: # Move the Servo or do what ever you want to do user_data.servo.angle =90 # Update the is it active variable so this doesnt keep repeating user_data.is_it_active = True print("OBJECT DETECTED!")
我們也有相反的情況。在這個else分支中(如果我們沒有檢測到人),我們將detection_counter設置為0,并將no_detection_counter增加1。然后我們檢查no_detection_counter是否大于5,如果是,我們將移動伺服返回。在這里,您可以放置自定義代碼,以便在未檢測到目標對象時“執行其他操作”。
這段代碼需要在5幀內未檢測到對象后才會“執行某些操作”,我們這樣做的原因與之前類似。假設一只狗正走向狗門,當它走過時,YOLO在一幀中將其識別為馬。這會在可憐的狗經過時關上門。因此,我們通過確保在目標對象消失前有5幀未檢測到它來解決這個問題。
值得注意的是,這段去抖動代碼會使代碼響應速度降低,因為必須在反應前經過4或5幀。代碼很可能以30fps運行,因此這大約會有1/6秒的延遲。如果您想移除這個功能,可以將這些值設置為1。
這段代碼中還有一件事值得探索。在這些去抖動檢查的末尾,我們還檢查了我們創建的is_it_active變量:
ifuser_data.detection_counter >=4and not user_data.is_it_active:
這本質上確保了每次檢測到對象時,我們只“執行一次該操作”。如果對象離開并再次返回,它將再次“執行該操作”,但只執行一次。假設我們不是移動伺服,而是在檢測到人時發送電子郵件。按照當前的設置,如果檢測到人,它將發送一封電子郵件,并且只有當人離開并再次返回時才會發送另一封。但是假設我們沒有檢查這個is_it_active變量。代碼會檢測到一個人,并且每次分析幀時都會發送一封電子郵件(每秒30封)。如果需要,您可以從代碼中移除這部分。
示例代碼2:計數對象
此腳本使用與上一段代碼相同的去抖動邏輯,但除了“執行某些操作”外,我們在檢測到特定數量的對象時“執行某些操作”。以下是完整代碼:
importgigi.require_version('Gst','1.0')fromgi.repositoryimportGst, GLibimportosimportnumpyasnpimportcv2importhailofromhailo_apps_infra.hailo_rpi_commonimport( get_caps_from_pad, get_numpy_from_buffer, app_callback_class,)fromhailo_apps_infra.detection_pipelineimportGStreamerDetectionAppfromgpiozeroimportLEDclassuser_app_callback_class(app_callback_class): def__init__(self): super().__init__() # Configuration self.target_object ="cup" # Object type to detect
# Debouncing variables self.detection_counter =0 # Consecutive frames with exact match self.no_detection_counter =0 # Consecutive frames without match
# State tracking, is it active or not? self.is_it_active =False
self.green_led = LED(18) self.red_led = LED(14)
self.red_led.off() self.green_led.on()defapp_callback(pad, info, user_data): # Get the GstBuffer from the probe info buffer = info.get_buffer() # Check if the buffer is valid ifbufferisNone: returnGst.PadProbeReturn.OK
# Using the user_data to count the number of frames user_data.increment()
# Get the caps from the pad format, width, height = get_caps_from_pad(pad) # If the user_data.use_frame is set to True, we can get the video frame from the buffer frame =None ifuser_data.use_frameandformatisnotNoneandwidthisnotNoneandheightisnotNone: frame = get_numpy_from_buffer(buffer,format, width, height)
# Get the detections from the buffer roi = hailo.get_roi_from_buffer(buffer) detections = roi.get_objects_typed(hailo.HAILO_DETECTION)
# Count objects in this frame object_count =0 detection_string =""
# Parse the detections fordetectionindetections: label = detection.get_label() confidence = detection.get_confidence()
# Check for target objects with confidence threshold ifconfidence >0.4: iflabel == user_data.target_object: object_count +=1 detection_string +=f"{label.capitalize()}detected! Confidence:{confidence:.2f}\n"
# Debouncing logic for number of items ifobject_count >=3: user_data.detection_counter +=1 user_data.no_detection_counter =0
# Only activate after sufficient consistent frames ifuser_data.detection_counter >=4andnotuser_data.is_it_active: # Turn on red led, or do what ever else you want to do user_data.red_led.on() user_data.green_led.off()
user_data.is_it_active =True print(f"NUMBER OF OBJECTS DETECTED!") else: user_data.no_detection_counter +=1 user_data.detection_counter =0
# Only deactivate after sufficient non-matching frames ifuser_data.no_detection_counter >=5anduser_data.is_it_active: # Turn on green LED or what ever else you wish to do user_data.red_led.off() user_data.green_led.on()
user_data.is_it_active =False print(f"No longer detecting number of objects.") # Print detections if any ifdetection_string: print(f"Current{user_data.target_object}count:{object_count}") print(detection_string, end='')
returnGst.PadProbeReturn.OKif__name__ =="__main__": # Create an instance of the user app callback class user_data = user_app_callback_class() app = GStreamerDetectionApp(app_callback, user_data) app.run()
此代碼目前設置為控制這個塔燈中的一對LED - 與前一個示例完全相同。此示例應用的一個實際應用是,我們將其設置為智能監控系統。樹脂3D打印部件在最后固化步驟之前是有毒的,我們希望在打印時讓人們遠離它。因此,此設置將尋找人,如果檢測到人并且他們位于打印機附近,它將打開警告燈。

這段代碼在很大程度上與之前的示例代碼相似,但有一些添加。首先,我們從gpiozero庫中導入LED,這是向GPIO引腳發送數字信號的最簡單方法。
fromgpiozeroimportLED
然后在類部分中,我們創建了一個要計數的目標對象的變量,在此示例中我們將其設置為杯子 - 再次根據您的需要進行更改。然后我們有與上次相同的計數變量。但在此部分中,我們設置了LED并初始化紅色為關閉狀態,綠色為開啟狀態。注意我們仍然必須使用“self.”前綴。
classuser_app_callback_class(app_callback_class): def__init__(self): super().__init__() # Configuration self.target_object ="cup" # Object type to detect # Debouncing variables self.detection_counter =0 # Consecutive frames with exact match self.no_detection_counter =0 # Consecutive frames without match # State tracking, is it active or not? self.is_it_active =False self.green_led = LED(18) self.red_led = LED(14) self.red_led.off() self.green_led.on()
我們的代碼在很大程度上是相同的,直到我們到達檢測循環。在這里,對于每個置信度高于0.4且標記為我們目標對象的對象,我們將計數器增加1。
# Check for target objects with confidence threshold ifconfidence >0.4: iflabel == user_data.target_object: object_count+=1 detection_string+= f"{label.capitalize()} detected! Confidence: {confidence:.2f}\n"
然后,如果有等于或多于3個這樣的對象,我們增加檢測計數器并運行與之前相同的去抖動代碼,并將根據相同的邏輯控制LED。
# Debouncing logic for number of items ifobject_count >=3: user_data.detection_counter +=1 user_data.no_detection_counter =0 # Only activate after sufficient consistent frames ifuser_data.detection_counter >=4and not user_data.is_it_active: # Turn on red led, or do what ever else you want to do user_data.red_led.on() user_data.green_led.off() user_data.is_it_active = True print(f"NUMBER OF OBJECTS DETECTED!") else: user_data.no_detection_counter +=1 user_data.detection_counter =0 # Only deactivate after sufficient non-matching frames ifuser_data.no_detection_counter >=5and user_data.is_it_active: # Turn on green LED or what ever else you wish to do user_data.red_led.off() user_data.green_led.on() user_data.is_it_active = False print(f"No longer detecting number of objects.")
示例代碼3:對象定位
此腳本使用與前一段代碼相同的去抖動邏輯,但在這里我們跟蹤被檢測對象的中心,如果它移動到指定位置,我們“執行某些操作”。以下是完整代碼:
importgigi.require_version('Gst','1.0')fromgi.repositoryimportGst, GLibimportosimportnumpyasnpimportcv2importhailofromhailo_apps_infra.hailo_rpi_commonimport( get_caps_from_pad, get_numpy_from_buffer, app_callback_class,)fromhailo_apps_infra.detection_pipelineimportGStreamerDetectionAppfromgpiozeroimportLEDclassuser_app_callback_class(app_callback_class): def__init__(self): super().__init__() # Configuration self.target_object ="person" # Object type to detect
# Target zone configuration (normalized coordinates 0-1) self.zone_x_min =0.4 # Left boundary of target zone self.zone_x_max =0.6 # Right boundary of target zone self.zone_y_min =0.3 # Top boundary of target zone self.zone_y_max =0.7 # Bottom boundary of target zone
# Debouncing variables self.in_zone_frames =0 # Consecutive frames with object in zone self.out_zone_frames =0 # Consecutive frames without object in zone
# State tracking self.is_it_active =False self.green_led = LED(18) self.red_led = LED(14)
self.red_led.off() self.green_led.on()
defapp_callback(pad, info, user_data): # Get the GstBuffer from the probe info buffer = info.get_buffer() ifbufferisNone: returnGst.PadProbeReturn.OK
user_data.increment()
# Get the caps from the pad format, width, height = get_caps_from_pad(pad) frame =None ifuser_data.use_frameandformatisnotNoneandwidthisnotNoneandheightisnotNone: frame = get_numpy_from_buffer(buffer,format, width, height)
# Get the detections from the buffer roi = hailo.get_roi_from_buffer(buffer) detections = roi.get_objects_typed(hailo.HAILO_DETECTION)
object_in_zone =False detection_string =""
# Parse the detections fordetectionindetections: label = detection.get_label() confidence = detection.get_confidence()
ifconfidence >0.4andlabel == user_data.target_object: # Get bounding box coordinates bbox = detection.get_bbox()
# Call the coordinate methods x_min = bbox.xmin() y_min = bbox.ymin() box_width = bbox.width() box_height = bbox.height()
# Calculate max coordinates x_max = x_min + box_width y_max = y_min + box_height
# Calculate center point (these are normalized 0-1) center_x = x_min + (box_width /2) center_y = (y_min + (box_height /2) -0.22) *1.83 # Debug print for coordinates detection_string += (f"{label.capitalize()}detected!\n" f"Position: center=({center_x:.2f},{center_y:.2f})\n" f"Bounds: xmin={x_min:.2f}, ymin={y_min:.2f}, xmax={x_max:.2f}, ymax={y_max:.2f}\n" f"Confidence:{confidence:.2f}\n")
# Check if object's center is in the target zone if(user_data.zone_x_min <= center_x <= user_data.zone_x_max?and?? ? ? ? ? ? ? ? (user_data.zone_y_min -?0.22) *?1.83?<= center_y <= (user_data.zone_y_max -?0.22) *?1.83):? ? ? ? ? ? ? ? object_in_zone =?True? ? ? ? ? ? ? ? detection_string +=?f"Object is in target zone!\n"
# Debouncing logic for zone detection ifobject_in_zone: user_data.in_zone_frames +=1 user_data.out_zone_frames =0
ifuser_data.in_zone_frames >=4andnotuser_data.is_it_active: # Turn on red led, or do what ever else you want to do user_data.red_led.on() user_data.green_led.off()
user_data.is_it_active =True print(f"{user_data.target_object.capitalize()}detected in target zone - Servo activated!") else: user_data.out_zone_frames +=1 user_data.in_zone_frames =0
ifuser_data.out_zone_frames >=5anduser_data.is_it_active: user_data.red_led.off() user_data.green_led.on()
user_data.is_it_active =False print(f"No{user_data.target_object}in target zone - Servo deactivated!") # Print detections if any ifdetection_string: print(detection_string, end='')
returnGst.PadProbeReturn.OKif__name__ =="__main__": user_data = user_app_callback_class() app = GStreamerDetectionApp(app_callback, user_data) app.run()
此代碼目前設置為控制這個塔燈中的一對LED。另一個實際問題的解決方案 - 每次我起身拿飲料時,經常會帶回一個新杯子,它們開始擠滿我的桌子。這段代碼將檢測我的桌子上是否有3個或更多杯子,如果有,將打開紅燈。如果杯子少于3個,它將打開綠燈。

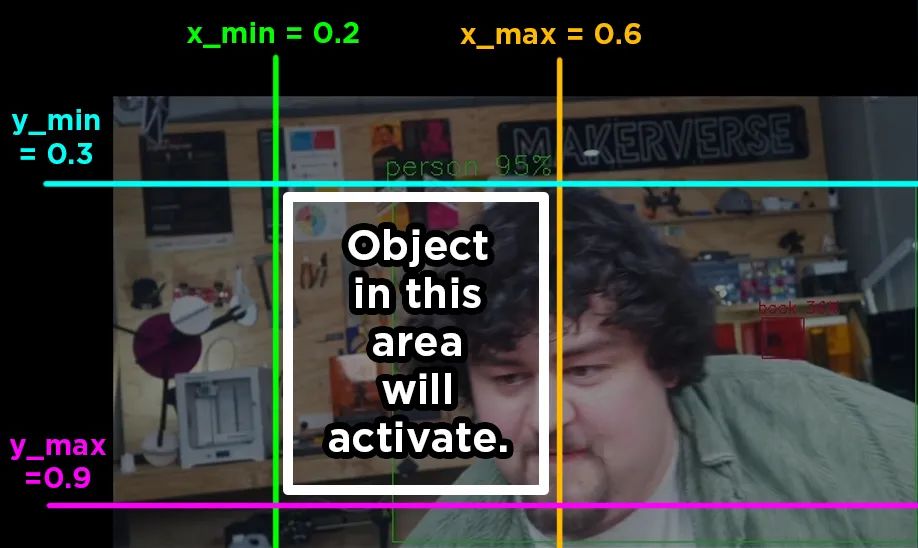
我們從與之前相同的類設置部分開始,但添加了一些額外的變量以在圖像上繪制一個框,該框具有最小和最大的x和y值。如果對象位于此框內,我們將“執行某些操作”。該框由小數定義,x軸上0為圖像左側,1.0為右側,0.5為中間。y軸從0(頂部)到1.0(底部)。以下是可以繪制的兩個框的示例,您可以更改這些x和y最小和最大變量以設置自定義檢測框。
detection_counter變量也已更改為in_zone_frames和out_zone_frames。這只是名稱更改,使用方式完全相同。
classuser_app_callback_class(app_callback_class): def__init__(self): super().__init__() # Configuration self.target_object ="person" # Object type to detect # Target zone configuration (normalized coordinates 0-1) self.zone_x_min =0.4 # Left boundary of target zone self.zone_x_max =0.6 # Right boundary of target zone self.zone_y_min =0.3 # Top boundary of target zone self.zone_y_max =0.7 # Bottom boundary of target zone # Debouncing variables self.in_zone_frames =0 # Consecutive frames with object in zone self.out_zone_frames =0 # Consecutive frames without object in zone # State tracking self.is_it_active =False self.green_led = LED(18) self.red_led = LED(14) self.red_led.off() self.green_led.on()
其余代碼幾乎相同,但在我們的檢測循環中,如果標簽是target_object且置信度高于0.4,我們從YOLO獲取邊界框,找到其中心,然后檢查其是否在我們的最小和最大x和y值內。如果是,則我們將object_in_zone設置為true,并運行與前兩個代碼片段完全相同的去抖動邏輯。
ifconfidence >0.4andlabel == user_data.target_object: # Get bounding box coordinates bbox = detection.get_bbox() # Call the coordinate methods x_min = bbox.xmin() y_min = bbox.ymin() box_width = bbox.width() box_height = bbox.height() # Calculate max coordinates x_max = x_min + box_width y_max = y_min + box_height # Calculate center point (these are normalized 0-1) center_x = x_min + (box_width /2) center_y = (y_min + (box_height /2) -0.22) *1.83 # Debug print for coordinates detection_string += (f"{label.capitalize()}detected!\n" f"Position: center=({center_x:.2f},{center_y:.2f})\n" f"Bounds: xmin={x_min:.2f}, ymin={y_min:.2f}, xmax={x_max:.2f}, ymax={y_max:.2f}\n" f"Confidence:{confidence:.2f}\n") # Check if object's center is in the target zone if(user_data.zone_x_min <= center_x <= user_data.zone_x_max?and?? ? ? ? ? ? ? ? (user_data.zone_y_min -?0.22) *?1.83?<= center_y <= (user_data.zone_y_max -?0.22) *?1.83):? ? ? ? ? ? ? ? object_in_zone =?True? ? ? ? ? ? ? ? detection_string +=?f"Object is in target zone!\n"
運行其他YOLO模型
我們為何要選擇其他模型呢?實際上,YOLO在不同版本和模型尺寸上有許多變體。較新的YOLO模型通常功能更強大,且處理需求更低。未來,你或許能在這里找到YOLO11以及其他新模型,但選擇其他模型的主要原因在于更改模型尺寸。YOLO有5種尺寸——納米級、小型、中型、大型和超大型。模型越大,其處理能力越強、精度越高、檢測距離越遠,但會犧牲幀率(FPS)。默認情況下,13 TOPS的設備將運行小型模型,26 TOPS的設備將運行中型模型,這兩種情況下都能實現流暢的30 FPS。
AI HAT+可以運行多種神經網絡模型,但有一個前提條件——必須先將模型轉換為HEF格式,并且需要針對特定型號的擴展板進行轉換(為13 TOPS擴展板轉換的模型可能在26 TOPS擴展板上表現不佳)。將模型轉換為HEF格式需要遵循一定流程,Hailo公司提供了相關指南,但請注意,這是一個相當復雜的過程。
https://github.com/hailo-ai/hailo-rpi5-examples/blob/main/doc/retraining-example.md
而且,這可能是一個極其漫長的過程,即使配備了最高端的GPU,也可能需要數小時,而使用低端GPU甚至CPU進行轉換,則可能需要數天或數周時間。
不過,幸運的是,我們可以從互聯網上獲取預轉換的模型,其中最好的來源之一就是Hailo的模型庫。該庫提供了適用于13 TOPS(Hailo-8)和26 TOPS(Hailo-8L)擴展板的模型集合。雖然可以使用多種模型,但我們將重點關注YOLO系列,因為我們發現該流程更有可能與它們兼容。
要運行模型,只需下載其編譯版本,該版本應位于表格的最右側(你可能需要向右滾動才能看到)。請仔細檢查下載的是“.hef”格式的文件。下載完成后,將其拖放到“hailo-rpi5-examples”文件夾中的“resources”文件夾內,與其他YOLO模型放在一起。在我們的示例中,我們下載了名為“yolov8l.hef”的大型模型。
如果模型已放入文件夾中,你可以通過在運行命令中添加該模型作為選項來運行它,此時需要使用模型名稱。例如,我們的命令如下:
python basic_pipelines/detection.py --input rpi --hef resources/yolov8l.hef
如果你獲得了其他已轉換為HEF格式的YOLO模型,操作流程也是一樣的。
接下來該做什么?
現在,我們已經設置好了樹莓派和AI HAT,并使用了一些示例代碼運行了目標檢測功能,這些代碼可以用于你的項目中。現在,唯一剩下的就是弄清楚如何實現你項目中想要完成的“某件事”。我們提供了一些關于樹莓派的一般指南,幫助你入門,例如,如何使用繼電器控制直流電機和步進電機、伺服電機,甚至電磁閥(你可以使用繼電器控制幾乎任何東西)。
使用樹莓派和繼電器控制電磁閥:
https://core-electronics.com.au/guides/raspberry-pi/control-servo-raspberry-pi/
原文地址:
https://core-electronics.com.au/guides/raspberry-pi/yolo-object-detection-on-the-raspberry-pi-ai-hat-writing-custom-python/#KBNAKNI
-
AI
+關注
關注
88文章
35194瀏覽量
280258 -
目標檢測
+關注
關注
0文章
227瀏覽量
16028 -
樹莓派
+關注
關注
121文章
2016瀏覽量
107512
發布評論請先 登錄
完整指南:如何使用樹莓派5、Hailo AI Hat、YOLO、Docker進行自定義數據集訓練?
MCC推出用于樹莓派的MCC 118電壓測量HAT模塊
MCC基于樹莓派的HAT模塊
樹莓派MCC118
【POE HAT擴展板試用連載】樹莓派3B+電路板POE供電應用
樹莓派ReSpeaker 2 Mics Pi HAT電路原理圖免費下載
樹莓派ReSpeaker 2 Mics Pi HAT的PCB圖免費下載
目標檢測—YOLO的重要性!
在樹莓派上部署YOLOv5進行動物目標檢測的完整流程
如何將 M.2 HAT+ 與 Raspberry Pi 5 一起使用?


 工商網監
工商網監
評論