") 如何用聲音控制任何串行控制的機(jī)器人
如何用聲音控制任何串行控制的機(jī)器人

第1步:你需要什么:
你只需要一些東西此
2。運(yùn)行Microsoft Visual Studio的計(jì)算機(jī)和您的代碼編輯軟件(在本例中是我的Arduino)
3。用于將草圖上傳到機(jī)器人的USB電纜
步驟2:從機(jī)器人開始
我已附上以下代碼但是,如果您沒有使用Arduino軟件,我已經(jīng)在下面發(fā)布了它。這就是我用于RobotShop.com的漫游機(jī)器人。我采用了一個(gè)簡單的WASD草圖并對其進(jìn)行了修改,以允許程序“遠(yuǎn)程”控制它。復(fù)制代碼后,您可以使用USB電纜或用于上傳到機(jī)器人的任何方式將其上傳到機(jī)器人。
//Setting motor variables
int motorSpeed = 6;
int motor2Speed = 5;
int motor1 = 8;
int motor2 = 7; void setup() {
int i;
for(i=5;i《=8;i++)
pinMode(i, OUTPUT);
Serial.begin(9600); //Start Serial Communication } void loop() {
//waiting for any serial communication. If any is received conduct the switch statement.
char data = Serial.read();
//Setting speed. 255 is max speed, you can change the values below to slow it down if you want.
int leftspeed = 255;
int rightspeed = 255;
switch (data) {
case ‘0’: //If the arduino receives a 0 then it will run the halt command which is defined below.
halt ();
break;
case ‘1’:
forward (leftspeed, rightspeed);
break;
case ‘2’:
reverse (leftspeed, rightspeed);
break;
case ‘3’:
left (rightspeed, leftspeed);
break;
case ‘4’:
right (rightspeed, leftspeed);
break;
} } void halt(void)
{
digitalWrite(motorSpeed, LOW);
digitalWrite(motor2Speed, LOW);
} void forward(char a, char b)
{
analogWrite(motorSpeed, a); //releasing the “brake”
digitalWrite(motor1, LOW); //Applying full power to the pin. This would typically be HIGH but, my wires are hooked up backwards so I just switched the command.
analogWrite(motor2Speed, b);
digitalWrite(motor2, LOW);
} void reverse (char a, char b)
{
analogWrite(motorSpeed, a);
digitalWrite(motor1, HIGH);
analogWrite(motor2Speed, b);
digitalWrite(motor2, HIGH);
}
void left (char a,char b)
{
analogWrite (motorSpeed, a);
digitalWrite(motor1, HIGH);
analogWrite (motor2Speed, b);
digitalWrite(motor2, LOW);
}
void right (char a,char b)
{
analogWrite (motorSpeed, a);
digitalWrite(motor1, LOW);
analogWrite (motor2Speed, b);
digitalWrite(motor2, HIGH);
}
步驟3:Microsoft Visual Studio C#應(yīng)用程序
現(xiàn)在是時(shí)候啟動(dòng)Microsoft Visual Studio了。我們首先創(chuàng)建一個(gè)C#windows窗體應(yīng)用程序。我首先創(chuàng)建UI。這包括5個(gè)標(biāo)簽,1個(gè)富文本框和2個(gè)按鈕。可以使用屏幕左側(cè)的工具箱將這些添加到表單中。
添加上述項(xiàng)目后,您可以雙擊應(yīng)用程序的頂部邊框。這將打開程序背后的C#代碼窗口。在附件和下面的代碼中,我試圖評論很多,它應(yīng)該很容易遵循。如果沒有,我已附加程序的“已發(fā)布”版本和Visual Studio項(xiàng)目文件。
您可以編輯COM端口到您的機(jī)器人所在的任何位置。我的機(jī)器人在COM5上。
using System;
using System.Collections.Generic;
using System.ComponentModel;
using System.Data;
using System.Drawing;
using System.Linq;
using System.Text;
using System.Threading.Tasks;
using System.Windows.Forms;
using System.IO.Ports;
using System.Speech;
using System.Speech.Recognition;
using System.Speech.Synthesis;
第4步:現(xiàn)在是時(shí)候把它放在一起了!
我們一直在等待的那一刻!啟動(dòng)機(jī)器人和程序。一切都啟動(dòng)后,單擊啟用并說出您的第一個(gè)命令!我很好,有時(shí)程序可能有點(diǎn)奇怪,并重復(fù)多次命令。這從來沒有打擾過我,所以我接受它。我希望你看看視頻,讓我知道這是否有助于你控制你的機(jī)器人!祝你有個(gè)美好的一天!
-
機(jī)器人
+關(guān)注
關(guān)注
213文章
29709瀏覽量
212727 -
聲音控制
+關(guān)注
關(guān)注
0文章
4瀏覽量
8964
發(fā)布評論請先 登錄
盤點(diǎn)#機(jī)器人開發(fā)平臺(tái)
【「# ROS 2智能機(jī)器人開發(fā)實(shí)踐」閱讀體驗(yàn)】機(jī)器人入門的引路書
基于先進(jìn)MCU的機(jī)器人運(yùn)動(dòng)控制系統(tǒng)設(shè)計(jì):理論、實(shí)踐與前沿技術(shù)
雅特力科技助力宇樹科技推動(dòng)智慧機(jī)器人創(chuàng)新應(yīng)用:深入布局機(jī)器人電機(jī)控制核心

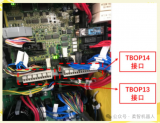
發(fā)那科機(jī)器人A型控制柜急停板安全回路接線方法
工業(yè)機(jī)器人4大控制方式,你知道幾種?
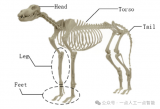
四足機(jī)器人的結(jié)構(gòu)、控制及運(yùn)動(dòng)控制
【「具身智能機(jī)器人系統(tǒng)」閱讀體驗(yàn)】2.具身智能機(jī)器人的基礎(chǔ)模塊
【「具身智能機(jī)器人系統(tǒng)」閱讀體驗(yàn)】2.具身智能機(jī)器人大模型
基于導(dǎo)納控制的機(jī)器人拖動(dòng)示教原理和實(shí)現(xiàn)步驟
構(gòu)建語音控制機(jī)器人 - 線性模型和機(jī)器學(xué)習(xí)


 工商網(wǎng)監(jiān)
評論