 激光手套的制作

第1步:BoM
*泡沫板
*激光指示器
* 2伺服電機
* Arduino
*面包板
* 2電位計
步驟2:取出紙張
*將泡沫板切割成適合您手臂的尺寸有一些余地。
*美元店的泡沫板非常堅硬,所以取下板子一側的紙層,這樣你就可以將它彎曲在你的手臂上。
第3步:翻身
*將它卷起來,用熱膠將泡沫粘在一起槍。
步驟4:伺服安裝座
*為臂上的伺服安裝座制作一個切口。
泡沫板上只安裝一個伺服器,因為另一個伺服器將位于第一個伺服器的頂部,以制作激光器的萬向節/轉塔機構。
步驟5:安裝激光器
這種強大的綠色激光器太重,無法用膠水噴射到第二個伺服電機上。所以我們需要添加一些結構支持。
*在第二個伺服電機的伺服喇叭上涂膠 - 未安裝在泡沫板上的伺服喇叭。盡可能將激光器固定在中心位置(參考激光器的重心)。
*在干燥時將紗線纏繞在激光指示器和伺服喇叭上,這樣紗線也會粘在伺服喇叭上。
步驟6:安裝萬向節機構
*將第一臺伺服電機粘到切出的泡沫板上。
*將第二個伺服電機的主體粘貼到第一個伺服的伺服喇叭上。
第7步:接線
*將面包板和Arduino粘貼到泡沫板護罩上
*將每個電位計的一個外部引腳連接到面包板上的地面導軌上。
*將電源軌連接到3.3V,將GND軌連接到Arduino上的GND 。
*將每個伺服的棕色線連接到地線。
*將每個伺服的紅線連接到電源軌。
*將每個伺服的信號引腳分別連接到引腳8和9。
步驟8:代碼
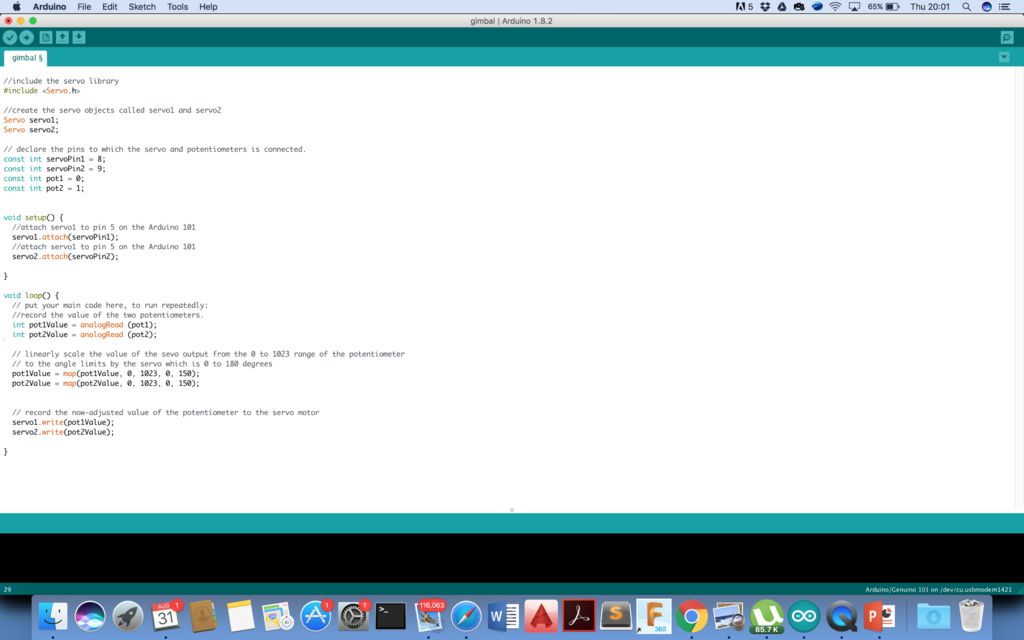
//include the servo library
#include //create the servo objects called servo1 and servo2
Servo servo1;
Servo servo2; // declare the pins to which the servo and potentiometers is connected.
const int servoPin1 = 8;
const int servoPin2 = 9;
const int pot1 = 0;
const int pot2 = 1; void setup() {
//attach servo1 to pin 5 on the Arduino 101
servo1.attach(servoPin1);
//attach servo1 to pin 5 on the Arduino 101
servo2.attach(servoPin2); } void loop() {
// put your main code here, to run repeatedly:
//record the value of the two potentiometers.
int pot1Value = analogRead (pot1);
int pot2Value = analogRead (pot2); // linearly scale the value of the sevo output from the 0 to 1023 range of the potentiometer
// to the angle limits by the servo which is 0 to 180 degrees
pot1Value = map(pot1Value, 0, 1023, 0, 150);
pot2Value = map(pot2Value, 0, 1023, 0, 150); // record the now-adjusted value of the potentiometer to the servo motor
servo1.write(pot1Value);
servo2.write(pot2Value); }
步驟9:享受!
-
激光
+關注
關注
20文章
3456瀏覽量
66095 -
Arduino
+關注
關注
189文章
6497瀏覽量
190587
發布評論請先 登錄
2025觸控技術新突破:聚徽揭秘觸摸式一體機如何實現“戴手套操作+防誤觸”雙升級
2025觸控技術新突破:聚會揭秘觸摸式一體機如何實現“戴手套操作+防誤觸”雙升級?
工業電腦一體機廠家聚徽解碼——支持手套 / 濕手操作的原理
納祥科技客戶案例:網紅Type-c迷你強光手電筒方案,超210流明輸出

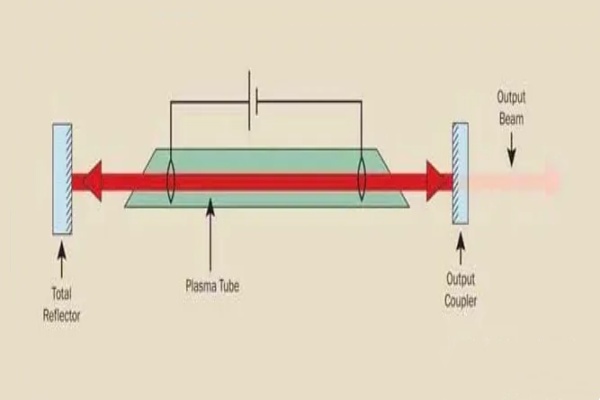
激光器基礎---激光腔
請問激光投影中激光光源能否像LED一樣瞬時開關?
激光焊錫和激光焊接的原理區別
電子科普!什么是激光二極管(半導體激光器)
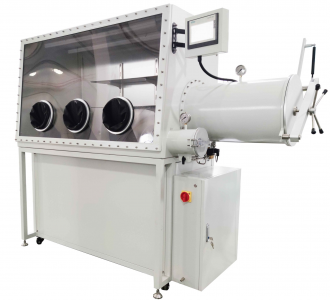
兩款氧氣傳感器在手套箱中的應用
激光焊接工藝有哪些?
微流控光刻掩膜制作
一種HDJS全自動絕緣靴(手套)耐壓試驗裝置使用方法
HDJS-6智能絕緣手套(靴)耐壓試驗裝置的使用手冊

HDJS-6絕緣手套(靴)試驗裝置之安裝與使用


 工商網監
工商網監
評論