 自制物聯網語音交互設備教程
步驟1:組件
選項1藍牙版本:
Arduino Uno
HC-06藍牙設備
繼電器2種方式
2 * 220 uhm
9v電池
電線
2 * LED燈
選項2 WIFI版本:
電線
繼電器2路
2 * 220 uhm電阻器
2 * LED燈
9v電池
BreadBoard或PCB
可選組件:
語音識別模塊v3
第2步:中繼電路
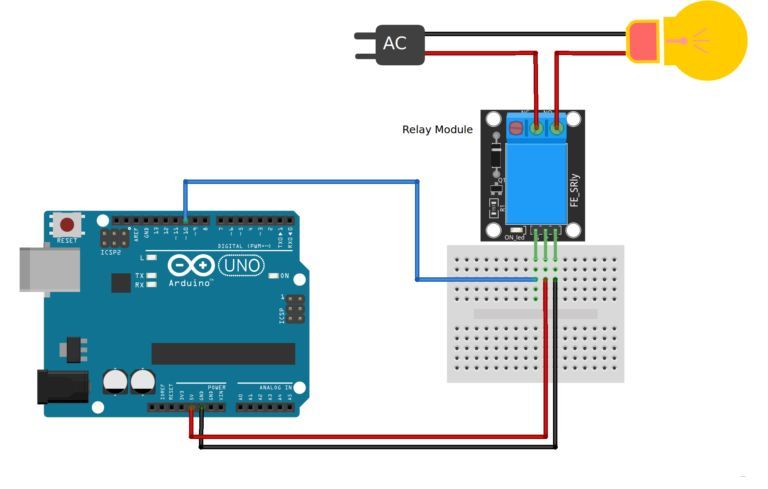
如何向ARDUINO或NodeMCU添加中繼
這是它能夠用于切換主電源設備的繼電器類型。這些繼電器將處理家庭中使用的大多數設備,除了房間加熱器,爐子和電機等最高功率設備。確保要打開/關閉的設備的VA(伏特x安培)小于繼電器額定值。
警告:在進行AC試驗時要特別小心,電擊會導致嚴重的傷害。連接交流電源時,底部的繼電器模塊打開,請勿觸摸電路。
對于電路的直流部分:
Arduino數字引腳10 - 》模塊引腳S
Arduino GND - 》模塊引腳 -
Arduino + 5V - 》模塊引腳+
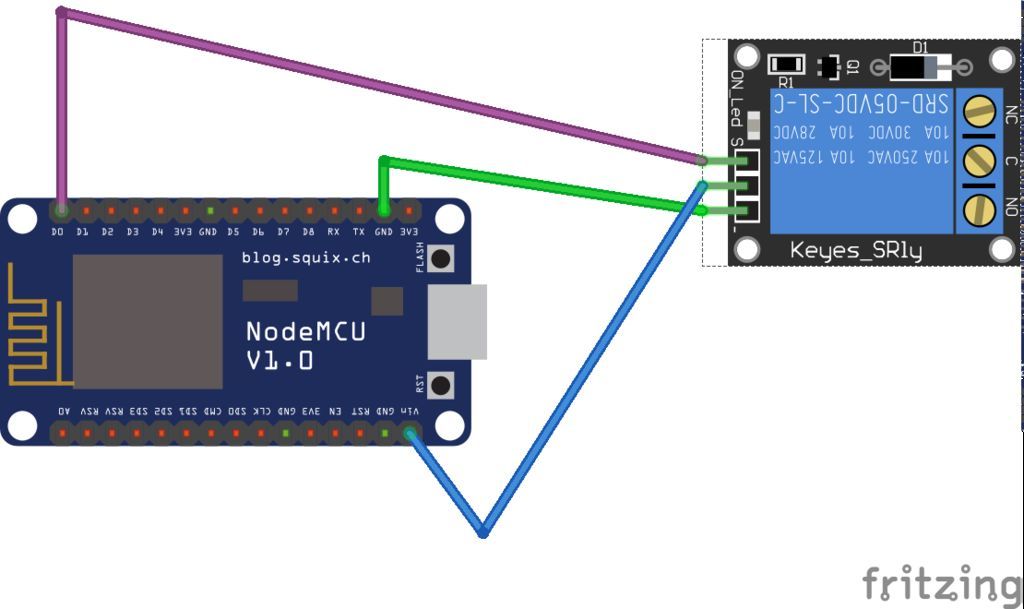
步驟3:NodeMcu配置
與其他組件不同,ESP8266模塊需要在使用之前進行
設置,因為它是獨立模塊,您可以使用許多方法將代碼上傳到它。
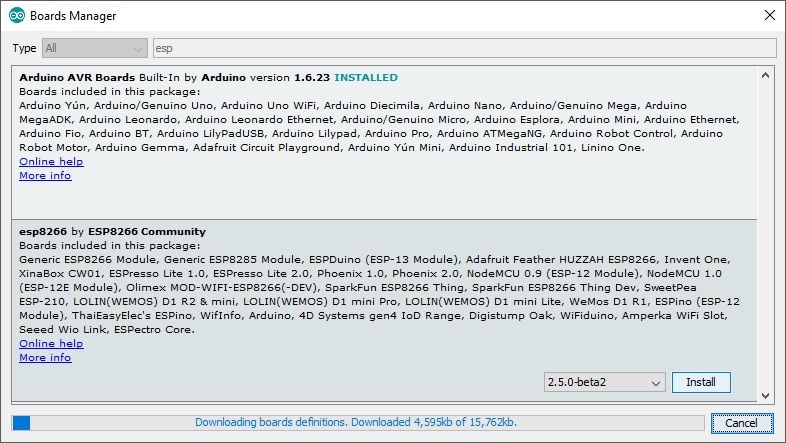
打開Adruino IDE
轉到文件》參考文獻
輸入http://arduino.esp8266.com/stable/package_esp8266.。.
進入其他Board Manager URL字段。
您可以添加多個網址,用逗號分隔。
從工具》 Board菜單打開Boards Manager,找到esp8266平臺。
從下拉框中選擇所需的版本。
單擊安裝按鈕。安裝后,不要忘記從工具》板菜單中選擇您的ESP8266板
。
重新啟動Arduino IDE
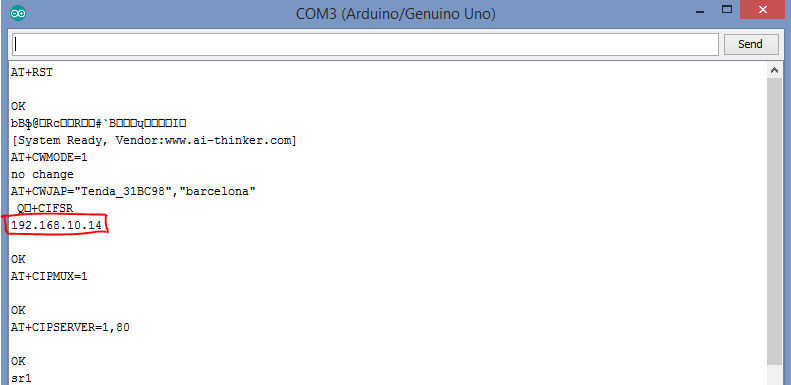
檢查您的主板的IP地址:
打開Arduino IDE
工具》板》選擇NodeMCU 1.0
工具》上傳速度》 115200
#include ESP8266WiFi.h
#include
int8_t pin_led = 16; // initiate 8 Bit unsigned variable
const char* ssid = “WIFI user name”;
const char* password = “WIFI password”;
void setup() {
pinMode(pin_led, OUTPUT);
// put your setup code here, to run once:
WiFi.begin(ssid,password);
Serial.begin(115200);
while(WiFi.status()!= WL_CONNECTED)
{
Serial.print(“。.”); // Connection Failed! Rebooting
delay(100);
}
Serial.println(“”);
Serial.print(“IP Address: ”);
Serial.print(WiFi.localIP());
myserver.on(“/”,[](){myserver.send(200,“text/plain”,“Hello World”);});
myserver.on(“/toggle”,toggleLED);
myserver.begin();
}
void loop() {
// put your main code here, to run repeatedly:
myserver.handleClient();
}
void toggleLED()
{
digitalWrite(pin_led,!digitalRead(pin_led)); // toggle on/off led according to its status
myserver.send(204,“”); // send response ‘204’
}
打開串口并復制IP地址如圖所示。現在您的設備已準備好您可以打開任何瀏覽器并檢查URL:
HTTP://192.168.40.10 (change the IP address as giving in your serial monitor)
步驟4:語音識別安裝
有兩種方法可以使用語音識別應用程序:
1 :谷歌語音識別SDK通過移動應用程序。
谷歌有一個多語言語音識別SDK,能夠指揮任何第三方軟件或填寫網站上的表格。除了聽寫,還提供語音命令功能,允許您搜索網絡,打開文件,程序和網站,查找信息,設置提醒,記筆記等等。自動化流程并提高您的個人和企業工作效率。
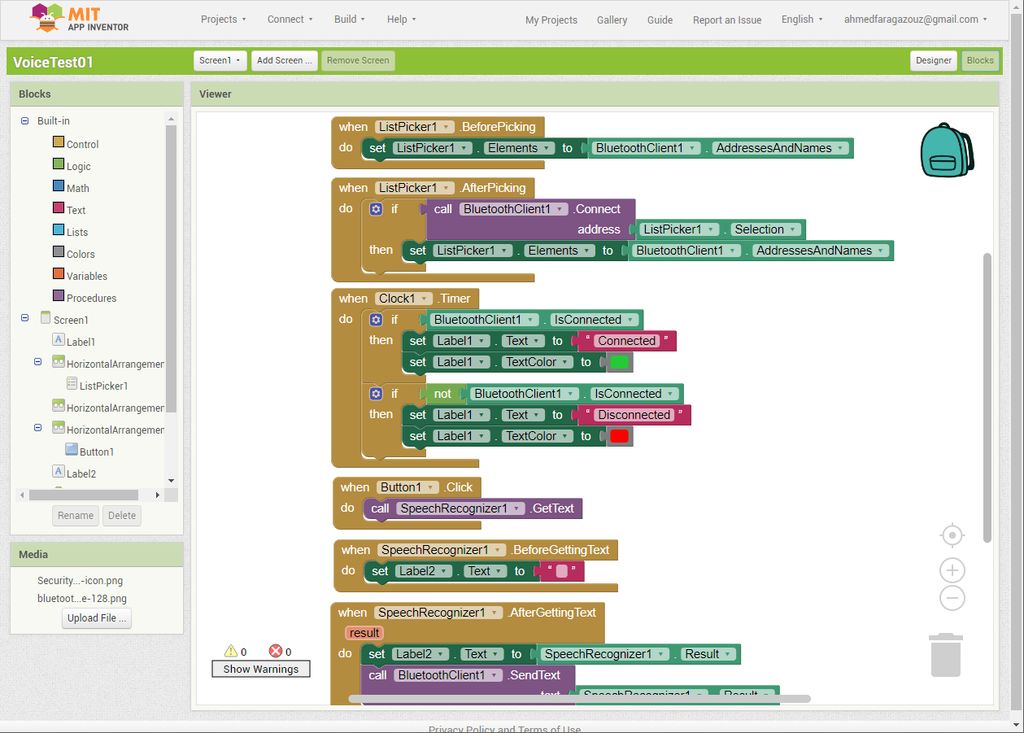
您可以使用 App Inventor for Android
Arduino和藍牙的示例代碼:
上傳當前代碼,然后將您的藍牙設備連接到TX和RX,然后使用移動應用程序來控制它。
int line1 = 8; // relay line
void setup()
{
Serial.begin(9600);
pinMode(line1,OUTPUT);
digitalWrite(line1,HIGH);
}
void loop()
{
if(Serial.available())
{
String value = Serial.readStringUntil(‘ ’);
Serial.println(value);
if(value == “*close#”)
{
digitalWrite(line1,HIGH);
Serial.print ( “Light Closed”);
}
else if(value == “*open#”)
{
digitalWrite(line1,LOW);
Serial.print ( “Light Opened”);
}
} }
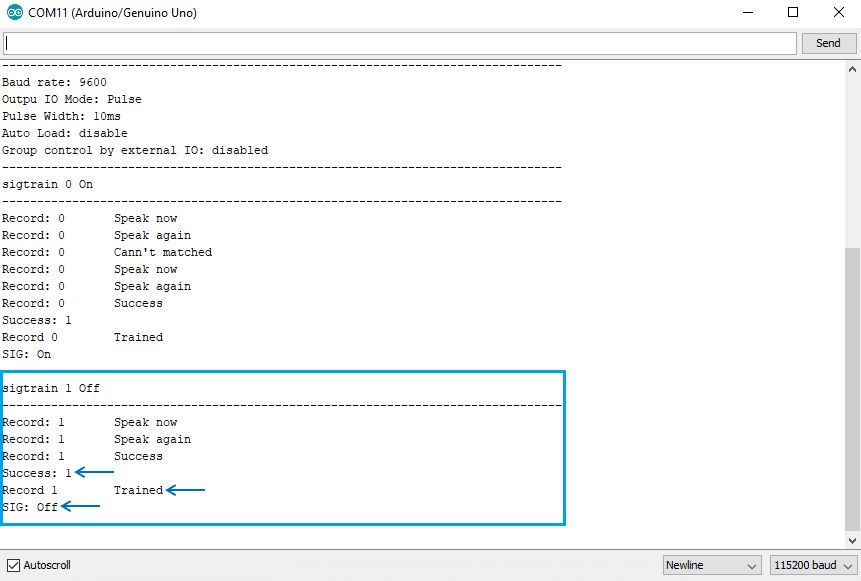
2。安裝語音識別模塊
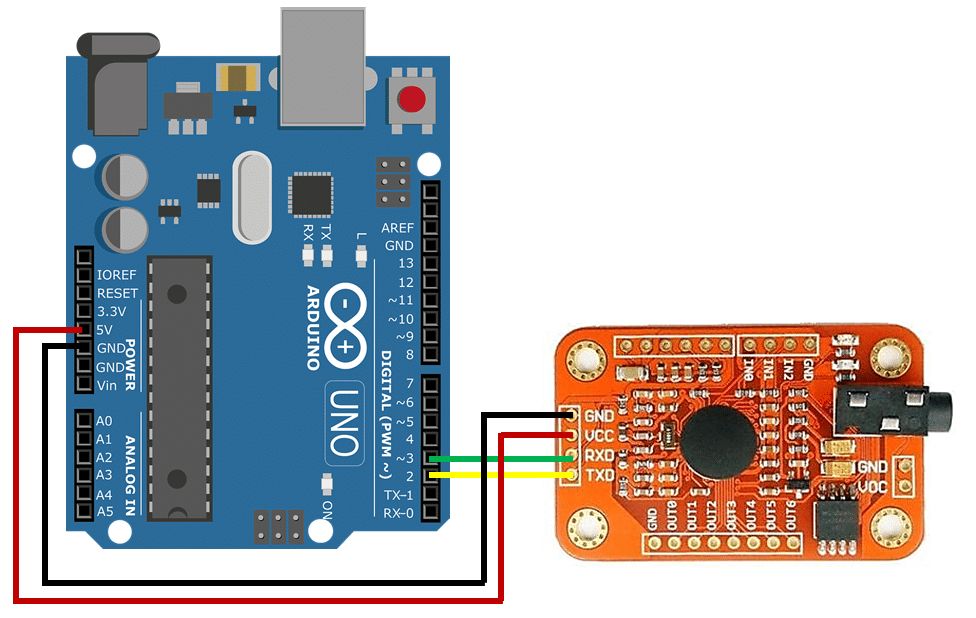
A。連接引腳
5v 5v
Tx 2
Rx 3
GND GND
B。安裝庫
C。文件 - 》示例 - 》 VoiceRecognitionV3 - 》 vr_sample_train
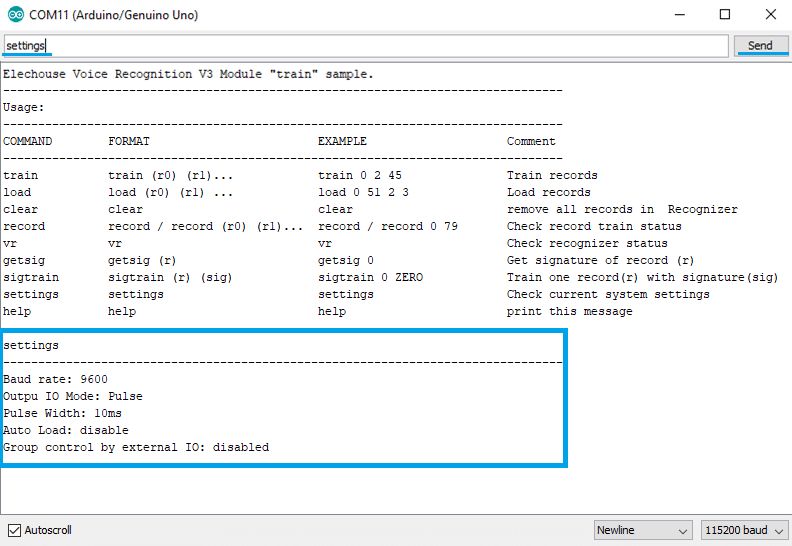
D. 打開串行監視器并鍵入:settings
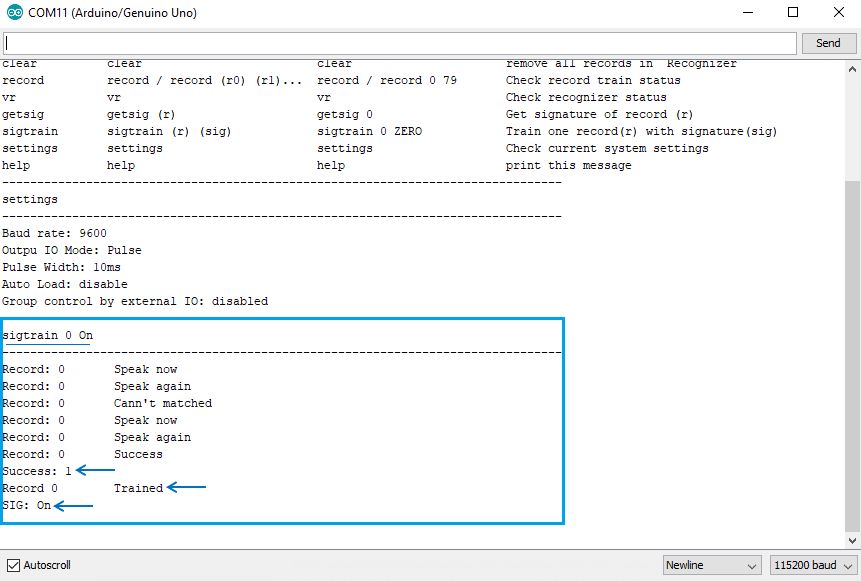
E。輸入sigtrain 0開》發送
F。錄制您的聲音
G。關閉串口并打開新文件并粘貼此代碼:
現在您可以使用語音識別模塊關閉并打開LED
#include “VoiceRecognitionV3.h”
VR myVR(2,3); // 2:RX 3:TX, you can choose your favourite pins.
uint8_t records[7]; // save record
uint8_t buf[64];
int led = 13;
#define onRecord (0)
#define offRecord (1)
void printSignature(uint8_t *buf, int len)
{
int i;
for(i=0; i0x19 && buf[i]《0x7F){
Serial.write(buf[i]);
}
else{
Serial.print(“[”);
Serial.print(buf[i], HEX);
Serial.print(“]”);
}
}
}
/** @brief Print signature, if the character is invisible, print hexible value instead. @param buf --》 VR module return value when voice is recognized.
buf[0] --》 Group mode(FF: None Group, 0x8n: User, 0x0n:System
buf[1] --》 number of record which is recognized.
buf[2] --》 Recognizer index(position) value of the recognized record.
buf[3] --》 Signature length
buf[4]~buf[n] --》 Signature
*/
void printVR(uint8_t *buf)
{
Serial.println(“VR Index Group RecordNum Signature”);
Serial.print(buf[2], DEC);
Serial.print(“ ”);
if(buf[0] == 0xFF){
Serial.print(“NONE”);
}
else if(buf[0]&0x80){
Serial.print(“UG ”);
Serial.print(buf[0]&(~0x80), DEC);
}
else{
Serial.print(“SG ”);
Serial.print(buf[0], DEC);
}
Serial.print(“ ”);
Serial.print(buf[1], DEC);
Serial.print(“ ”);
if(buf[3]》0){
printSignature(buf+4, buf[3]);
}
else{
Serial.print(“NONE”);
}
Serial.println(“ ”);
}
void setup()
{
/** initialize */
myVR.begin(9600);
Serial.begin(115200);
Serial.println(“Elechouse Voice Recognition V3 Module Control LED sample”);
pinMode(led, OUTPUT);
if(myVR.clear() == 0){
Serial.println(“Recognizer cleared.”);
}else{
Serial.println(“Not find VoiceRecognitionModule.”);
Serial.println(“Please check connection and restart Arduino.”);
while(1);
}
if(myVR.load((uint8_t)onRecord) 》= 0){
Serial.println(“onRecord loaded”);
}
if(myVR.load((uint8_t)offRecord) 》= 0){
Serial.println(“offRecord loaded”);
}
}
void loop()
{
int ret;
ret = myVR.recognize(buf, 50);
if(ret》0){
switch(buf[1]){
case onRecord:
/** turn on LED */
digitalWrite(led, HIGH);
break;
case offRecord:
/** turn off LED*/
digitalWrite(led, LOW);
break;
default:
Serial.println(“Record function undefined”);
break;
}
/** voice recognized */
printVR(buf);
}
}
第5步:激光切割
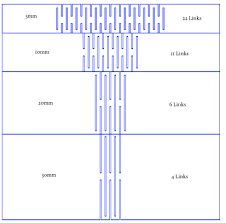
設備設計非常簡單,但這是我第一次使用木材使用激光切割機的彎曲技術。
這是最常見的格子鉸鏈和最可靠的。格子鉸鏈依靠材料的扭轉來彎曲,在這張照片中很容易看到。彎曲的半徑取決于切口的長度,它們之間的距離和材料的厚度。
第6步:設備組裝
最后設備可以使用了。
-
物聯網
+關注
關注
2927文章
45962瀏覽量
388773 -
語音交互
+關注
關注
3文章
304瀏覽量
28525
發布評論請先 登錄
OBOO鷗柏丨AI數字人觸摸屏查詢觸控人臉識別語音交互一體機上市

智能語音芯片WT588F02B-8S:低功耗設計賦能多元化場景應用
WT3000T8-32N語音合成TTS芯片:小體積、強性能,重塑智能語音交互體驗

為什么選擇蜂窩物聯網
重慶大學:研究用于語音識別和交互的機器學習輔助可穿戴傳感系統
WTV380-8S語音芯片:智能清潔設備的“語音助手”,小體積大能量,重塑人機交互體驗

【智能語音交互新標桿】WTK6900HC語音識別芯片:重新定義離線語音控制體驗

宇樹科技在物聯網方面
物聯網(IoT)智能設備是什么?

如何測試物聯網設備的功耗


 工商網監
工商網監
評論