 Arduino機器人鼓手DIY圖解
步驟1:材料
1x Arduino UNO
3x伺服電機
2x電壓調節器模塊
1x電壓升降器模塊
1x駐極體微型電腦
2x壓電傳感器
1x Tact按鈕
1x任何ON/OFF開關
5x 2n3904晶體管
3x 500k電位器
3x 100k電阻器
3x 10k電阻器
3x 47k電阻器
1x 1/4“單聲道插孔
1x 9v至12v電源
各種電阻器(可能需要進行實驗)
各種電容器(可能需要進行實驗)
PCB穿孔板,或者面包板。
一些MDF **
**我手工制作了所有木制件,所以我真的沒有任何確切的計劃我盡可能地畫出并解釋了所有的東西,我認為復制它們并不困難,莫如果您有cnc或3d打印機,請重新進行操作。
步驟2:一般理念
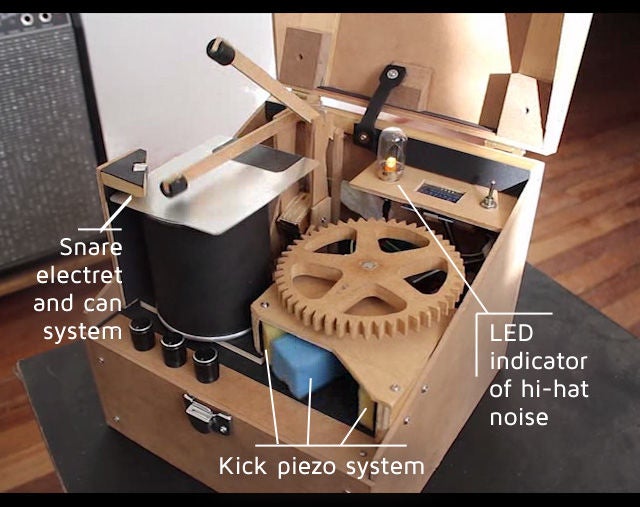
地方,有必要定義drumkit元素將是什么。遵循頻率范圍的邏輯,標準鼓組通常由三個基本元素組成;踢(低頻范圍),小鼓(中距離)和踩镲(高音)。經過幾個星期的實驗,我決定按照以下安排復制這些聲音:
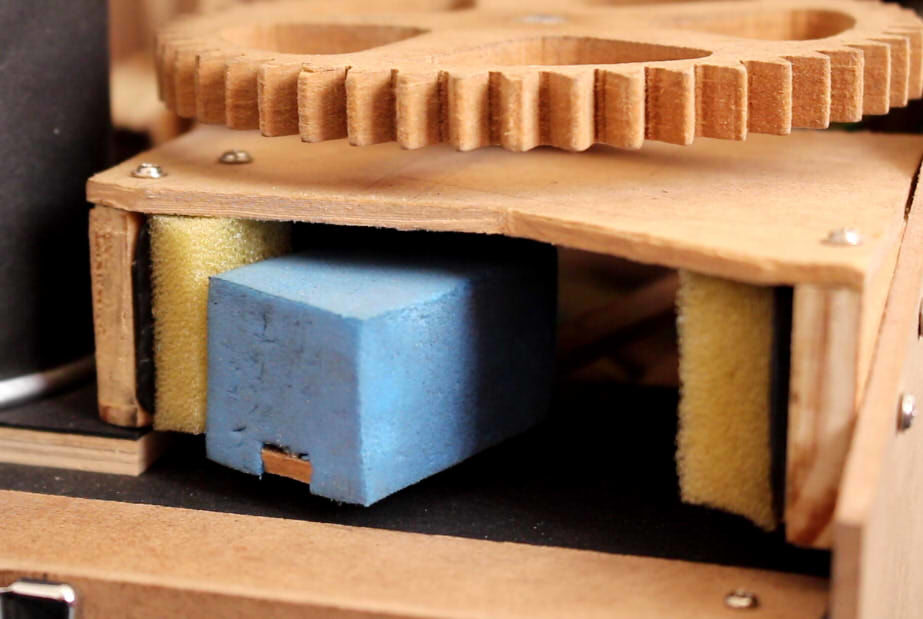
Kick/LowRange: 2個壓電,用一小塊海綿材料覆蓋,它們是用一個柔軟的橡膠末端的伺服控制棒擊中。
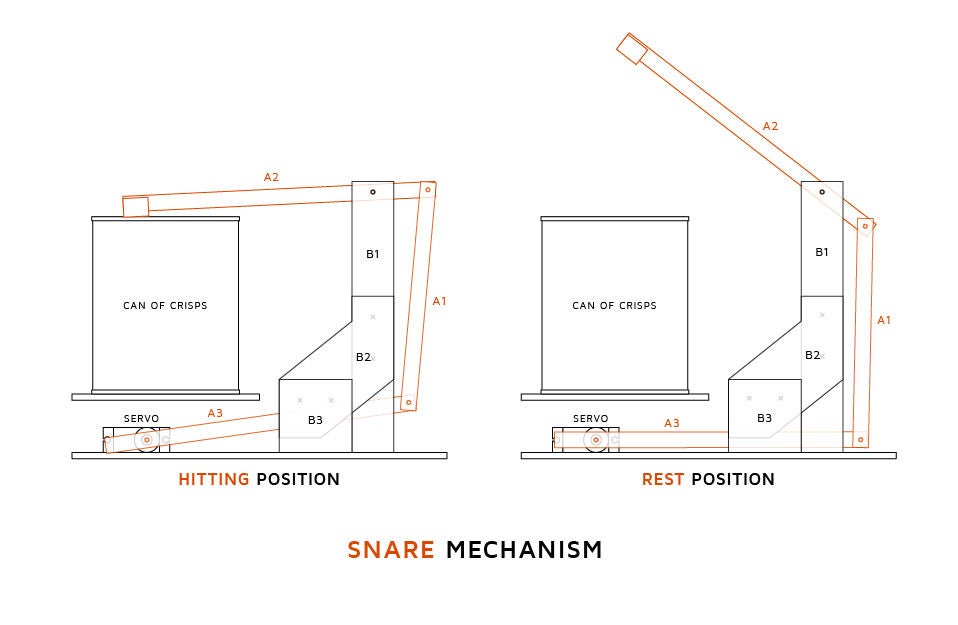
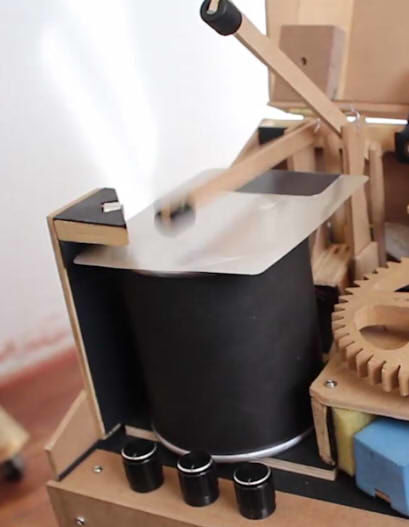
Snare/MidRange:一罐帶有小方形錫片的小齒輪,用于共振,也被擊中伺服控制棒,橡膠端。然后由駐極體麥克風捕獲聲音。
HiHat/HighRange:基于晶體管的白噪聲發生器電路,由arduino直接控制。
所有上述系統均由arduino板,然后由它們產生的音頻信號通過三個簡單的放大器電路放大到儀器電平信號。
步驟3:踢鼓
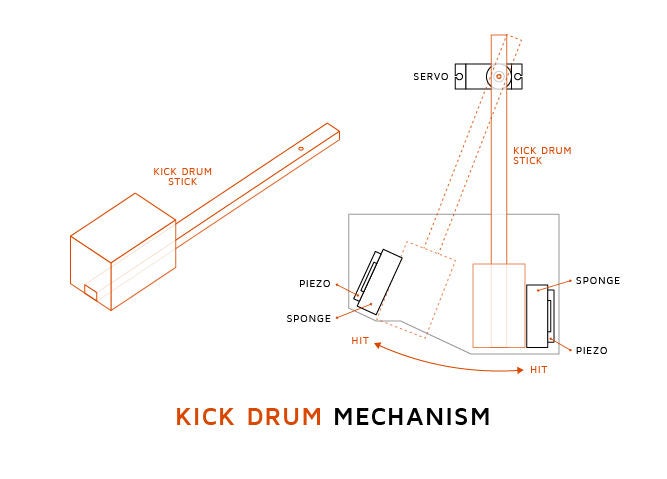
這可以利用直接觸碰或擊打壓電拾音器時產生的低頻聲音柔軟的物體。為了使這個工作,首先我們需要自動匹配壓電器,其次,我們需要放大由所述壓電器產生的音頻信號。
如上所述,我使用伺服控制桿來擊中位于伺服運動范圍兩端的兩個不同的壓電(為了利用所有的運動)。為了幫助抑制高頻,壓電器用海綿覆蓋,并且桿上有一個柔軟的橡膠端。
此時,重要的是要確定伺服器擊打時的角度其運動范圍的每一端。稍后將需要此信息,并且可以使用基本的arduino代碼(如此處所述的代碼)和 Serial.print(); 命令輕松獲取。
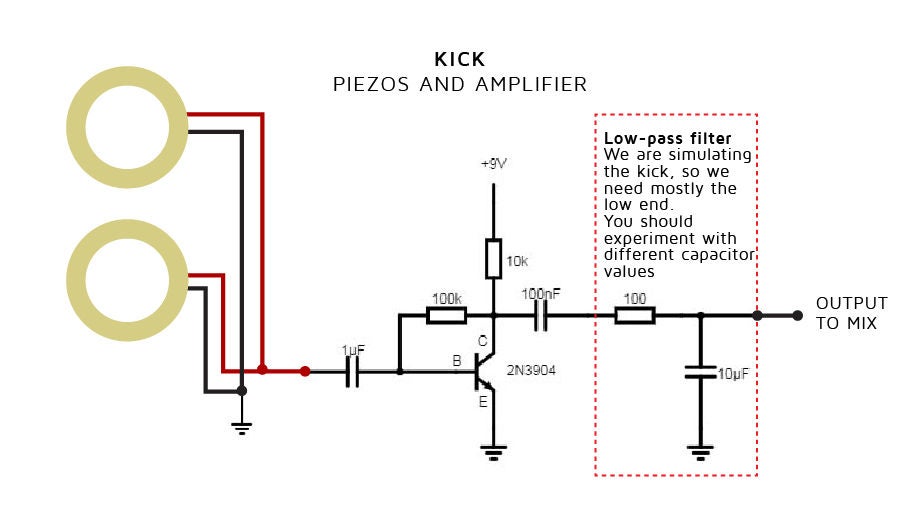
來自壓電的音頻信號然后由上圖所示的電路放大,由來自電源調節器的5v-7v供電,電壓調節器由主電源(不是arduino板)供電。這很重要,因為盡管放大器本身能夠與arduino提供的5v一起工作,但理想的是保持模擬音頻信號盡可能與數字電路分開,以避免任何數字噪聲干擾進入最終音頻信號的方式。
同樣,我沒有正式(或任何lol)電子學教育,而且我在這最后一個問題上遇到了很多困難。在任何音頻應用中幾乎不可能完全消除噪聲,但我發現電壓調節器中的濾波(以及模擬和數字分離,以及項目的適當電屏蔽)將噪聲降低到非常可接受的水平。第2步:小軍團
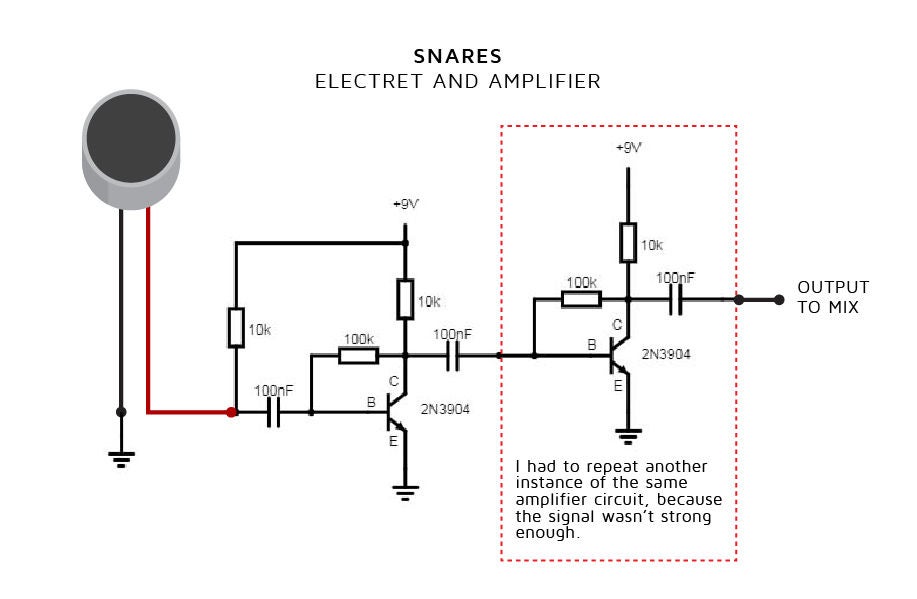
這是一個非常復雜的復制聲音,即使現在我仍然對我所取得的聲音并不十分滿意。為了拾取這個聲音,我決定使用駐極體麥克風,因為它們通常更敏感,并且小鼓聲的獨特聲學特性使這成為必要。
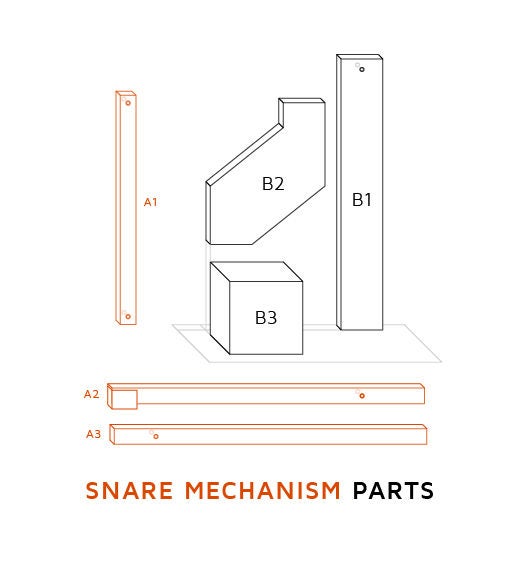
正如我們對踢腿系統所做的那樣,我們需要一個機械部件和一個音響部件。我附上了我設計的機械系統的圖紙。是的,我用Pringles可以顛倒,它是完美的形狀,有我能找到的最好的聲音,薯片很美味。
就像我們做的一樣,我們需要得到每個伺服在休息和擊球時的角度。再次,修補電位計+伺服教程,我們可以獲得該信息。
來自駐極體的音頻信號被踢放大器中使用的同一電路的另一個實例放大,盡管在這種情況下有一個很少修改駐極體麥克風的電源,也沒有使用低通濾波器。
步驟5:HiHat
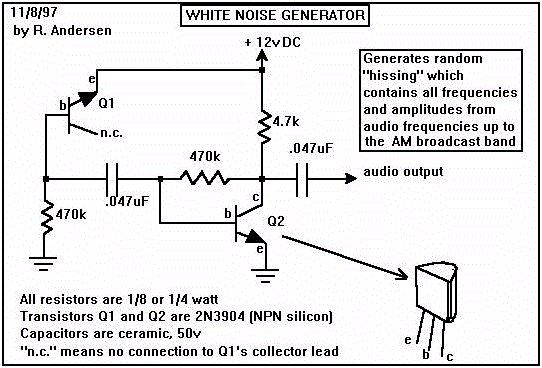
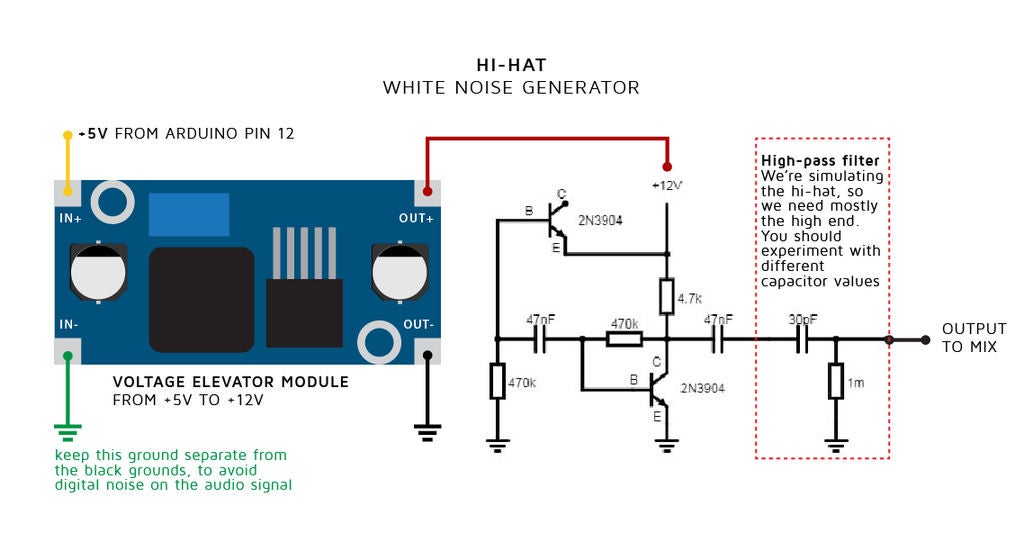
我用這種聲音的不同方法,一個基于晶體管的白噪聲發生器電路和一個LED指示燈,在需要時由arduino激活。白噪聲是在不同頻率下具有相等強度的隨機信號。粗略地說,就像白光包含所有顏色一樣,白噪聲包含所有頻率,它聽起來像一個不存在的無線電臺(靜態)。這是一種常用于電子音樂和音頻合成的噪音,我讀到它甚至用來制作80年代小鼓和鈸的經典聲音。
如圖所示,在產生噪音之后,然后它通過一個高通濾波器來消除不需要的頻率,并強調鼓鈸的感覺。
白噪聲發生器需要12v或更高功能,由升壓電梯提供,它本身由arduino引腳直接供電。這是音頻系統直接連接到arduino的唯一情況,因為噪聲必須僅在特定時間產生,并且噪聲似乎不是產生噪聲的電路中的問題。你不能讓白色更白嗎?
第6步:信號混合和完整圖
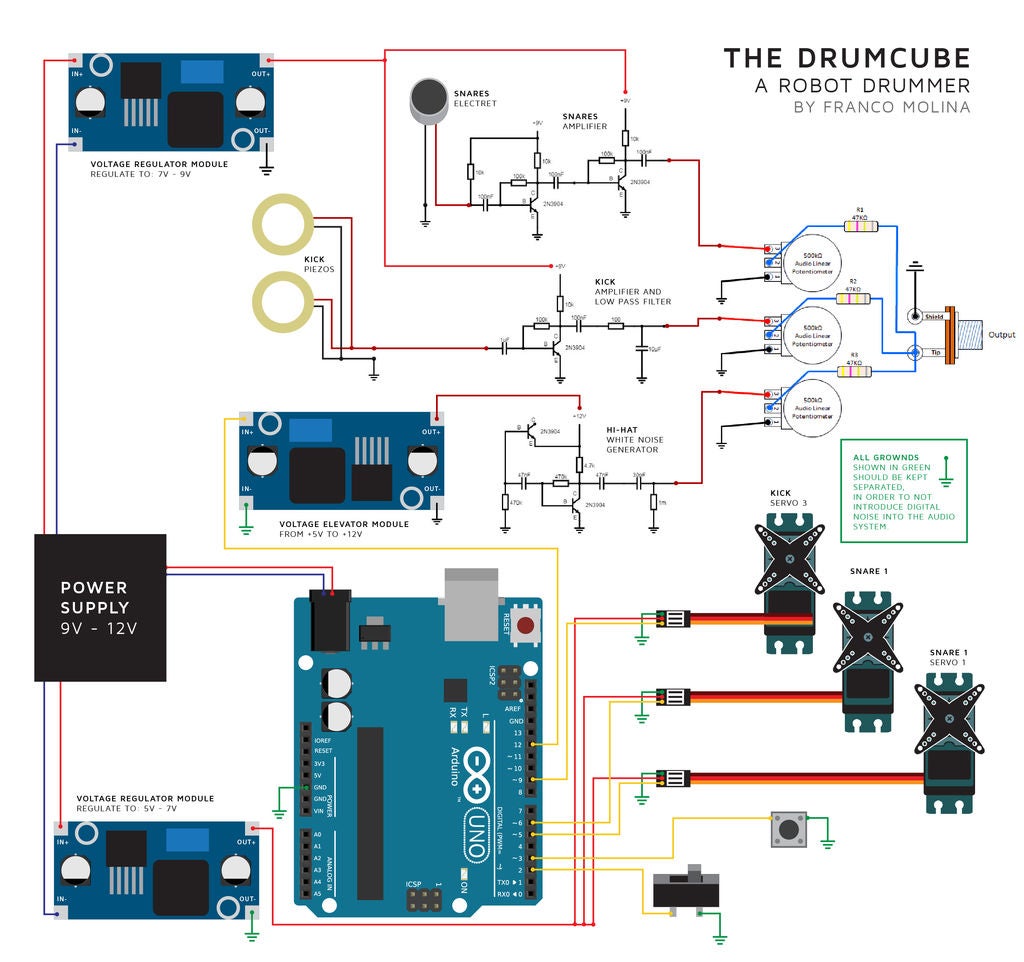
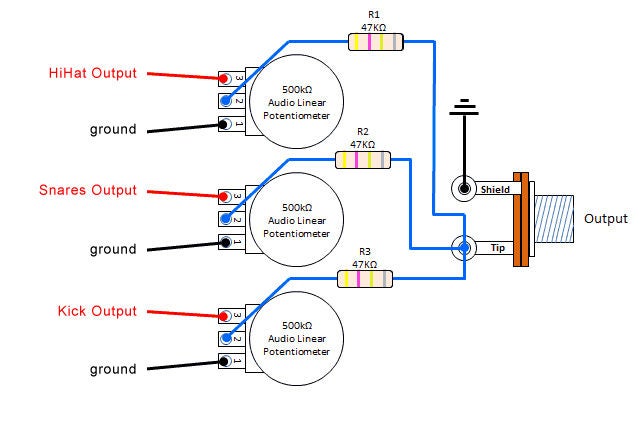
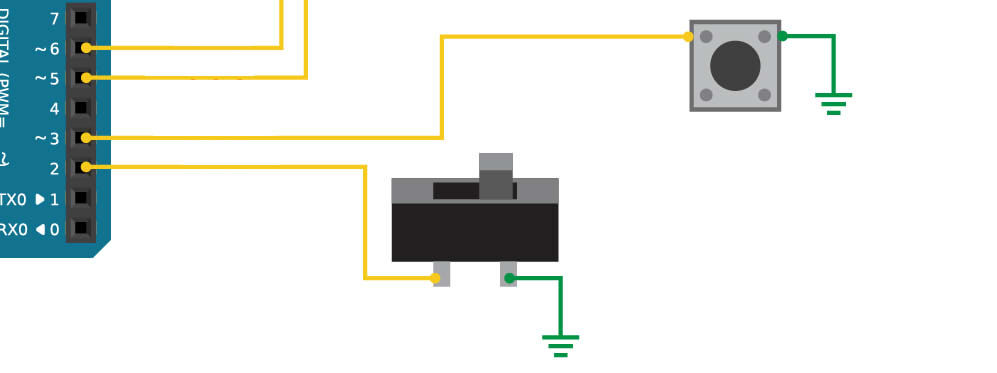
在產生所有三個鼓組音色之后,每個信號都通過一個電位器和一個基本的無源混音器電路,它混合了最終的音頻信號。
我們還需要一種方法來選擇要播放的鼓聲以及何時開始和結束播放。對于這個指示,我們將分別使用連接的按鈕和一個簡單的開關(連接到arduino引腳2和3,如上圖所示)
步驟7:代碼I - 伺服時間校準
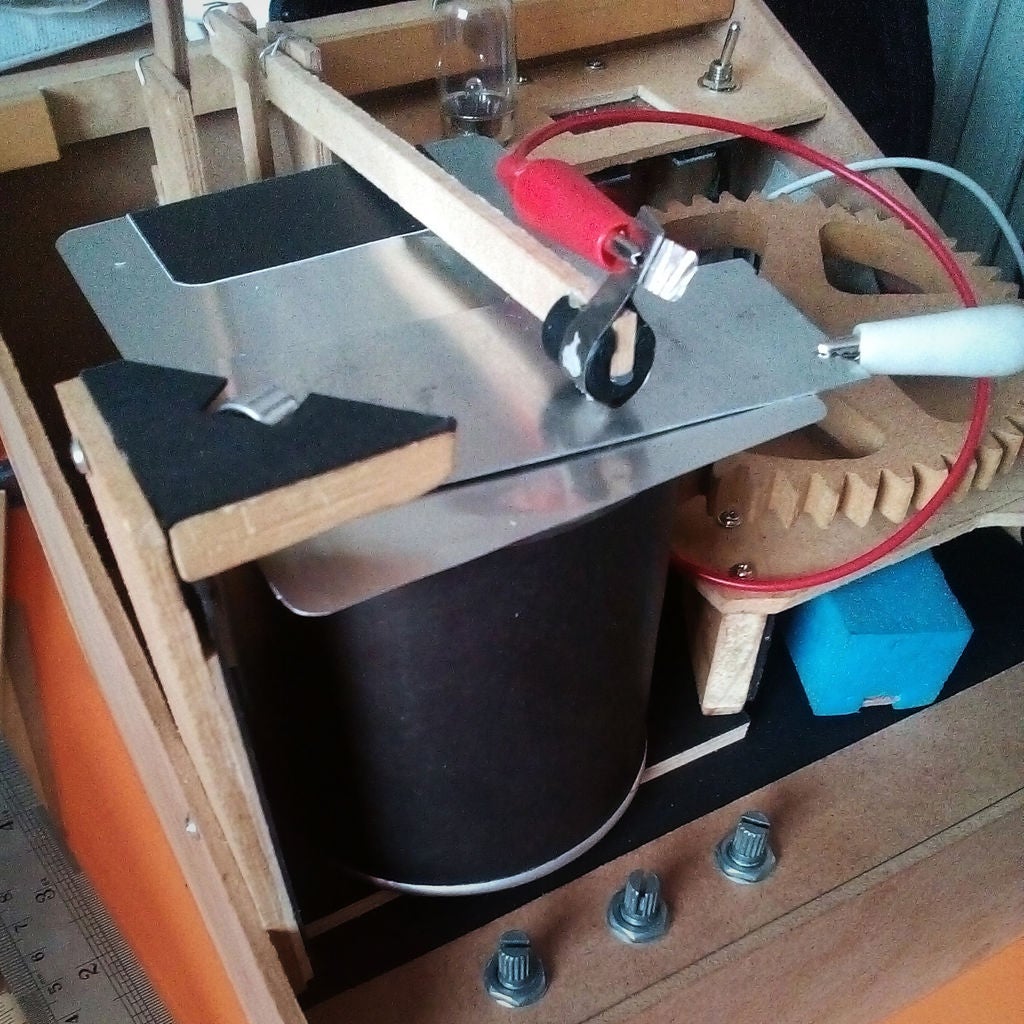
現在,鑒于此項目是一種樂器,它需要在合適的時間產生聲音。因此,在我們開始編碼不同的節奏和功能之前,特別是在踢球和小鼓的情況下,我們需要對舵機的運動進行編程,以便在它們轉向聲音之前的幾毫秒開始,以便補償杖的時間。為了解決這個問題,我想出了一個簡單的系統來測量每個伺服從靜止位置到達擊中目的地的確切點。我用鋁箔覆蓋了棍棒和它們所在的區域,并將鱷魚夾連接到箔片上,創造了一個只有當棍子擊中目標時才能用arduino測量的連接。然后我寫了一段簡單的代碼,它做了兩件事:首先,讓伺服棒反復擊中目標,從靜止角度到擊球角度。其次,打印發送伺服命令的時間,以及棒與目標關閉連接的時間。減去這兩個值將給我們時間棒發出聲音所需的時間,從休息到擊打。
這樣做了足夠多次之后,你會得到很多大致相似的數字,然后你可以平均,并獲得每個伺服的預期相當可用的時間。
步驟8:代碼II - 鼓組合
現在,我們為節拍中的kick,snare和hihat的每個組合定義一個數字代碼。我們將第一個奇數分配給我們的三個drumkit元素:
Kick Snare HiHat
1 3 5
然后,如果我們需要同時播放多個元素,我們只需添加每個元素的數字元件。 Kick和Snare將是4,kick和HiHat 6,依此類推。零/零是沉默。現在我們為每個可能的鼓元素組合都有一個數字,我們可以將它們存儲在變量(cycleNumber變量)中。
3 HiHat x - x x
2 Snare - x x x
1 Kick x x - x
_________________________________________
COMBINATION: 4 3 5 6
步驟9:Code III - Semiquaver循環(按時間命中)
我們現在知道有必要預測kick和snare伺服系統的命令,但我們還必須玩這些命令帽子準時,這是一個幾乎立即工作的電路。
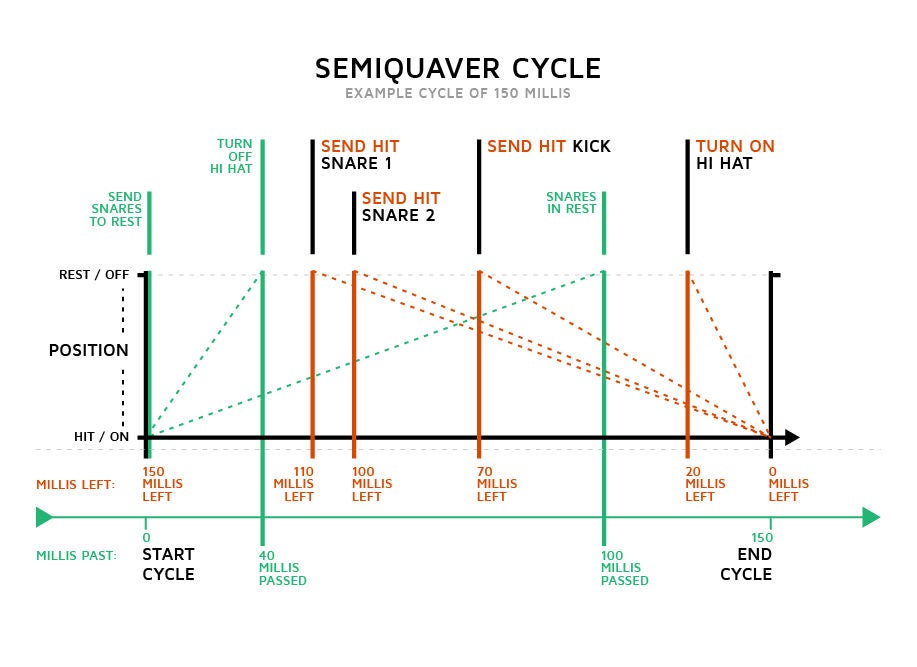
為了解決這個問題,這可能會讓我感到有些混亂,我決定在每個半音符(或十六分音符)內建立一個檢查點系統每個酒吧。我選擇了第16個,因為在最常見節奏的節奏中,音符的十六分之一持續約100到150毫秒,這也是較慢的伺服(在我的情況下)從靜止到擊打的速度,或反之亦然。我們可以通過簡單地改變分配給timeTotalCycle變量的毫秒數來改變速度。這是一個有用的速度,音符和毫秒等效表。如果我們試圖更快地發揮作用,并且我們將周期的總時間減少到慢于伺服移動的時間,則該伺服可能無法從靜止到達擊中位置,因此不會產生聲音。更詳細地看一下我發布的圖表,將更好地解釋這一點。
如圖所示,在我稱之為semiquaver-cycle的開始,我們發送用于定位圈套伺服器的命令在他們的休息位置,如果他們被命令在前一個周期擊中。此時,我們開始計算在整個半切割周期內設置的毫秒數。
之后,arduino將開始檢查循環結束剩余的時間是否等于每個伺服需要產生聲音的任何時間。這里的想法是檢測我們必須發送命中命令的時間點,以便每個伺服到達并在周期的確切結束時擊中它們的目標(并發出它們的聲音)。因此,每個元素都必須在循環中的不同檢查點開始運動,具體取決于伺服及其機構的速度。另一方面,hihat白噪聲電路可以在循環結束時或幾毫秒之前打開(推薦20)。它的結尾將在你定義的檢查點的下一個循環中被命令,在你設置它的循環開始后多久,將是hihat聲音的時間長度(我設置在30到40毫秒之間,但是這個結束了
每當滿足其中一個檢查點時,arduino將通過將其與存儲在cycleNumber變量上的鼓組合號(數字代碼)進行比較來檢查其相應的元素是否有效。系統先前解釋過)。例如,如果圈套的檢查點滿足,則圈套的數量為3,因此只有當鼓組合具有數字3,4(3 + 1),8(3 + 5)或9(3+)時才會發送命中命令1 + 5)。
3 HiHat x - x x
2 Snare - x x x
1 Kick x x - x
_________________________________________
COMBINATION: 4 3 5 6
為什么在圈套機制中使用兩組木棍和伺服?
嗯,如果你考慮一下,如果只使用一個伺服,并且讓它的休息時間為100毫秒,那么我們的半定時器周期可以持續的最短時間是200毫秒。 100允許從打擊到休息,然后再從休息到休息100。每十六分音符200毫秒相當于約75 bpm的速度(由航空匠“夢想”),這是非常緩慢的并且限制了可能的節奏。
使用兩組獨立的棍棒和舵機,并交替使用它們,讓其中一個在100毫秒內從擊中休息,而另一個在相同的時間內擊中,將最小的半定時器周期時間從大約200毫秒減少到100毫秒(“給我打電話”)金發女郎),快得多。換句話說,較慢的伺服時間也是半續半周期可以持續的最短時間。
步驟10:代碼IV - 使鼓節拍
我們現在有辦法確切地定義要生成的聲音,并且還可以在同一時間完成所有聲音。我們只需要一個接一個地播放這些十六分音符周期中的16個,每個音符組合所需的鼓組合,我們有一個小節。只要我們想要,我們就重復那個吧,而且,我們有一個鼓聲。
用簡單的代碼,我們將16個半序列的條形序列存儲在一個數組中,然后制作arduino經歷了一遍又一遍。通過設置16個數字的不同數組,可以存儲和播放不同的鼓節拍,如下圖所示:
3 HiHat x-x-x-x-x-x-x-x-
2 Snare ----x-------x---
1 Kick x-------x-------
ARRAY: 6050805060508050
3 HiHat x-x-x-x-x-x-x-x-
2 Snare ----x-------x---
1 Kick x--x--x--xx---x-
ARRAY: 6051806051608060
要在這些數組之間切換,我們將使用輕觸開關按鈕連接到引腳3。
步驟11:代碼V - 全部放在一起
// DrumCube, an arduino robot drummer
// by Franco Molina @artefrancomolina
// Setting servos
#include
Servo servo1;
Servo servo2;
Servo servo3;
// Servo positions
// this will differ depending on your servos, please test yours to find out the values that best suit you
byte restServo1 = 12;
byte hitServo1 = 21;
byte restServo2 = 123;
byte hitServo2 = 114;
byte restServo3 = 4;
byte hitServo3 = 19;
// Setting the HiHat white noise generator
#define noiseGenerator 12
#define noiseLed 13 //turn on led as a visual representation of the noise being generated
// Setting servo times
// this will also differ depending on your servos, please test yours to find out the values that best suit you
byte timeSnare1 = 110;
byte timeSnare2 = 108;
byte timeKick = 71;
byte timeHihat = 20;
byte sustainTimeHihat = 70;
// Setting previous Snare and Kick
byte previousSnare = 2;
byte previousKick = 0;
// Setting cycle times
static unsigned long timeStartCycle;
static unsigned long timeTotalCycle; // changing this, change how fast/slow the rhythm is, you can set a specific value for each drumbeat in the selectDrumBeat() function
// Bar and Cycles variables
int cycleNumber;
int cycleNumbers[] = {6, 0, 5, 0, 8, 0, 5, 0, 6, 0, 5, 0, 8, 0, 5, 0}; // this array stores the drum elements combination for each cycle (semiquaver or sixteenth) of the drumbeat
byte timeSignature = 44;
int drumbeatID = 0; // ID number for each drumbeat
//
int i; // for counting the time in the “for loop” of the cyclePlayer function
int b; // for the “for loop” that counts the number of cycles
// control interface
#define switchPlayStop 2 // switch bettween playing and stop
#define buttonSelect 3 // tact button that select the drumbeat to play
void setup(void) {
// define pins for each servo
pinMode (5, OUTPUT);
pinMode (6, OUTPUT);
pinMode (9, OUTPUT);
// attach servos to those pins
servo1.attach(5); //caja 1
servo2.attach(6); //caja 2
servo3.attach(9); //bombo
delay(150);
// put all servos on rest position
servo1.write(restServo1);
servo2.write(restServo2);
servo3.write(restServo3);
delay(300);
// Setting hihat and led pinmodes
pinMode (noiseGenerator, OUTPUT);
digitalWrite(noiseGenerator, LOW);
pinMode (noiseLed, OUTPUT);
digitalWrite(noiseLed, LOW);
// Setting control interface pinmodes
pinMode (switchPlayStop, INPUT_PULLUP);
pinMode (buttonSelect, INPUT_PULLUP);
}
void loop(void) {
if (switchPlayStop == LOW) { //if the play/stop switch is ON (logical LOW)
//We start a “for loop” to play a semiquaver cycle a maximum of 16 times, for every bar
for (b = 0; b 《 16; b = b + 1) {
selectDrumBeat(); // select the drumbeat based on the drumbeatID selected
cyclePlayer(cycleNumbers[b]); //play the semiquaver cycle for each number stored in the cycleNumbers array
// if we reach the maximum number of cycles (16 for 4/4, 12 for 6/8, 12/8 or 3/4) we start again
if (b == 11 && (timeSignature == 68 || timeSignature == 128)) {
b = -1;
}
if (b == 15) {
b = -1;
}
}
}
// If the play/stop switch is OFF (logical HIGH) we enter settingMode
else {
settingMode(); // function that lets you choose between different drumbeats and wait for the play switch to be activated
}
}
// CYCLE PLAYER
// this functions runs a semiquaver cycle every time is called.
void cyclePlayer(int cycleNumber) { // we store every single value of the cycleNumbers array into the cycleNumber variable
timeStartCycle = millis(); // we save the starting time, to compare it later with the actual time and get the time past
//set both snare servos to rest position in case they were on hit position
servo1.write(restServo1);
servo2.write(restServo2);
//we star a “for loop” for the entire duration of every semiquaver cycle
for (i = 0; i 《 timeTotalCycle; i++) {
//now we send the hitting commands on time so they reach their destination on time (the end of the semiquaver cycle)
// if we reach the time to send the command to the snare on servo1. We start checking the element that takes the longest time to move, in this case is servo1, in yours could be different.
if ((millis() - timeStartCycle 》= timeTotalCycle - timeSnare1)) {
// we check if this is the one snare of the two, that has to be played,
// and also, if in this cycle a snare has to be played at, all based on the cycleNumber number (this number define the cobination of drum elements)
if ((previousSnare == 2) && ((cycleNumber == 9) || (cycleNumber == 8) || (cycleNumber == 4) || (cycleNumber == 3)) ) {
servo1.write(hitServo1 + 5); // we send the servo command
}
// if we reach the time to send the command to the snare on servo2
if (millis() - timeStartCycle 》= timeTotalCycle - timeSnare2) {
// we check if this is the one snare of the two, that has to be played, and also if in this cycle a snare has to be played at all
if ((previousSnare == 1) && ((cycleNumber == 9) || (cycleNumber == 8) || (cycleNumber == 4) || (cycleNumber == 3)) ) {
servo2.write(hitServo2 - 5); // we send the servo command
}
// we now check if we reached the time to send the command to the third servo, the kick
if ((millis() - timeStartCycle 》= timeTotalCycle - timeKick)) {
// we check if in this cycle a snare has to be played
if ( (cycleNumber == 9) || (cycleNumber == 4) || (cycleNumber == 6) || (cycleNumber == 1) ) {
// we check on what position was previosly the servo, either hiting the left or the right piezo, this state will be saved later
if (previousKick == 0) {
servo3.write(hitServo3);
}
else if (previousKick == 1) {
servo3.write(restServo3);
}
}
// finally, we check if the time to turn on the white noise generator was reached, for the hihat
if (millis() - timeStartCycle 》= (timeTotalCycle - timeHihat)) {
// we check if in this cycle the hihat has to be played
if ( (cycleNumber == 9) || (cycleNumber == 8) || (cycleNumber == 6) || (cycleNumber == 5) ) {
digitalWrite(noiseLed, HIGH);
digitalWrite(noiseGenerator, HIGH);
}
}
}
}
}
// This is where the semiquaver cycle ends.
// HIHAT DURATION
// turn off hi-hat noise generator, but only under the following conditions:
// //if the noise-generator was ON //the time past exceed the time set as sustain //the time past does not reach yet the point where a new noise could start
if ( (digitalRead(noiseGenerator) == HIGH) && (millis() - timeStartCycle 》= sustainTimeHihat) && (millis() - timeStartCycle 《 (timeTotalCycle - (timeHihat + 10))) ) {
digitalWrite(noiseGenerator, LOW);
digitalWrite(noiseLed, LOW);
}
// Check if the play/stop switch is switched OFF
if (digitalRead(switchPlayStop) == HIGH) {
i = timeTotalCycle; //reset time counting
digitalWrite(noiseGenerator, LOW); //turn off noise
digitalWrite(noiseLed, LOW); //turn off noise
servo1.write(restServo1); //stop servos
servo2.write(restServo2); //stop servos
}
delay(1);
}
// If one of the Snares was hit, then declare it as the previous one, in order to hit the other one the next time
if ((cycleNumber == 9) || (cycleNumber == 8) || (cycleNumber == 4) || (cycleNumber == 3)) {
switch (previousSnare) {
case 1:
previousSnare = 2;
break;
case 2:
previousSnare = 1;
break;
default:
break;
}
}
// If one of the piezo kick was hit, then declare it as the previous one, in order to hit the other one the next time
if ( (cycleNumber == 9) || (cycleNumber == 4) || (cycleNumber == 6) || (cycleNumber == 1) ) {
switch (previousKick) {
case 0:
previousKick = 1;
break;
case 1:
previousKick = 0;
break;
default:
break;
}
}
}
// SETTING MODE
// this mode is activated when the play/stop switch is swiched OFF (logical LOW)
void settingMode() {
while (digitalRead(switchPlayStop) == HIGH) { // keep doing the following actions while the play/stop switch is OFF
if (digitalRead(buttonSelect) == LOW) { // if the selection button is pressed (logical LOW), we change the drumbeat
drumbeatID ++; // we select the next drumbeat each time the button is pressed
selectDrumBeat(); // select the drumbeat based on the drumbeatID
// OPTIONAL
// Here you can add whatever piece of code to indicate which drumbeat is being selected,
// this could be turning in a led, sending a serial.print(), etc.
if (drumbeatID 》 7) { //in case we exceed the total number of drumbeats availabe (), we go back to 0.
drumbeatID = 0;
}
delay(100); //delay to avoid detecting button twice when pressed once
}
}
}
// SELECT DRUMBEAT
// this functions uses the value stored in drumbeatID, to modify all the variables needed in order to choose between drumbeats.
void selectDrumBeat() {
switch (drumbeatID) {
case 1: // DiscoBasic
timeTotalCycle = 124;
timeSignature = 44;
cycleNumbers[0] = 1;
cycleNumbers[1] = 0;
cycleNumbers[2] = 5;
cycleNumbers[3] = 0;
cycleNumbers[4] = 4;
cycleNumbers[5] = 0;
cycleNumbers[6] = 5;
cycleNumbers[7] = 0;
cycleNumbers[8] = 1;
cycleNumbers[9] = 0;
cycleNumbers[10] = 5;
cycleNumbers[11] = 0;
cycleNumbers[12] = 4;
cycleNumbers[13] = 0;
cycleNumbers[14] = 5;
cycleNumbers[15] = 0;
break;
case 2: // NewBugalú
timeTotalCycle = 155;
timeSignature = 44;
cycleNumbers[0] = 6;
cycleNumbers[1] = 0;
cycleNumbers[2] = 5;
cycleNumbers[3] = 0;
cycleNumbers[4] = 8;
cycleNumbers[5] = 0;
cycleNumbers[6] = 5;
cycleNumbers[7] = 3;
cycleNumbers[8] = 5;
cycleNumbers[9] = 3;
cycleNumbers[10] = 6;
cycleNumbers[11] = 0;
cycleNumbers[12] = 8;
cycleNumbers[13] = 0;
cycleNumbers[14] = 5;
cycleNumbers[15] = 0;
break;
case 3: // HiHat16
timeTotalCycle = 134;
timeSignature = 44;
cycleNumbers[0] = 6;
cycleNumbers[1] = 5;
cycleNumbers[2] = 5;
cycleNumbers[3] = 5;
cycleNumbers[4] = 8;
cycleNumbers[5] = 5;
cycleNumbers[6] = 5;
cycleNumbers[7] = 5;
cycleNumbers[8] = 6;
cycleNumbers[9] = 5;
cycleNumbers[10] = 5;
cycleNumbers[11] = 5;
cycleNumbers[12] = 8;
cycleNumbers[13] = 5;
cycleNumbers[14] = 5;
cycleNumbers[15] = 5;
break;
case 4: // SwingGroove
timeTotalCycle = 153;
timeSignature = 128; // (12/8)
cycleNumbers[0] = 6;
cycleNumbers[1] = 0;
cycleNumbers[2] = 0;
cycleNumbers[3] = 6;
cycleNumbers[4] = 0;
cycleNumbers[5] = 5;
cycleNumbers[6] = 6;
cycleNumbers[7] = 0;
cycleNumbers[8] = 0;
cycleNumbers[9] = 6;
cycleNumbers[10] = 0;
cycleNumbers[11] = 5;
break;
case 5: // BossaNova
timeTotalCycle = 200;
timeSignature = 44;
cycleNumbers[0] = 6;
cycleNumbers[1] = 5;
cycleNumbers[2] = 5;
cycleNumbers[3] = 9;
cycleNumbers[4] = 6;
cycleNumbers[5] = 5;
cycleNumbers[6] = 8;
cycleNumbers[7] = 6;
cycleNumbers[8] = 6;
cycleNumbers[9] = 5;
cycleNumbers[10] = 8;
cycleNumbers[11] = 6;
cycleNumbers[12] = 9;
cycleNumbers[13] = 5;
cycleNumbers[14] = 5;
cycleNumbers[15] = 6;
break;
case 6: // ShuffleGroove
timeTotalCycle = 134;
timeSignature = 128; // (12/8)
cycleNumbers[0] = 6;
cycleNumbers[1] = 0;
cycleNumbers[2] = 5;
cycleNumbers[3] = 9;
cycleNumbers[4] = 0;
cycleNumbers[5] = 5;
cycleNumbers[6] = 6;
cycleNumbers[7] = 0;
cycleNumbers[8] = 5;
cycleNumbers[9] = 9;
cycleNumbers[10] = 0;
cycleNumbers[11] = 5;
break;
case 7: // Franco‘s beat
timeTotalCycle = 142;
timeSignature = 44;
cycleNumbers[0] = 6;
cycleNumbers[1] = 0;
cycleNumbers[2] = 5;
cycleNumbers[3] = 1;
cycleNumbers[4] = 8;
cycleNumbers[5] = 0;
cycleNumbers[6] = 6;
cycleNumbers[7] = 0;
cycleNumbers[8] = 5;
cycleNumbers[9] = 1;
cycleNumbers[10] = 6;
cycleNumbers[11] = 0;
cycleNumbers[12] = 8;
cycleNumbers[13] = 0;
cycleNumbers[14] = 6;
cycleNumbers[15] = 0;
break;
default: // Basic 4/4
timeTotalCycle = 144;
timeSignature = 44;
cycleNumbers[0] = 6;
cycleNumbers[1] = 0;
cycleNumbers[2] = 5;
cycleNumbers[3] = 0;
cycleNumbers[4] = 8;
cycleNumbers[5] = 0;
cycleNumbers[6] = 5;
cycleNumbers[7] = 0;
cycleNumbers[8] = 6;
cycleNumbers[9] = 0;
cycleNumbers[10] = 5;
cycleNumbers[11] = 0;
cycleNumbers[12] = 8;
cycleNumbers[13] = 0;
cycleNumbers[14] = 5;
cycleNumbers[15] = 0;
break;
}
}
第12步:與機器人鼓手一起播放音樂!

就是這樣,拿起您的首選樂器,插上機器人鼓手,打開播放/停止開關,然后開始播放。
步驟13:下一步是什么?
替代 行級別輸出
這是現在最多的我需要的功能,因為它可以提高機器的便攜性。我可以簡單地將它插入一個普通的藍牙便攜式揚聲器。
MIDI輸入
我正在努力使這個東西受MIDI控制,使其更加通用在現場情況。這個想法的主要挑戰是這個鼓手所需的預期時間,midi協議不起作用。
電池操作
這是事情最讓人頭疼的是。我一直無法弄清楚電池是如何工作的。我需要一種可靠且可充電的方式來提供這個東西所需的12v功能,但到目前為止還沒有任何工作。在我愚蠢的嘗試中,我嘗試了一對帶有TP4056模塊和電壓升降模塊的18650 。..。..失敗了。有什么想法嗎?
-
機器人
+關注
關注
211文章
28805瀏覽量
209150 -
Arduino
+關注
關注
188文章
6478瀏覽量
188290
發布評論請先 登錄
相關推薦
海爾智家成立機器人科技公司
【「具身智能機器人系統」閱讀體驗】2.具身智能機器人的基礎模塊
【「具身智能機器人系統」閱讀體驗】2.具身智能機器人大模型
【「具身智能機器人系統」閱讀體驗】1.初步理解具身智能
【「具身智能機器人系統」閱讀體驗】+初品的體驗
《具身智能機器人系統》第1-6章閱讀心得之具身智能機器人系統背景知識與基礎模塊
【開源項目】你準備好DIY一款功能強大的機器人了嗎?
開源項目!用ESP32做一個可愛的無用機器人
開源項目!用ESP32做一個可愛的無用機器人
柔性機器人與剛性機器人區別與聯系


 工商網監
工商網監
評論