步驟1:設(shè)置Arduino

刻錄以下內(nèi)容
void setup()
{
Serial.begin(9600);
}
void loop()
{
int i=0,j=0;
j=analogRead(A1);
Serial.print(i);
Serial.print(“,”);
Serial.println(i);
}
步驟2:設(shè)置啟動MySQL

為MySQL安裝Wamp服務(wù)器并將其配置為存儲數(shù)據(jù)
運(yùn)行wamp服務(wù)器
打開MySQL控制臺
選擇數(shù)據(jù)庫
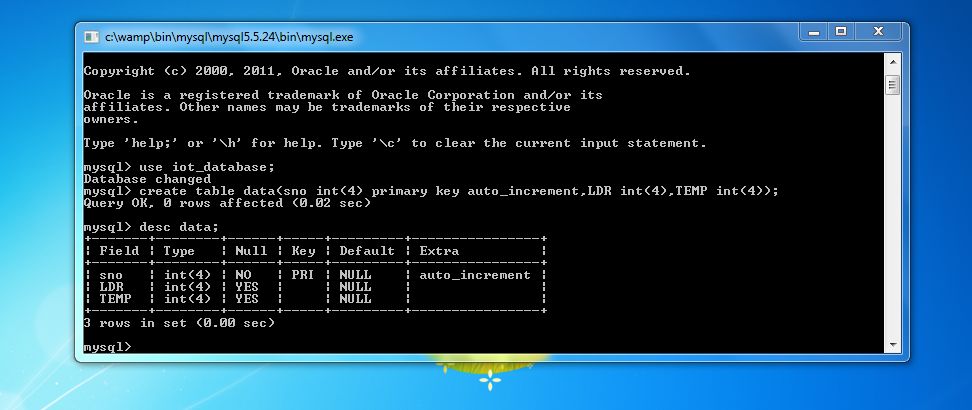
然后為您的數(shù)據(jù)創(chuàng)建表
create table data(sno int(4) primary key auto_increment,LDR int(4),TEMP int(4));
使用desc your_table_name顯示表詳細(xì)信息
desc data;
這就是數(shù)據(jù)庫的全部內(nèi)容,現(xiàn)在我們可以進(jìn)行處理了……
第3步:設(shè)置處理IDE

下載并安裝Processing IDE 2.2.1
將上述給定的ZIP壓縮到MyDocuments/Processing/Libraries中
現(xiàn)在打開正在處理的IDE和檢查庫是否已正確安裝(如上圖所示)
然后將以下代碼復(fù)制并進(jìn)行處理,并自行命名
/*
ARDUINO TO MYSQL THROUGH PROCESSING
Read Serial messages from Arduino then write it in MySQL.
Author : J.V.JohnsonSelva September 2016
*/
import de.bezier.data.sql.*; //import the MySQL library
import processing.serial.*; //import the Serial library
MySQL msql; //Create MySQL Object
String[] a;
int end = 10; // the number 10 is ASCII for linefeed (end of serial.println), later we will look for this to break up individual messages
String serial; // declare a new string called ‘serial’ 。 A string is a sequence of characters (data type know as “char”)
Serial port; // The serial port, this is a new instance of the Serial class (an Object)
void setup() {
String user = “root”;
String pass = “”;
String database = “iot_database”;
msql = new MySQL( this, “l(fā)ocalhost”, database, user, pass );
port = new Serial(this, Serial.list()[0], 9600); // initializing the object by assigning a port and baud rate (must match that of Arduino)
port.clear(); // function from serial library that throws out the first reading, in case we started reading in the middle of a string from Arduino
serial = port.readStringUntil(end); // function that reads the string from serial port until a println and then assigns string to our string variable (called ‘serial’)
serial = null; // initially, the string will be null (empty)
}
void draw()
{
while (port.available() 》 0)
{
//as long as there is data coming from serial port, read it and store it
serial = port.readStringUntil(end);
}
if (serial != null)
{
//if the string is not empty, print the following
//Note: the split function used below is not necessary if sending only a single variable. However, it is useful for parsing (separating) messages when
//reading from multiple inputs in Arduino. Below is example code for an Arduino sketch
a = split(serial, ‘,’); //a new array (called ‘a(chǎn)’) that stores values into separate cells (separated by commas specified in your Arduino program)
println(a[0]); //print LDR value
println(a[1]); //print LM35 value
function();
}
}
void function()
{
if ( msql.connect() )
{
msql.query( “insert into data(LDR,Temp)values(”+a[0]+“,”+a[1]+“)” );
}
else
{
// connection failed !
}
msql.close(); //Must close MySQL connection after Execution
}
第4步:執(zhí)行程序。

通過單擊“運(yùn)行”按鈕運(yùn)行程序,請關(guān)閉彈出窗口。關(guān)閉窗口將停止執(zhí)行,并在下面的查詢中查看在MySQL中存儲數(shù)據(jù)。..
select * from data;
查看數(shù)據(jù)插入器的數(shù)量可以使用下面的查詢。
select count(*) from data;
責(zé)任編輯:wv
-
MySQL
+關(guān)注
關(guān)注
1文章
854瀏覽量
27837 -
Arduino
+關(guān)注
關(guān)注
189文章
6497瀏覽量
191376
發(fā)布評論請先 登錄
企業(yè)級MySQL數(shù)據(jù)庫管理指南
MySQL數(shù)據(jù)庫是什么
數(shù)據(jù)采集到MYSQL和SQLSERVER數(shù)據(jù)庫可以實(shí)現(xiàn)哪些功能
NXP MCU RT1166如何使用JTAG/SWD工具將數(shù)據(jù)存儲到內(nèi)部閃存中?
從Delphi、C++ Builder和Lazarus連接到MySQL數(shù)據(jù)庫

使用插件將Excel連接到MySQL/MariaDB

適用于MySQL和MariaDB的Python連接器:可靠的MySQL數(shù)據(jù)連接器和數(shù)據(jù)庫

MySQL數(shù)據(jù)庫的安裝

數(shù)據(jù)庫數(shù)據(jù)恢復(fù)—Mysql數(shù)據(jù)庫表記錄丟失的數(shù)據(jù)恢復(fù)流程

MySQL數(shù)據(jù)遷移的流程介紹


 怎樣將Arduino數(shù)據(jù)直接存儲到MySQL


評論