 利用MySQL進行一主一從的主從復制
1 概述
本文講述了如何使用MyBatisPlus+ShardingSphereJDBC進行讀寫分離,以及利用MySQL進行一主一從的主從復制。具體步驟包括:-
MySQL主從復制環境準備(Docker) -
搭建
ShardingShpereJDBC+MyBatisPlus+Druid環境 - 測試
2 環境
-
OpenJDK 17.0.3 -
Spring Boot 2.7.0 -
MyBatis Plus 3.5.1 -
MyBatis Plus Generator 3.5.2 -
Druid 1.2.10 -
ShardingSphereJDBC 5.1.1 -
MySQL 8.0.29(Docker)
3 一些基礎理論
3.1 讀寫分離
讀寫分離,顧名思義就是讀和寫分開,更具體來說,就是:- 寫操作在主數據庫進行
- 讀操作在從數據庫進行
MySQL上實現,相信會不如一臺MySQL寫,另外兩臺MySQL讀這樣的配置性能高。另一方面,在很多時候都是讀操作的請求要遠遠高于寫操作,這樣就顯得讀寫分離非常有必要了。3.2 主從復制
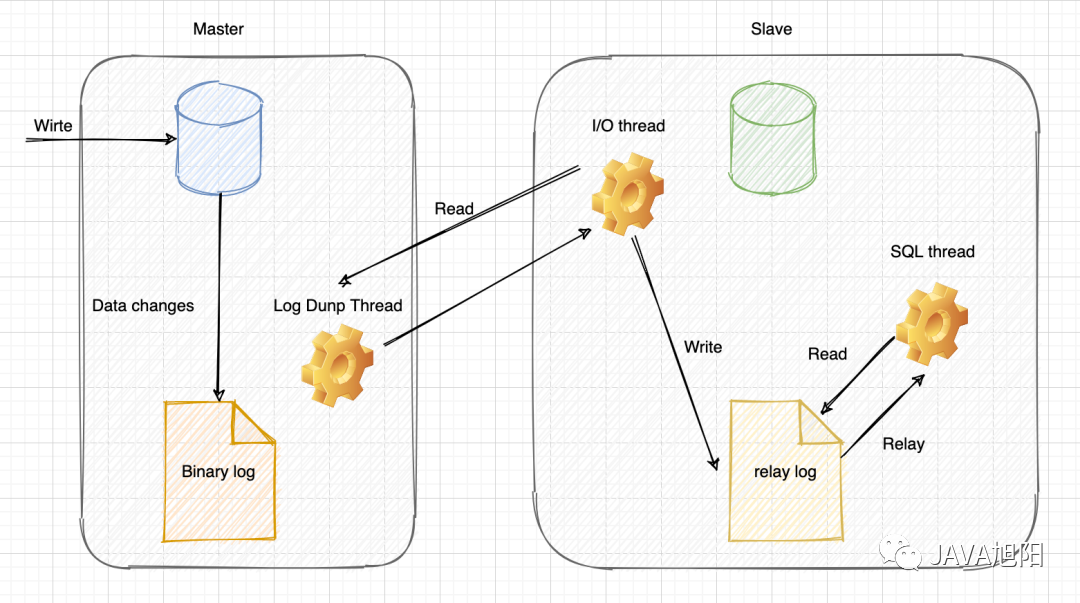
主從復制,顧名思義就是把主庫的數據復制到從庫中,因為讀寫分離之后,寫操作都在主庫進行,但是讀操作是在從庫進行的,也就是說,主庫上的數據如果不能復制到從庫中,那么從庫就不會讀到主庫中的數據。嚴格意義上說,讀寫分離并不要求主從復制,只需要在主庫寫從庫讀即可,但是如果沒有了主從復制,讀寫分離將失去了它的意義。因此讀寫分離通常與主從復制配合使用。因為本示例使用的是MySQL,這里就說一下MySQL主從復制的原理,如下圖所示: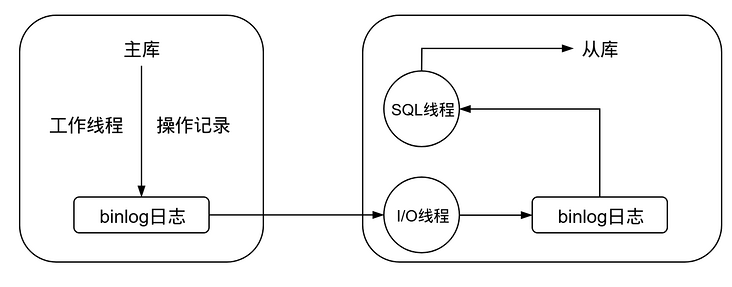 ?工作流程如下:
-
主庫修改數據后,將修改日志寫入
binlog -
從庫的
I/O線程讀取主庫的binlog,并拷貝到從庫本地的binlog中 -
從庫本地的
binlog被SQL線程讀取,執行其中的內容并同步到從庫中
3.3 數據庫中間件簡介
數據庫中間件可以簡化對讀寫分離以及分庫分表的操作,并隱藏底層實現細節,可以像操作單庫單表那樣操作多庫多表,主流的設計方案主要有兩種:- 服務端代理:需要獨立部署一個代理服務,該代理服務后面管理多個數據庫實例,在應用中通過一個數據源與該代理服務器建立連接,由該代理去操作底層數據庫,并返回相應結果。優點是支持多語言,對業務透明,缺點是實現復雜,實現難度大,同時代理需要確保自身高可用
-
客戶端代理:在連接池或數據庫驅動上進行一層封裝,內部與不同的數據庫建立連接,并對
SQL進行必要的操作,比如讀寫分離選擇走主庫還是從庫,分庫分表select后如何聚合結果。優點是實現簡單,天然去中心化,缺點是支持語言較少,版本升級困難
-
Cobar:阿里開源的關系型數據庫分布式服務中間件,已停更 -
DRDS:脫胎于Cobar,全稱分布式關系型數據庫服務 -
MyCat:開源數據庫中間件,目前更新了MyCat2版本 -
Atlas:Qihoo 360公司Web平臺部基礎架構團隊開發維護的一個基于MySQL協議的數據中間層項目,同時還有一個NoSQL的版本,叫Pika -
tddl:阿里巴巴自主研發的分布式數據庫服務 -
Sharding-JDBC:ShardingShpere的一個子產品,一個輕量級Java框架
4 MySQL主從復制環境準備
看完了一些基礎理論就可以進行動手了,本小節先準備好MySQL主從復制的環境,基于Docker+MySQL官方文檔搭建。4.1 主庫操作
4.1.1 拉取鏡像并創建容器運行
dockerpullmysql dockerrun-itd-p3306:3306-eMYSQL_ROOT_PASSWORD=123456--namemastermysql dockerexec-itmaster/bin/bash 在主庫中進行更新鏡像源,安裝
vim以及net-tools的操作:cd/etc/apt echodebhttp://mirrors.aliyun.com/debian/bustermainnon-freecontribdeb-srchttp://mirrors.aliyun.com/debian/bustermainnon-freecontribdebhttp://mirrors.aliyun.com/debian-securitybuster/updatesmaindeb-srchttp://mirrors.aliyun.com/debian-securitybuster/updatesmaindebhttp://mirrors.aliyun.com/debian/buster-updatesmainnon-freecontribdeb-srchttp://mirrors.aliyun.com/debian/buster-updatesmainnon-freecontribdebhttp://mirrors.aliyun.com/debian/buster-backportsmainnon-freecontribdeb-srchttp://mirrors.aliyun.com/debian/buster-backportsmainnon-freecontrib>sources.list aptupdate&&aptupgrade aptinstallvimnet-tools
4.1.2 修改配置文件
vim/etc/mysql/my.cnf 添加下面兩行數據:
[mysqld] server-id=1#全局唯一,取值[1,2^32-1],默認為1 binlog-do-db=test#表示需要復制的是哪個庫 修改完成后重啟。
4.1.3 準備數據源
CREATEDATABASEtest; USEtest; CREATETABLEuser( idBIGINTPRIMARYKEY, nameVARCHAR(30)NOTNULL, );
4.1.4 創建一個復制操作的用戶(可選但推薦)
注意創建用戶需要加上mysql_native_password,否則會導致從庫一直處于連接狀態:CREATEUSER'repl'@'172.17.0.3'IDENTIFIEDWITHmysql_native_passwordBY'123456'; GRANTREPLICATIONslaveON*.*TO'repl'@'172.17.0.3'; 具體的地址請根據從庫的地址修改,可以先看后面的從庫配置部分。
4.1.5 數據備份(可選)
如果原來的主庫中是有數據的,那么這部分數據需要手動同步到從庫中:FLUSHTABLESWITHREADLOCK; 開啟主庫的另一個終端,使用
mysqldump導出:mysqldump-uroot-p--all-databases--master-data>dbdump.db 導出完成后,解除讀鎖:
UNLOCKTABLES;
4.1.6 查看主庫狀態
SHOWMASTERSTATUS;

File以及Position記錄下來,后面從庫的配置需要用到。4.2 從庫操作
4.2.1 拉取鏡像并創建容器運行
dockerpullmysql dockerrun-itd-p3307:3306-eMYSQL_ROOT_PASSWORD=123456--nameslavemysql dockerexec-itslave/bin/bash 進入容器后,像主庫一樣更新源然后安裝
vim和net-tools:cd/etc/apt echodebhttp://mirrors.aliyun.com/debian/bustermainnon-freecontribdeb-srchttp://mirrors.aliyun.com/debian/bustermainnon-freecontribdebhttp://mirrors.aliyun.com/debian-securitybuster/updatesmaindeb-srchttp://mirrors.aliyun.com/debian-securitybuster/updatesmaindebhttp://mirrors.aliyun.com/debian/buster-updatesmainnon-freecontribdeb-srchttp://mirrors.aliyun.com/debian/buster-updatesmainnon-freecontribdebhttp://mirrors.aliyun.com/debian/buster-backportsmainnon-freecontribdeb-srchttp://mirrors.aliyun.com/debian/buster-backportsmainnon-freecontrib>sources.list aptupdate&&aptupgrade aptinstallvimnet-tools
4.2.2 修改配置文件
vim/etc/mysql/my.cnf 添加如下兩行:
[mysqld] server-id=2#全局唯一,不能與主庫相同 replicate-do-db=test#與主庫相同,表示對該庫進行復制 修改完成后重啟。
4.2.3 查看ip地址
查看從庫的ip地址,用于給主庫設置同步的用戶:ifconfig 輸出:
inet172.17.0.3netmask255.255.0.0broadcast172.17.255.255 那么主庫中用于復制的用戶就可以是
repl@172.17.0.3。4.2.4 導入數據(可選)
如果主庫有數據可以先導入到從庫:mysqldump-uroot-p--all-databases
4.2.5 準備數據源
CREATEDATABASEtest; USEtest; CREATETABLEuser( idBIGINTPRIMARYKEY, nameVARCHAR(30)NOTNULL, );
4.2.6 設置主庫
可以使用change master to/change replication source to(8.0.23+)命令:CHANGEREPLICATIONSOURCETO source_host='172.17.0.2',#可以使用ifconfig查看主庫ip source_user='repl',#之前主庫創建的用戶 source_password='123456',#密碼 source_log_file='binlog.000003',#之前在主庫上使用showmasterstatus查看的日志文件 source_log_pos=594;#同樣使用showmasterstatus查看
4.2.7 開啟從庫
STARTSLAVE; SHOWSLAVESTATUSG 新版本(
8.0.22+)可使用:STARTREPLICA; SHOWREPLICASTATUSG 需要
IO和SQL線程顯示Yes才算成功: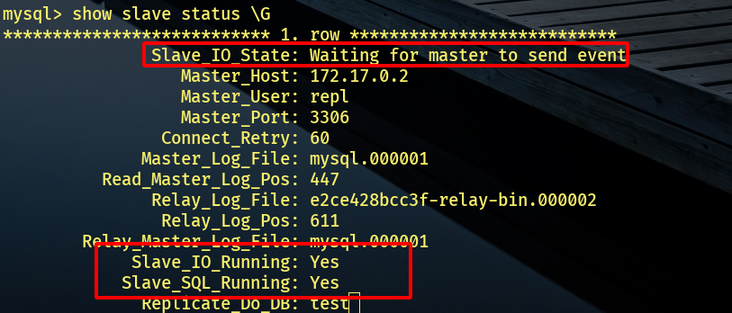 ?
?4.3 測試
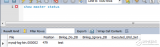
主庫選擇插入一條數據:INSERTINTOuserVALUES(1,"name",3); 然后從庫就能
select到了: ?
?
5 搭建Spring Boot環境
5.1 新建項目并引入依賴
新建Spring Boot項目,并引入如下依賴:implementation'com.alibaba1.2.10' implementation'com.baomidou3.5.1' implementation'org.freemarker2.3.31' implementation'com.baomidou3.5.2' implementation'org.apache.shardingsphere5.1.1'
Maven版本:<dependency> <groupId>com.baomidougroupId> <artifactId>mybatis-plus-boot-starterartifactId> <version>3.5.1version> dependency> <dependency> <groupId>com.baomidougroupId> <artifactId>mybatis-plus-generatorartifactId> <version>3.5.2version> dependency> <dependency> <groupId>org.freemarkergroupId> <artifactId>freemarkerartifactId> <version>2.3.31version> dependency> <dependency> <groupId>com.alibabagroupId> <artifactId>druidartifactId> <version>1.2.10version> dependency> <dependency> <groupId>org.apache.shardingspheregroupId> <artifactId>sharding-jdbc-spring-boot-starterartifactId> <version>5.1.1version> dependency>
5.2 使用生成器
importcom.baomidou.mybatisplus.generator.FastAutoGenerator; importcom.baomidou.mybatisplus.generator.engine.FreemarkerTemplateEngine; publicclassGenerator{ publicstaticvoidmain(String[]args){ FastAutoGenerator.create("jdbc//localhost:3306/test","root","123456") .globalConfig(builder-> builder.author("author").outputDir(System.getProperty("user.dir")+"/src/main/java").build()) .packageConfig(builder-> builder.parent("com.example.demo").moduleName("user").build()) .strategyConfig(builder-> builder.addInclude("user").entityBuilder().enableLombok().disableSerialVersionUID().build()) .templateEngine(newFreemarkerTemplateEngine()) .execute(); } } 直接運行
main方法即可生成代碼,配置請根據個人需要進行更改。5.3 配置文件
spring: shardingsphere: mode: type:Memory#內存模式,元數據保存在當前進程中 datasource: names:master,slave#數據源名稱,這里有兩個 master:#跟上面的數據源對應 type:com.alibaba.druid.pool.DruidDataSource#連接池 url:jdbc//127.0.0.1:3306/test#連接url username:root password:123456 slave:#跟上面的數據源對應 type:com.alibaba.druid.pool.DruidDataSource url:jdbc//127.0.0.1:3306/test username:root password:123456 rules: readwrite-splitting:#讀寫分離規則 data-sources:#數據源配置 random:#這個名字隨便起 type:Static#靜態類型 load-balancer-name:round_robin#負載均衡算法名字 props: write-data-source-name:master#寫數據源 read-data-source-names:slave#讀數據源 load-balancers:#負載均衡配置 round_robin:#跟上面負載均衡算法的名字對應 type:ROUND_ROBIN#負載均衡算法 props: sql-show:true#打印SQL 因為配置文件的內容比較多,以下進行分開說明。
5.3.1 模式
spring.shardingsphere.mode.type,模式有三種:-
Memory:內存模式,初始化配置或執行SQL等操作均在當前進程生效 -
Standalone:單機模式,可以將數據源和規則等元數據信息持久化,但是這些元數據不會在集群中同步 -
Cluster:集群模式,提供了多個Apache ShardingSphere實例之間元數據共享以及分布式場景下的狀態協調的能力,也提供水平擴展以及高可用的能力
-
spring.shardingsphere.mode.type=Standalone:設置單機模式 -
spring.shardingsphere.mode.repository.type=:持久化倉庫的類型,單機模式適用類型為File -
spring.shardingsphere.mode.repository.props.path=:元數據存儲路徑,默認.shardingsphere -
spring.shardingsphere.mode.overwrite=:是否覆蓋
-
spring.shardingsphere.mode.type=Cluster:設置集群模式 -
spring.shardingsphere.mode.repository.type=:持久化倉庫類型,集群模式支持ZooKeeper以及Etcd持久化 -
spring.shardingsphere.mode.repository.props.namespace=:注冊中心命名空間 -
spring.shardingsphere.mode.repository.props.server-lists=:注冊中心服務器列表 -
spring.shardingsphere.mode.overwrite=:是否覆蓋 -
spring.shardingsphere.mode.repository.props.:注冊中心的屬性配置,對于= ZooKeeper,可以配置retryIntervalMilliseconds(重試間隔毫秒)、maxRetries(客戶端連接最大重試數)、timeToLiveSeconds(臨時數據存活秒數)、operationTimeoutMilliseconds(客戶端操作超時毫秒數)、digest(登錄密碼),對于Etcd,可以配置timeToLiveSeconds(臨時數據存活秒數)、connectionTimeout(連接超時秒數)
5.3.2 數據源配置
spring.shardingsphere.datasource.names,后面接數據源的名稱,使用,分隔,比如此處有兩個數據源:-
master -
slave
-
type:數據庫連接池類型,這里使用的是Druid -
username:用戶名 -
password:密碼 -
jdbc-url:連接url,注意,對于此處使用的Druid連接池,需要使用url而不是jdbc-url
5.3.3 讀寫分離規則配置
spring.shardingsphere.rules.readwrite-splitting,需要配置其中的數據源以及負載均衡類型:-
spring.shardingsphere.rules.readwrite-splitting.data-sources -
spring.shardingsphere.rules.readwrite-splitting.load-balancers
5.3.3.1 數據源配置
數據源配置首先需要添加一個數據源的名字,隨便起一個,比如這里是random,然后需要配置三個屬性:-
spring.shardingsphere.rules.readwrite-splitting.data-sources.random.type:讀寫分離的類型,可選值為Static與Dynamic,這里選擇Static,如果選擇Dynamic,也就是動態數據源,請配合dynamic-datasource-spring-boot-starter使用 -
spring.shardingsphere.rules.readwrite-splitting.data-sources.random.props.write-data-source-name:寫數據源 -
spring.shardingsphere.rules.readwrite-splitting.data-sources.random.props.read-data-source-name:讀數據源 -
spring.shardingsphere.rules.readwrite-splitting.data-sources.random.load-balancer-name:負載均衡算法的名稱,這里寫的是round_robin
5.3.3.2 負載均衡配置
負載均衡配置需要與上面的spring.shardingsphere.rules.readwrite-splitting.data-sources.random.load-balancer-name屬性對應,比如這里是round_robin,那么需要配置的就是spring.shardingsphere.rules.readwrite-splitting.load-balancers.round_robin。然后下一步就是配置具體的負載均衡算法。內置的負載均衡算法有三個:-
輪詢算法:
ROUND_ROBIN,配置type=ROUND_ROBIN即可,也就是spring.shardingsphere.rules.readwrite-splitting.load-balancers.round_robin.type=ROUND_ROBIN -
隨機訪問算法:
RANDOM,配置type=RANDOM -
權重訪問算法:
WEIGHT,配置type=WEIGHT,同時需要配置props,在其中配置各個讀節點的權重
5.3.4 屬性配置
屬性的話這里只配置了一個spring.shardingsphere.props.sql-show=true,也就是打印SQL,其他支持的屬性有:-
spring.shardingsphere.props.sql-simple:是否打印簡單風格的SQL,默認為false -
spring.shardingsphere.props.kernel-exector-size:設置任務處理線程池大小,默認為infinite -
spring.shardingsphere.props.max-connections-size-per-query:每次查詢所能使用的最多數據庫連接數,默認為1 -
spring.shardingsphere.props.check-table-metadata-enabled:啟動時是否檢查分片元數據的一致性,默認為false -
spring.shardingsphere.props.check-duplicate-table-enabled:啟動時是否檢查重復表,默認為false -
spring.shardingsphere.props.sql-federation-enabled:是否開啟聯邦查詢,默認為false
5.4 準備Controller
@RestController @RequestMapping("/user") @RequiredArgsConstructor(onConstructor=@__(@Autowired)) publicclassUserController{ privatefinalUserServiceImpluserService; @GetMapping("/select") publicUserselect(){ returnuserService.getById(1); } @GetMapping("/insert") publicbooleaninsert(){ returnuserService.saveOrUpdate(User.builder().id(3L).name("name3").build()); } }
6 測試
訪問http://localhost:8080/user/insert,可以看到寫操作在主庫進行: 訪問
訪問http://localhost:8080/user/select,可以看到讀操作在從庫進行: 這樣讀寫分離就算是完成了。
審核編輯:湯梓紅
聲明:本文內容及配圖由入駐作者撰寫或者入駐合作網站授權轉載。文章觀點僅代表作者本人,不代表電子發燒友網立場。文章及其配圖僅供工程師學習之用,如有內容侵權或者其他違規問題,請聯系本站處理。
舉報投訴
-
數據庫
+關注
關注
7文章
3902瀏覽量
65791 -
spring
+關注
關注
0文章
340瀏覽量
14891 -
MySQL
+關注
關注
1文章
849瀏覽量
27563
原文標題:SpringBoot+ShardingSphereJDBC實現讀寫分離!
文章出處:【微信號:AndroidPush,微信公眾號:Android編程精選】歡迎添加關注!文章轉載請注明出處。
發布評論請先 登錄
相關推薦
熱點推薦
MySQL主從復制原理詳解
簡單講,MySQL主從復制就是數據寫入一臺服務器(主服務器)后,同時還會額外寫入另外的服務器(從服務器)。也就是說數據會寫多份,這樣做的目的
一個操作把MySQL主從復制整崩了
最近公司某項目上反饋mysql主從復制失敗,被運維部門記了一次大過,影響到了項目的驗收推進,那么究竟是什么原因導致的呢?而主從復制的原理又是什么呢?本文就對排查分析的過程做

mysql主從復制的原理
實現數據的復制。 一、主從復制的基本概念 主數據庫(Master): 負責接收客戶端的寫操作,并將這些操作記錄到binlog中。 從數據庫(


 工商網監
工商網監
評論