 Android APP如何進行訪問硬件驅動

本文我們要講的是在用 i.MX8 平臺開發時,Android APP 如何進行訪問硬件驅動。
主要內容包括:框架代碼編寫和注意事項(Linux Driver、C Library、SystemServer、APP 等五個部分)、Sepolicy 信息配置,話不多說,我們直接進入正題吧~
一、Android 應用層訪問硬件服務框架
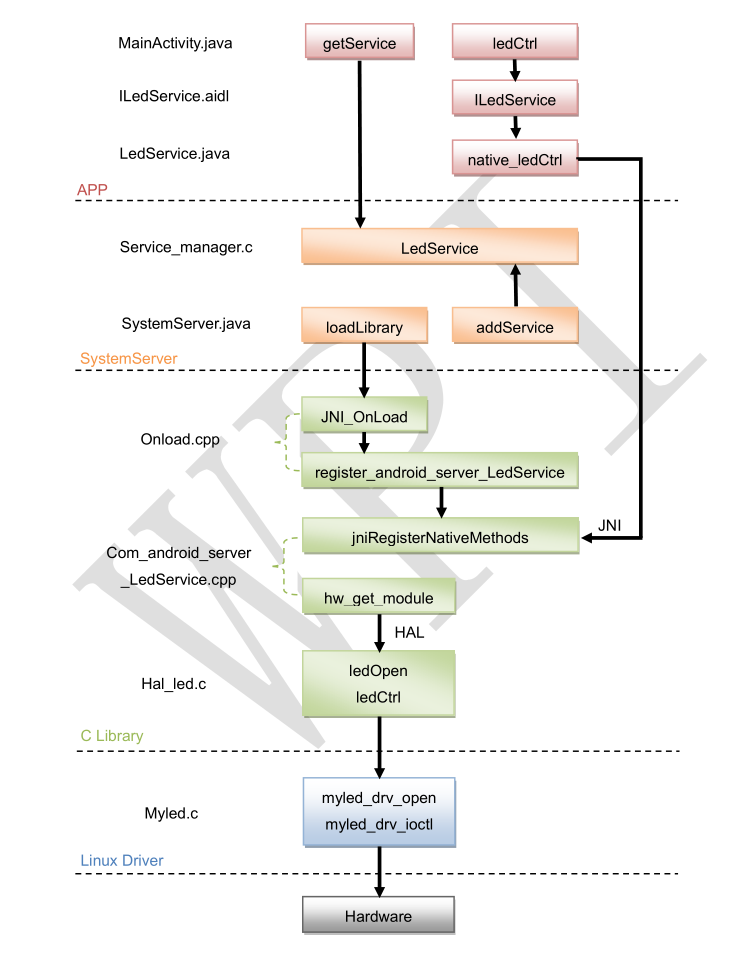
Android 應用層訪問硬件服務框架主要可以分為:① APP;② SystemServer;③ C Library;④ Linux Driver。
① APP:
從 service_manager 里獲取相關服務,再通過接口調用,接口里實現對本地方法的調用。
涉及到的相關文件:MainActivity.java、activity_main.xml、ILedService.aidl、LedService.java
② SystemServer:
通過注冊 android 服務的方式加載 C 庫,再將服務加入 service_manager 里面。
涉及到的相關文件:SystemServer.java、SystemServiceRegistry.java、LedManager.java
③ C Library:
HAL 層操作 /dev/myled,JNI 層加載 HAL 文件和向上注冊 java 本地方法。
涉及到的相關文件:onload.cpp、com_android_server_LedService.cpp、led_hal.c、led_hal.h
④ Linux Driver
和 Linux 驅動完全一樣,編寫驅動,向上提供 /dev/myled 節點。
涉及到的相關文件:myled.c
二、框架代碼編寫
2.1 編寫 Linux Driver
通過 Linux Driver 來實現從應用層到底層的控制,這里主要實現對 LED 燈的 ON/OFF 控制及 GPIO 引腳電平 HIGH/LOW 的上報。
在 vendor/nxp-opensource/kernel_imx/drivers/leds 目錄下創建 myled.c
#include < linux/module.h >
#include < linux/kernel.h >
#include < linux/fs.h >
#include < linux/init.h >
#include < linux/delay.h >
#include < asm/uaccess.h >
#include < asm/irq.h >
#include < asm/io.h >
#include < linux/device.h >
#include < linux/uaccess.h >


#include < linux/platform_device.h >


#include < linux/cdev.h >
#include < linux/slab.h >                          /*kmalloc*/
#include < linux/vmalloc.h >                      /*vmalloc*/
#include < linux/types.h >                         /*ssize_t*/
#include < linux/gpio_keys.h >
#include < linux/gpio.h >
#include < linux/interrupt.h >
#include < linux/sched.h >
#include < asm-generic/ioctl.h >
#include < asm-generic/errno-base.h >


#define USER_LED          374    /*GPIO LED  GPIO4_22*/
#define USER_BUTTON      357    /*GPIO LED  GPIO4_05*/
int major;
static struct class *myled_class;
static struct class_device  *myled_class_devs;


static int myled_drv_open(struct inode *inode, struct file *file)
{
  printk("[pual] Enter %s - %d -- n",__func__,__LINE__);


  return 0;
}


static long myled_drv_ioctl(struct file *file, unsigned int cmd, unsigned long arg)
{
  int read_val;
  printk("gpio_ioctln");
  switch(cmd) {


        case 0:
      if(arg == 0)
      {
        gpio_set_value(USER_LED, 0);
        printk("led is offn");
        break;
      }else
        {
                   gpio_set_value(USER_LED, 1);
                    printk("led is onn");
                    break;
        }
  case 1:
       read_val = gpio_get_value(USER_BUTTON);
       if(copy_to_user((int __user*)arg,&read_val,sizeof(read_val)))
       return ENOTTY;

       printk("gpio input: %dn", read_val);

              break;
        default:
                return -EINVAL;
  }
  return 0;
}


static struct file_operations myled_drv_fops = {
    .owner = THIS_MODULE,
    .open = myled_drv_open,
    .unlocked_ioctl = myled_drv_ioctl,
};


static  int myled_probe(struct platform_device *pdev)
{
  int ret;
  printk("[pual] Enter %s - %d -- n",__func__,__LINE__);
  ret = gpio_request(USER_LED, "LED");//第一個參數,為要申請的引腳,第二個為你要定義的名字
  if (ret)
  {
            return ret;
  }
  printk("[pual] Enter %s - %d -- n",__func__,__LINE__);
  gpio_direction_output(USER_LED, 1);
  printk("[pual] Enter %s - %d -- n",__func__,__LINE__);
  gpio_set_value(USER_LED, 1);
  printk("[pual] Enter %s - %d -- n",__func__,__LINE__);
  major = register_chrdev(0,"myled",&myled_drv_fops);

      //創建設備信息,執行后會出現 /sys/class/myled
      myled_class = class_create(THIS_MODULE, "myled");


  //創建設備節點,就是根據上面的設備信息來的
      myled_class_devs = device_create(myled_class, NULL, MKDEV(major, 0), NULL, "myled"); /* /dev/myled */
  return 0;
}


static int myled_remove(struct platform_device *pdev)
{
  gpio_free(USER_LED);
  unregister_chrdev(major,"myled");
  device_unregister(myled_class_devs);
  class_destroy(myled_class);
  return 0;
}


static const struct of_device_id myled_ids[] = {

  { .compatible = "fsl,myled", },
  { },
};


MODULE_DEVICE_TABLE(of, myled_ids);


/*1. 構建platform_driver 結構體*/
static struct platform_driver myled_driver={
  .probe  = myled_probe,
  .remove = myled_remove,
  .driver = {
    .name  = "myled",
    .of_match_table = myled_ids,
  }
};


static int __init myled_init(void)
{
  /*2. 注冊平臺驅動*/
  platform_driver_register(&myled_driver);
  printk("[pual] Enter %s - %d -- n",__func__,__LINE__);
  return 0;
}


static void __exit myled_exit(void)
{
  /*3. 注銷平臺驅動*/
  platform_driver_unregister(&myled_driver);
}
module_init(myled_init);
module_exit(myled_exit);


/* 描述驅動程序的一些信息,不是必須的 */
MODULE_AUTHOR("WPI Pual Lin");
MODULE_VERSION("1.0");
MODULE_DESCRIPTION("i.MX8 LED Driver");
MODULE_LICENSE("GPL");
修改 vendor/nxp-opensource/kernel_imx/drivers/leds 目錄下 Makefile 及 Kconfig,添加代碼
Makefile
obj-$(CONFIG_MYLED) += myled.o
Kconfig
config MYLED
         tristate "MYLED support"
         depends on LEDS_CLASS
         help
           This option enables support for userspace LEDs. Say 'y' to enable this
           support in kernel. To compile this driver as a module, choose 'm' here:
           the module will be called uleds.
修改默認配置文件 vendor/nxp-opensource/kernel_imx/arch/arm64/configs/android_defconfig,添加代碼
CONFIG_MYLED=y
由于這里給的值是 y,會把我們的 driver 編譯進內核,不會生成 ko 文件,也不需要我們去手動掛載。注意,必須是給 y,因為我們后續會把 led 添加進 system server 里面,會在系統啟動的時候就調用到 open 來打開 /dev/myled。
執行如下命令,開始編譯 kernel 內核
source build/envsetup.sh
lunch mek_8q-eng
make bootimage -j16
2.2 編寫 C Library
2.2.1 修改 onload.cpp
SystemServer.java 會加載 C 庫,調用到 onload.cpp,需要在 onload.cpp 注冊 LED 服務。
修改 frameworks/base/services/core/jni/onload.cpp,添加:
int register_android_server_LedService(JNIEnv* env);
……
register_android_server_LedService(env);
2.2.2 創建 com_android_server_LedService.cpp
前面用到了 register_android_server_LedService(),是在 com_android_server_LedService.cpp 里實現的。
com_android_server_LedService.cpp 理論上可以直接操作節點 /dev/myled,但一般不這樣做。
通常的做法是,向上提供本地方法 (native_ledOpen),向下加載 HAL 文件 (led_hal.c),并調用 HAL 的函數。
這樣操作有兩個好處:
- 方便修改;
如果需要修改硬件部分的操作,只需要修改 led_hal.c,生成 so 文件,放入系統即可,而不需要編譯整個 Android 系統;
- 保密代碼;
因為 Linux 的 GPL 協議,一旦使用的內核代碼,自己的代碼也得開源出去,硬件廠商為了保密硬件的具體細節,只在內核實現操作寄存器的接口,具體的操作邏輯放在 HAL 文件里,而 Android 采用 Apache 協議,修改了代碼而無需開源,這樣就實現了保密代碼;
編寫步驟如下:
- 定義 JNINativeMethod,建立 Java 本地方法與 C 庫函數名的映射關系;
- 使用 jniRegisterNativeMethods 注冊本地方法,將在 onload.cpp 被調用;
- 在 open() 里:
① 使用 hw_get_module 獲得 hw_module_t 結構體;
② 使用 module->methods->open 獲得 hw_device_t 結構體;
③ 將 hw_device_t 轉換為 led_device_t,調用對應 open;
- 完成其它函數 ctrl、close 的調用;
在 frameworks/base/services/core/jni/ 路徑下創建 com_android_server_LedService.cpp
/*/frameworks/base/services/core/jni/*/
#define LOG_TAG "LedService"


#include "jni.h"
#include < nativehelper/JNIHelp.h >
#include "android_runtime/AndroidRuntime.h"
#include < utils/misc.h >
#include < utils/Log.h >
#include < stdio.h >
#include < sys/types.h >
#include < sys/stat.h >
#include < fcntl.h >
#include < sys/ioctl.h >
#include < hardware/led_hal.h >


namespace android
{
    static led_device_t* led_device;


    jint ledOpen(JNIEnv *env, jobject cls)
{
        jint err;
        hw_module_t* module;
        hw_device_t* device;


        ALOGI("[pual] native ledOpen");


        //1. hw_get_module for get module
        err = hw_get_module("led", (hw_module_t const**)&module);
        ALOGE("[pual] native ledOpen");
        if (err == 0) {
            //2. module- >methods- >open for get device
            err = module- >methods- >open(module, NULL, &device);
            if (err == 0) {
                //3. conversion, call led_open
                led_device = (led_device_t *)device;
                return led_device- >led_open(led_device);
            } else {
                return -1;
            }
        }
        return -1;
    }


    void ledClose(JNIEnv *env, jobject cls)
{
        ALOGI("[pual] nativeled Close");

        return;
    }


    jint ledCtrl(JNIEnv *env, jobject cls, jint number, jint status)
{
        ALOGI("[pual] native ledCtrl %d, %d", number, status);
        return led_device- >led_ctrl(led_device, number, status);
    }


    static const JNINativeMethod method_table[] = {
        {"native_ledOpen",  "()I",   (void *)ledOpen},
        {"native_ledClose", "()V",   (void *)ledClose},
        {"native_ledCtrl",  "(II)I", (void *)ledCtrl},
    };


    int register_android_server_LedService(JNIEnv *env)
{
        return jniRegisterNativeMethods(env, "com/android/server/LedService",
                method_table, NELEM(method_table));
    }
};
修改 frameworks/base/services/core/jni/Android.bp,添加
"com_android_server_LedService.cpp",
執行 mmm frameworks/base/services 編譯 com_android_server_LedService.cpp 和 onload.cpp
2.2.3 創建 HAL 文件:led_hal.c 和 led_hal.h
在 hardware/libhardware/modules 目錄下新建一個目錄 test_led
在 hardware/libhardware/modules/test_led 目錄下創建 led_hal.c
#include < hardware/hardware.h >
#include < cutils/log.h >
#include < stdio.h >
#include < unistd.h >
#include < fcntl.h >
#include < errno.h >
#include < stdlib.h >
#include < sys/types.h >
#include < sys/stat.h >
#include < fcntl.h >
#include < sys/ioctl.h >
#include < utils/Log.h >
#include < hardware/led_hal.h >


//#define LOG_TAG "LED_HAL"


static int fd;


static int led_open(struct led_device_t* dev __unused)
{
    fd = open("/dev/myled", O_RDWR);
    ALOGI("led_open : %d", fd);
    if (fd >= 0)
        return 0;
    else
        return -1;
}


static int led_ctrl(struct led_device_t* dev __unused, int number, int status)
{
    int read_val,ret = 0;
    switch(number)
    {
        case 0:
            ret = ioctl(fd, 0, status);
           ALOGI("[pual] led_write : status = %d, ret = %d", status, ret);
            return ret;
    case 1:
        ioctl(fd,1,&read_val);
        ALOGI("[pual] led_read : read_val = %d", read_val);
        return read_val;
    default:
        return -1;
    }
}


static int led_close(struct hw_device_t* device __unused)
{
    close(fd);
    ALOGI("led_close : %d", fd);
    return 0;
}


static struct led_device_t myled_dev = {
    .common = {
        .tag   = HARDWARE_DEVICE_TAG,
        .close = led_close,
    },
    .led_open  = led_open,
    .led_ctrl  = led_ctrl,
};


static int led_device_open(const struct hw_module_t* module __unused, const char* id __unused,
        struct hw_device_t** device)
{
    //return by id
    *device = (hw_device_t*) &myled_dev;
    return 0;
}


static struct hw_module_methods_t led_module_methods = {
    .open = led_device_open,
};


struct hw_module_t HAL_MODULE_INFO_SYM = {
    .tag = HARDWARE_MODULE_TAG,
    .id = "led",
    .methods = &led_module_methods,
};
在目錄 hardware/libhardware/include/hardware 下創建 led_hal.h
#ifndef ANDROID_LED_INTERFACE_H
#define ANDROID_LED_INTERFACE_H
#include < stdint.h >
#include < sys/cdefs.h >
#include < sys/types.h >
#include < hardware/hardware.h >


__BEGIN_DECLS


struct led_device_t  {
    struct hw_device_t common;
    int (*led_open) (struct led_device_t* dev);
    int (*led_ctrl) (struct led_device_t* dev, int number, int status);
};

__END_DECLS

#endif
在 hardware/libhardware/modules/test_led 目錄下創建 Android.mk
LOCAL_PATH := $(call my-dir)


include $(CLEAR_VARS)


LOCAL_MODULE := led.default


LOCAL_MODULE_RELATIVE_PATH := hw
LOCAL_C_INCLUDES := hardware/libhardware
LOCAL_SRC_FILES := led_hal.c
LOCAL_SHARED_LIBRARIES := liblog
LOCAL_MODULE_TAGS := eng


include $(BUILD_SHARED_LIBRARY)
執行 mmm hardware/libhardware/modules/test_led 編譯 led_hal.c
編譯完成后會在 out/target/product/mek_8q/obj_arm/SHARED_LIBRARIES/led.default_intermediates 目錄下生成 so 文件 led.default.so
2.3 編寫 SystemServer
2.3.1 修改 SystemServer.java
SystemServer.java 主要做兩件事,一是加載 C 庫,二是使用 addService 將 LED 服務加入 service_manager 里面。
加載 C 庫這個是調用 onload.cpp,這個前面已經修改 onload.cpp,這里就不需要改了。
修改frameworks/base/services/java/com/android/server/SystemServer.java,添加:
traceBeginAndSlog("StartLedService");
    ServiceManager.addService("led", new LedService());
    traceEnd();
2.3.2 創建 LedManager.java
在目錄 frameworks/base/core/java/android/app 下,創建 LedManager.java
package android.app;


import android.content.Context;
import android.os.ILedService;
import android.os.RemoteException;


public class LedManager {
    ILedService mService;
    public LedManager(Context ctx,ILedService service){
        mService = service;
    }


    public void ledCtrl(int number, int status){
        try {
            mService.ledCtrl(number, status);
        } catch (RemoteException e) {
            e.printStackTrace();
        }
      }
}
2.3.3 修改 SystemServiceRegistry.java
在 SystemServiceRegistry.java 中注冊我們的 LedManager Service 服務。
修改 frameworks/base/core/java/android/app/ SystemServiceRegistry.java,在 static 塊中添加
registerService(Context.LED_SERVICE, LedManager.class,
              new CachedServiceFetcher() {
            @Override
            public LedManager createService(ContextImpl ctx) {
                IBinder b = ServiceManager.getService(Context.LED_SERVICE);
                ILedService service = ILedService.Stub.asInterface(b);
                return new LedManager(ctx, service);
            }});
這里面的 LED_SERVIC,需要在frameworks/base/core/java/android/content/Context.java 中聲明
@StringDef(suffix = { "_SERVICE" }, value = {
    LED_SERVICE,
    …
})
…
public static final String LED_SERVICE="led";
2.4 編寫 APP
2.4.1 創建 AIDL
AIDL(Android Interface Definition Language),即 Android 接口定義語言,顧名思義就是定義接口,提供給 APP 使用。
frameworks/base/core/java/android/os/ 目錄下新建:ILedService.aidl :
package android.os;


interface ILedService {
    int ledCtrl(int number, int status);
}
frameworks/base 目錄下修改:Android.bp,添加:
"core/java/android/os/ILedService.aidl",
在 android_build 目錄下執行編譯
mmm frameworks/base/
編譯完成后將會自動生成:
out/soong/.intermediates/frameworks/base/framework/android_common/gen/aidl/frameworks/base/core/java/android/os/ILedService.java。
2.4.2 創建 LedService.java
前面生成了 ILedService.java,需要實現 ILedService 接口的成員函數。
在 frameworks/base/services/core/java/com/android/server/ 路徑下,創建 LedService.java
/*frameworks/base/services/core/java/com/android/server/*/
package com.android.server;
import android.os.ILedService;
import android.util.Slog;


public class LedService extends ILedService.Stub {
private static final String TAG = "ILedService";

  //Call native c function to access hardware
  public int ledCtrl(int number, int status) throws android.os.RemoteException
{
    Slog.i(TAG, "[pual] enter ledCtrl.");
    return native_ledCtrl(number, status);
  }

  public LedService() {
    Slog.i(TAG, "[pual] enter native_ledOpen.");
    native_ledOpen();
  }

  //Function declaration
  public static native int native_ledCtrl(int number, int status);
  public static native int native_ledOpen();
  public static native void native_ledClose();
}
可以看到 LedService.java 繼承于 ILedService,并調用本地方法實現了成員函數。并在構造函數里調用 native_ledOpen()。
其 Android.mk 自動包含了所有 java 文件,不需要修改 Android.mk。
執行完以上步驟后就可以執行 make -j16 命令開始編譯
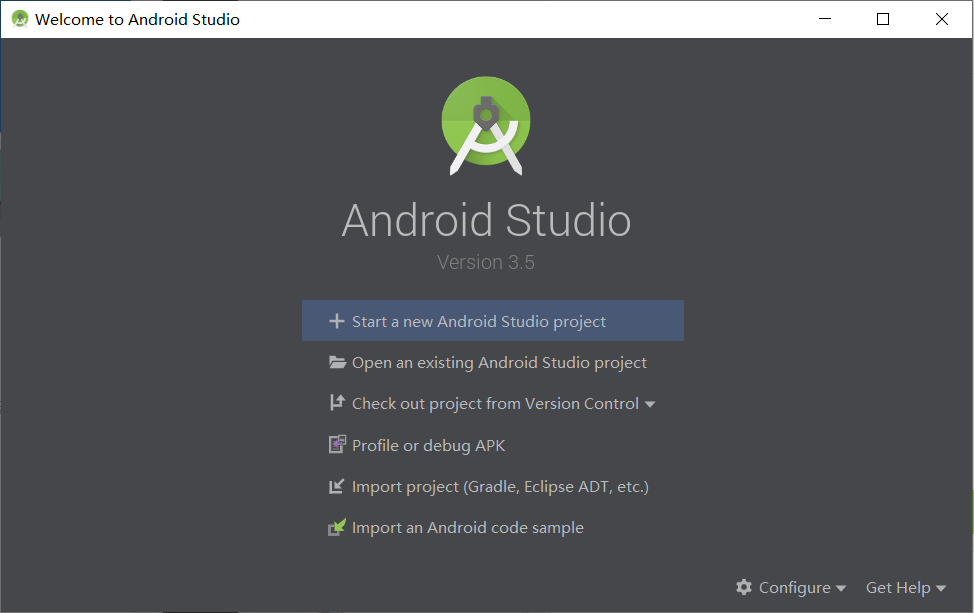
2.4.3 創建 APP 工程
① 打開 Android Studio,選擇 “Start a new Android Studio project” 創建一個新 APP 工程;
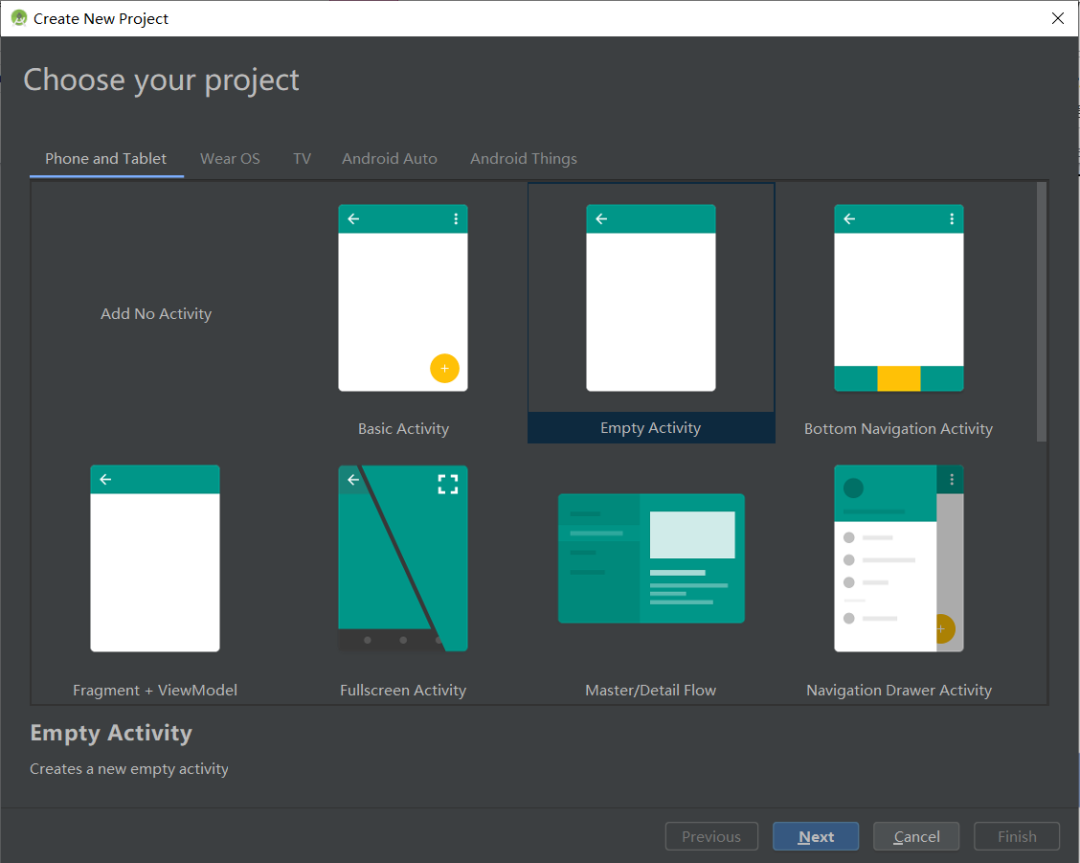
② 然后選擇 “Empty Activity” 空主界面,點擊下一步;
③ 最后設置 APP 信息、保存路徑、選擇語言、兼容API版本、勾選支持安裝 apps,點擊完成。
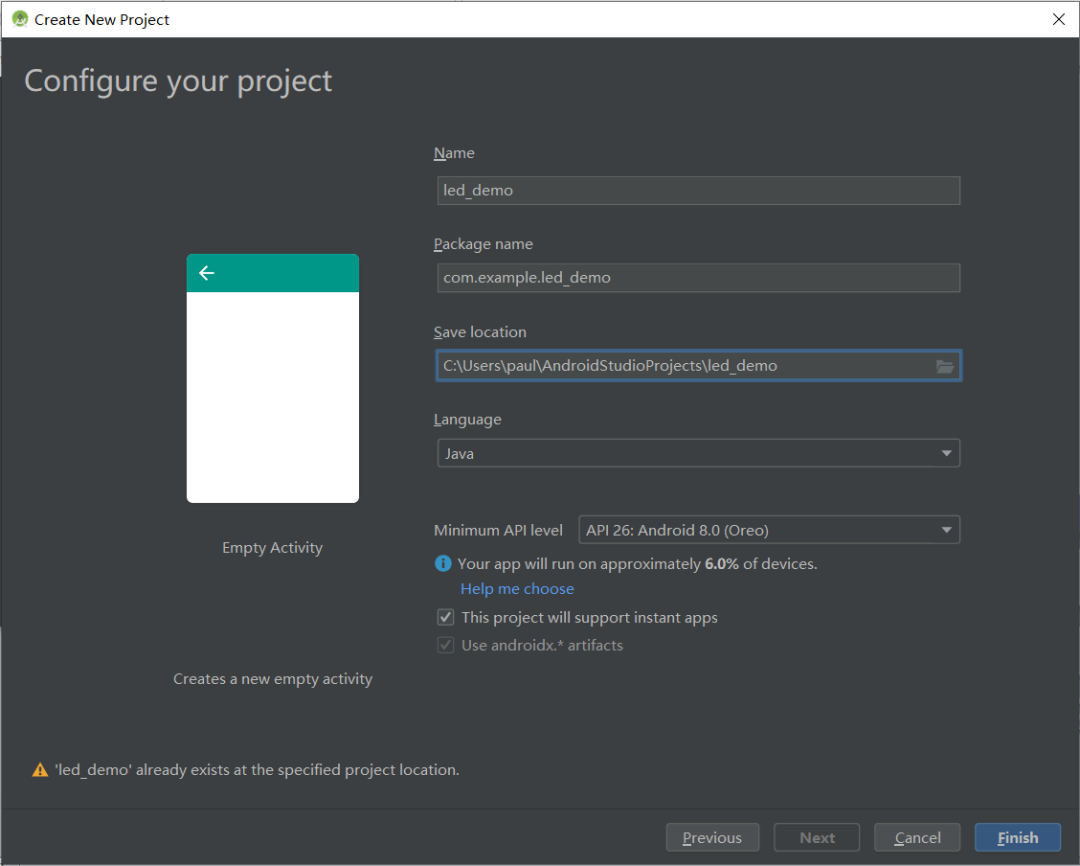
等待自動創建完成后,會自動生成工程文件,生成的工程文件中會包含MainActivity.java 和 activity_main.xml,appsrcmainreslayoutactivity_main.xml,界面控件布局文件,既可通過圖形界面設計控件,也可直接編輯 xml;
appsrcmainjavacomexampleled_demoMainActivity.java,實現控件各種具體功能,邏輯關系。
MainActivity.java
package com.example.led_demo;
import androidx.appcompat.app.AppCompatActivity;
import android.os.IBinder;
import android.os.RemoteException;
import android.os.Bundle;
import android.util.Log;
import android.widget.Button;
import android.view.View;
import android.os.ILedService;
import android.os.ServiceManager;
//import static android.os.ServiceManager.getService;


public class MainActivity extends AppCompatActivity {


    private boolean ledStatus = false;
    private int gpiostatus;
    private final String TAG="MainActivity";
    private Button button1,button2 = null;
    private ILedService iLedService = null;


    @Override
    protected void onCreate(Bundle savedInstanceState) {
        super.onCreate(savedInstanceState);
        setContentView(R.layout.activity_main);
        Log.i(TAG,"[pual] AppService onCreate");
        initView();
    }


    private void initView() {
        iLedService =ILedService.Stub.asInterface(ServiceManager.getService("led"));
        if(iLedService==null)
            Log.e(TAG,"iLedService = null");
        else
            Log.e(TAG,"iLedService not null");


        button1 = (Button) findViewById(R.id.BUTTON1);
        button1.setOnClickListener(new MyButtonListener1());


        button2 = (Button) findViewById(R.id.BUTTON2);
        button2.setOnClickListener(new MyButtonListener2());
    }


    class MyButtonListener1 implements View.OnClickListener {
        @Override
        public void onClick(View v) {
            ledStatus = !ledStatus;
            if (ledStatus) {
                button1.setText("LED OFF");
                try {
                        iLedService.ledCtrl(0, 0);
                } catch (RemoteException e) {
                    e.printStackTrace();
                }
            } else {
                button1.setText("LED  ON");
                try {
                        iLedService.ledCtrl(0, 1);
                } catch (RemoteException e) {
                    e.printStackTrace();
                }
            }
        }
    }


    class MyButtonListener2 implements View.OnClickListener {
        @Override
        public void onClick(View v) {
            try {
                gpiostatus = iLedService.ledCtrl(1, 0);
            } catch (RemoteException e) {
                e.printStackTrace();
            }
            if (gpiostatus == 1) {
                button2.setText("HIGH");
            } else {
                button2.setText("LOW");
                }
            }
        }
    }
activity_main.xml
< ?xml version="1.0" encoding="utf-8"? >
< androidx.constraintlayout.widget.ConstraintLayout xmlns:android="http://schemas.android.com/apk/res/android"
    xmlns:app="http://schemas.android.com/apk/res-auto"
    xmlns:tools="http://schemas.android.com/tools"
    android:layout_width="match_parent"
    android:layout_height="match_parent"
    tools:context=".MainActivity" >


    < LinearLayout
        android:layout_width="match_parent"
        android:layout_height="match_parent"
        android:orientation="vertical" >


        < TextView
            android:id="@+id/TEXT"
            android:layout_width="match_parent"
            android:layout_height="wrap_content"
            android:gravity="center"
            android:layout_marginTop="30dp"
            android:text="Android access hardware"
            android:textColor="#008577"
            android:textSize="25sp"
            android:textStyle="bold" / >


        < Button
            android:id="@+id/BUTTON1"
            android:layout_width="50pt"
            android:layout_height="wrap_content"
            android:layout_marginTop="30dp"
            android:layout_gravity="center"
            android:text="LED ON" / >


        < Button
            android:id="@+id/BUTTON2"
            android:layout_width="50pt"
            android:layout_height="wrap_content"
            android:layout_marginTop="30dp"
            android:layout_gravity="center"
            android:text="HIGH" / >


    < /LinearLayout >


< /androidx.constraintlayout.widget.ConstraintLayout >
由于這里會調用到我們前面定義好的 ledctrl 函數接口,但是我們還沒有把對應的庫導進來,需要執行如下操作:
將 out/target/common/obj/JAVA_LIBRARIES/framework_intermediates/classes.jar 放在 Windows 里。
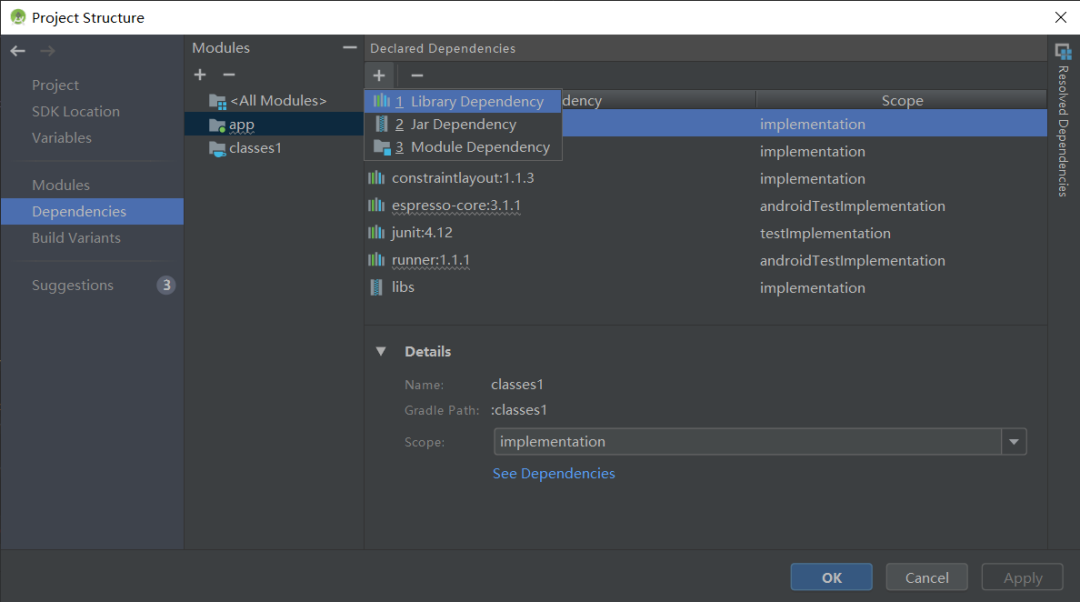
在 Android Studio 里,選擇 File->Project Structure,此時彈出配置界面,點擊 Modules 窗口左上角的 +,選擇 Import .JAR/.AAR Package,選擇剛才的 classes.jar。
切換到 Dependencies 選項卡,選擇 app,點擊 Declared Dependencies 窗口左上角的 + 號,選擇 3 Module dependency,在彈出的界面選擇剛才添加的 classes,最后點擊 OK。
以上操作后,會在 APP 工程根目錄下生成 classes 文件夾,里面就包含了 classes.jar。
完成后可以點擊 Build -> Build Bundle(s) / APK(s) -> Build APK(s) 開始編譯

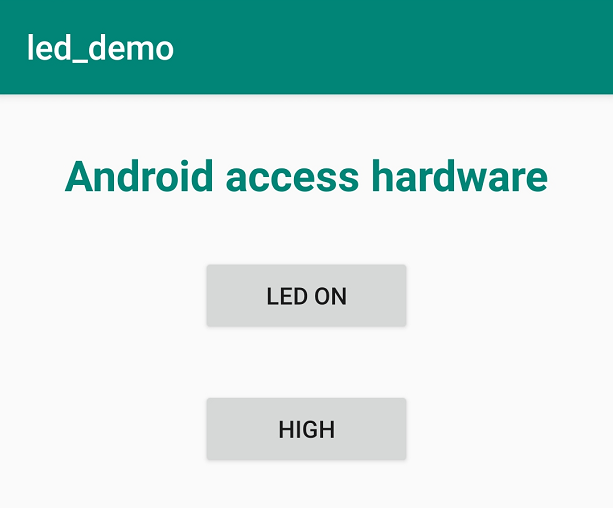
2.4.4 APK 安裝
上面編譯生成的 APK 名稱為 :app-debug.apk,我們需要連接好開發板的 USB TypeC 接口,在 Windows 終端輸入如下命令開始安裝:
adb install app-debug.apk
安裝完成后,打開 APK 即可看到如下界面:
三、Sepolicy 權限配置
3.1 denied error
在完成各層代碼添加后,還需要添加 Sepolicy 權限,否則系統在啟動的時候回出現類似如下報錯
avc: denied { find } for service=led pid=4363 uid=10067 scontext=u:r:untrusted_app:s0:c67,c256,c512,c768 tcontext=u:object_r:default_android_service:s0 tclass=service_manager permissive=0


avc: denied { module_load } for pid=4566 comm="insmod" path="/data/pual/myled.ko" dev="mmcblk0p12" ino=221 scontext=u:r:su:s0 tcontext=u:object_r:system_data_file:s0 tclass=system permissive=1
我們需要在 device/fsl/imx8q/sepolicy/system_server.te 中添加:
allow system_server default_android_service:service_manager { add };
allow untrusted_app default_android_service:service_manager { find };
allow su system_data_file:system { module_load };
添加完后編譯,出現了如下報錯:
libsepol.report_failure: neverallow on line 1314 of system/sepolicy/public/domain.te (or line 10945 of policy.conf) violated by allow su system_data_file:system { module_load };
修改以下目錄中的 domain.te,
system/sepolicy/public/domain.te
system/sepolicy/prebuilts/api/28.0/public/domain.te
將 1314 行代碼注釋如下:
#neverallow * ~{ system_file vendor_file rootfs }:system module_load;
3.2 open error
雖然前面我們已經將 myled 添加到系統啟動的進程中,并且也可以在 /dev/ 目錄下查找到了我們的 myled 設備,但是查看啟動 logcat 仍然出現 open error 的現象。出現這樣現象的原因主要是跟 system server 沒有權限去操作我們的 myled 設備有關,解決權限的問題需要分兩步走:
- myled 設備的權限
打開目錄文件 android_build/system/core/rootdir/ueventd.rc ,添加如下內容:
/dev/myled 0666 root root
- system server 訪問 myled 設備的權限
這里主要涉及的是 Android 的 Sepolicy 安全機制,需要修改 android_build/device/fsl/imx8q/sepolicy 目錄下的三個文件:file_contexts、device.te、system_server.te
① file_contexts
仿照這個文件里面的寫法,添加一個自定義的設備名字,myled_device 為自定義,其他內容保持一致:
/dev/myled u:object_r:myled_device:s0
② device.te
仿照這個文件里的寫法,將剛剛上一步寫的 myled_device 聲明為 dev_type:
type myled_device, dev_type;
③ system_server.te
加入允許 system_server 對 /dev/myled 的讀寫權限:
allow system_server myled_device:chr_file rw_file_perms;
chr_file表示字符設備文件,如果是普通文件用file,目錄請用dir
rw_file_perms代表讀寫權限
完成以上步驟后,執行 make -j16 開始編譯
編譯完成后會在 out/target/product/mek_8q 目錄下生成鏡像文件
四、注意事項
① 如果把 LED_SERVICE 添加到 system server 成功的話,系統啟動完成可以通過 adb shell service list 可以看到 led service,如果沒有則說明沒有添加成功。
60      window: [android.view.IWindowManager]
61      alarm: [android.app.IAlarmManager]
62      consumer_ir: [android.hardware.IConsumerIrService]
63      led: [android.os.ILedService]
64      vibrator: [android.os.IVibratorService]
65      content: [android.content.IContentService]
② 如果 so 文件沒有正確添加(HAL 文件沒有編譯),會出現如下 log
--------- beginning of crash
09-04 08:42:57.134 3404 3792 F libc : Fatal signal 11 (SIGSEGV), code 1 (SEGV_MAPERR), fault addr 0x80 in tid 3792 (Binder:3404_7), pid 3404 (system_server)
09-04 08:42:57.247 4652 4652 I crash_dump64: obtaining output fd from tombstoned, type: kDebuggerdTombstone
09-04 08:42:57.248 3299 3299 I /system/bin/tombstoned: received crash request for pid 3792
09-04 08:42:57.249 4652 4652 I crash_dump64: performing dump of process 3404 (target tid = 3792)
09-04 08:42:57.265 4652 4652 F DEBUG : *** *** *** *** *** *** *** *** *** *** *** *** *** *** *** ***
09-04 08:42:57.265 4652 4652 F DEBUG : Build fingerprint: 'Android/mek_8q/mek_8q:9/2.0.0-ga-rc4/pual09030609:eng/dev-keys'
09-04 08:42:57.265 4652 4652 F DEBUG : Revision: '0'
09-04 08:42:57.265 4652 4652 F DEBUG : ABI: 'arm64'
09-04 08:42:57.265 4652 4652 F DEBUG : pid: 3404, tid: 3792, name: Binder:3404_7  >> > system_server    09-04 08:42:57.265 4652 4652 F DEBUG : signal 11 (SIGSEGV), code 1 (SEGV_MAPERR), fault addr 0x80
09-04 08:42:57.265 4652 4652 F DEBUG : Cause: null pointer dereference
09-04 08:42:57.265 4652 4652 F DEBUG : x0 0000000000000000 x1 0000000000000001 x2 0000000000000001 x3 0000000000000003
09-04 08:42:57.265 4652 4652 F DEBUG : x4 0000000000000067 x5 0080000000000000 x6 0aff646268757164 x7 7f7f7f7f7f7f7f7f
09-04 08:42:57.265 4652 4652 F DEBUG : x8 0000f12def02b000 x9 601f5be1668242d3 x10 0000f12de3a7f580 x11 0000000000000014
09-04 08:42:57.265 4652 4652 F DEBUG : x12 0000f12de3a7f6b8 x13 ffffffffffffffff x14 ffffffffff000000 x15 ffffffffffffffff
09-04 08:42:57.265 4652 4652 F DEBUG : x16 0000f12e0a4fbcc0 x17 0000f12e0cb317e0 x18 0000f12de3a7ee7a x19 0000000000000001
09-04 08:42:57.265 4652 4652 F DEBUG : x20 0000000000000001 x21 0000f12e09dc6c00 x22 0000f12de3a7fdc0 x23 0000000072e471d2
09-04 08:42:57.265 4652 4652 F DEBUG : x24 0000000000000008 x25 0000f12de3a81588 x26 0000f12e09dc6ca0 x27 0000000000000002
09-04 08:42:57.265 4652 4652 F DEBUG : x28 0000000000000002 x29 0000f12de3a7fbe8
09-04 08:42:57.265 4652 4652 F DEBUG : sp 0000f12de3a7faf0 lr 000000007195e9a4 pc 0000f12deeff5e30
檢查設備中 /system/lib/led.default.so 文件是否存在,如果不存在則需要在主機端中將 out/target/product/mek_8q/obj/SHARED_LIBRARIES/led.default_intermediates/led.default.so 拷貝到 out/target/product/mek_8q/system/lib 目錄中,再重新編譯燒錄。如果 led.default_intermediates 目錄中也不存在 so 文件,則還要重新執行 mmm hardware/libhardware/modules/test_led,來生成 so 文件。
理論上我們也可以將 so 文件直接 push 到開發板的 /system/lib 目錄中,但是由于權限問題,會出現 Read-only file system 的錯誤提示,所以只能通過重新編譯生成系統文件來實現。
-
Android
+關注
關注
12文章
3971瀏覽量
129970 -
Linux
+關注
關注
87文章
11499瀏覽量
213335 -
硬件
+關注
關注
11文章
3473瀏覽量
67366 -
代碼
+關注
關注
30文章
4895瀏覽量
70493
發布評論請先 登錄
Android App環境檢測分析
DMK如何進行硬件調試???
Android手機操控ARM開發板外圍硬件設備【創科之龍】原創
Android程序中進行串口訪問
求助apk要怎么使用基于rk3288 Android的硬件訪問框架呢
Android手機的輕量級訪問控制

Java代碼加密支持Android App Bundle動態化框架


 工商網監
工商網監
評論