 冰點測試!樹莓派CM5如何避免“熱”戰?
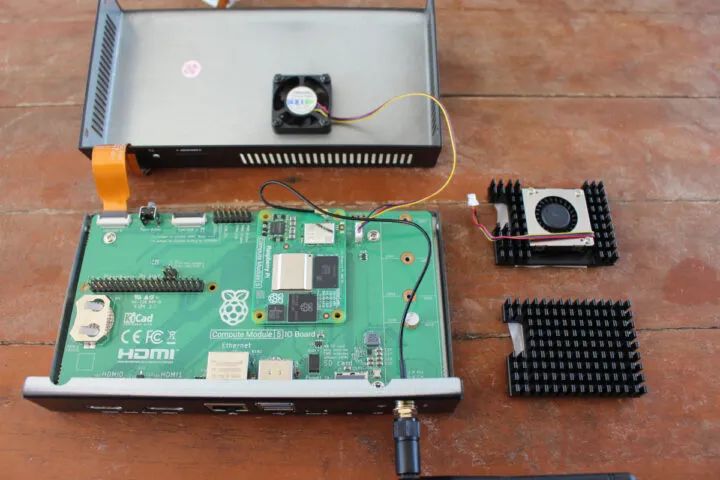
在Raspberry Pi CM5發布的那天,我發表了一篇關于Raspberry Pi CM5開發套件的迷你評測,展示了如何組裝套件并啟動RaspberryPi操作系統,還運行了sbc-bench基準測試來評估其性能。遺憾的是,在測試過程中,Broadcom BCM2712 CPU出現了降頻,這意味著當CM5 IO板置于IO盒內且處理器模塊5僅靠風扇散熱時,散熱效果并不理想。因此,今天我將使用其他散熱方案重復相同的測試,即官方的Raspberry Pi CM5散熱器(僅散熱片)和上海晶珩的CM5主動散熱器,后者類似于RaspberryPi5的主動散熱器,但專為CPU模塊設計。
但在那之前,我要做一些“清理工作”。自從上次我從NVMe SSD啟動Raspberry Pi 操作系統以來,我發現攝像頭無法正常工作。因此,我將報告我在eMMC閃存上安裝Raspberry Pi 操作系統并使攝像頭正常工作的經歷,這兩件事都進行得不太順利。
將Raspberry Pi操作系統安裝到CM5的eMMC閃存
理論上,將Raspberry Pi操作系統安裝到CM5模塊的eMMC閃存上應該很容易,因為已有相關文檔說明。
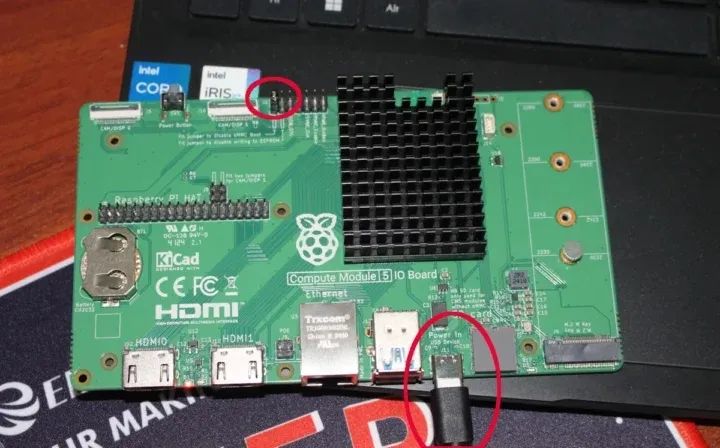
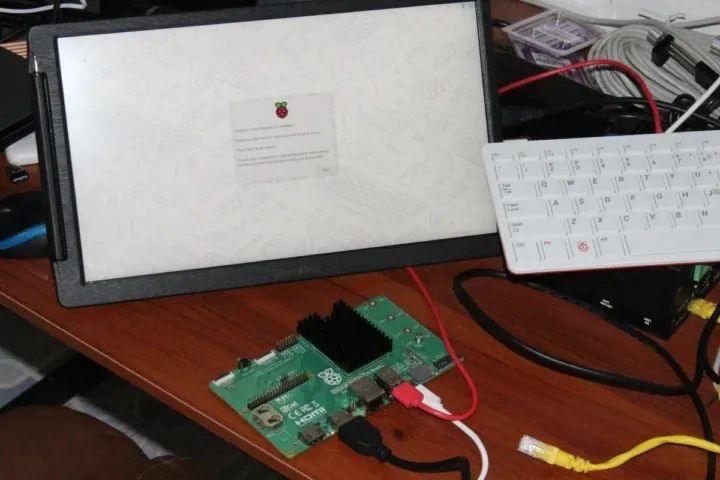
我們需要在J6接頭的左側插入一個跳線,標記為“安裝跳線以禁用eMMC啟動”,并按照下圖所示在IO板和主機之間連接一根USB-C電纜。
然后,我們需要安裝并運行rpiboot,以便eMMC閃存作為主機上的USB存儲設備出現。
sudo apt install rpibootsudo rpiboot
該實用程序一直卡在等待主板的界面……而且我無法在系統中看到任何表明有新USB設備的信息。
RPIBOOT: build-date Jan 31 2022 version 0~20220315+git6fa2ec0+nowin-0ubuntu1Waiting for BCM2835/6/7/2711...
經過幾次嘗試后,我認為可能是Ubuntu 22.04存儲庫中的rpiboot版本太舊了。因此,我將其刪除,并從源代碼構建了該實用程序:
sudo apt remove rpibootsudo apt install git libusb-1.0-0-dev pkg-config build-essentialgit clone --recurse-submodules --shallow-submodules --depth=1 https://github.com/raspberrypi/usbbootcd usbbootmakesudo make install
該命令的輸出現在看起來好多了……
jaufranc@CNX-LAPTOP-5:~/usbboot$ sudo rpibootRPIBOOT: build-date Dec 20 2024 version 20240422~085300 ef721cdaIf the device fails to connect then please see https://rpltd.co/rpibootfordebuggingtips.Waiting for BCM2835/6/7/2711/2712...2712: Directory not specified using default /usr/share/rpiboot/mass-storage-gadget64/Sending bootcode.binSuccessful read 4 bytesWaiting for BCM2835/6/7/2711/2712...Second stage boot serverFile read: mcb.binFile read: memsys00.binFile read: memsys01.binFile read: memsys02.binFile read: memsys03.binFile read: bootmainLoading: /usr/share/rpiboot/mass-storage-gadget64//config.txtFile read: config.txtLoading: /usr/share/rpiboot/mass-storage-gadget64//boot.imgFile read: boot.imgSecond stage boot server done
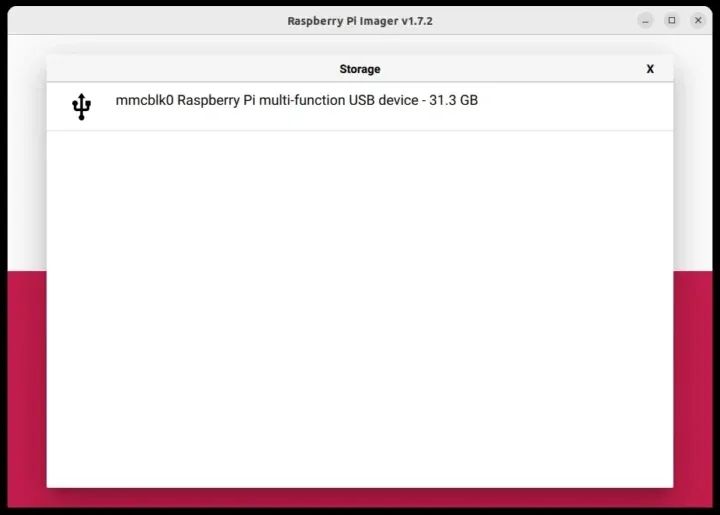
于是我啟動了Raspberry Pi鏡像,選擇了Raspberry Pi OS的64位版本,以及名為“Raspberry Pi多功能USB設備”的存儲設備,其容量為31.3GB,這與我模塊上的32GBeMMC閃存相對應。
我可以像將鏡像寫入microSD卡那樣,將鏡像寫入Raspberry Pi CM5。
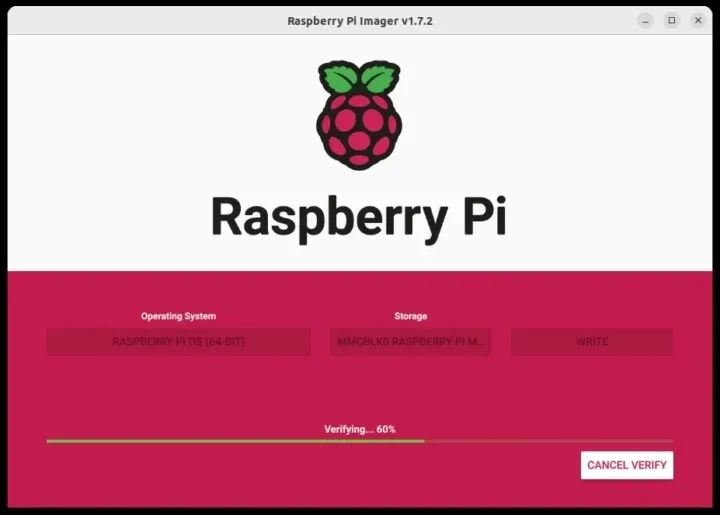
一旦完成,操作系統就會從eMMC閃存中正常啟動。
我們還可以使用lsblk命令來檢查eMMC閃存的分區:
pi@raspberrypi:~ $ lsblkNAME MAJ:MIN RM SIZE RO TYPE MOUNTPOINTSmmcblk0 179:0 0 29.1G 0 disk├─mmcblk0p1 179:1 0 512M 0 part /boot/firmware└─mmcblk0p2 179:2 0 28.6G 0 part /mmcblk0boot0 179:32 0 4M 1 diskmmcblk0boot1 179:64 0 4M 1 disk
Raspberry Pi CM5 攝像頭支持
如引言所述,當將Raspberry Pi 攝像頭模塊3連接到CAM/DISP 0連接器時,它并不能即插即用。
pi@raspberrypi:~ $ rpicam-hello --listNo cameras available!
雖然有關于如何在CAM/DISP 0和CAM/DISP 1上啟用攝像頭的文檔,但文檔有些不完整,且部分內容存在錯誤。
我按照指示編輯了/boot/firmware/config.txt文件,將camera_auto_detect行注釋掉,并為RaspberryPiCameraModule3添加了overlay:
# Automatically load overlays for detected cameras#camera_auto_detect=1dtoverlay=imx708,cam0
重啟后,問題解決了。
pi@raspberrypi:~ $ rpicam-hello --listAvailable cameras-----------------0 : imx708 [4608x2592 10-bit RGGB] (/base/axi/pcie@120000/rp1/i2c@88000/imx708@1a)Modes: 'SRGGB10_CSI2P' : 1536x864 [120.13 fps - (768, 432)/3072x1728 crop]2304x1296 [56.03 fps - (0, 0)/4608x2592 crop]4608x2592 [14.35 fps - (0, 0)/4608x2592 crop]
這很簡單,沒有遇到任何問題。
使用第二個相機的方法類似,但CAM/DISP 1接口要求我們在J6上添加兩個跳線。
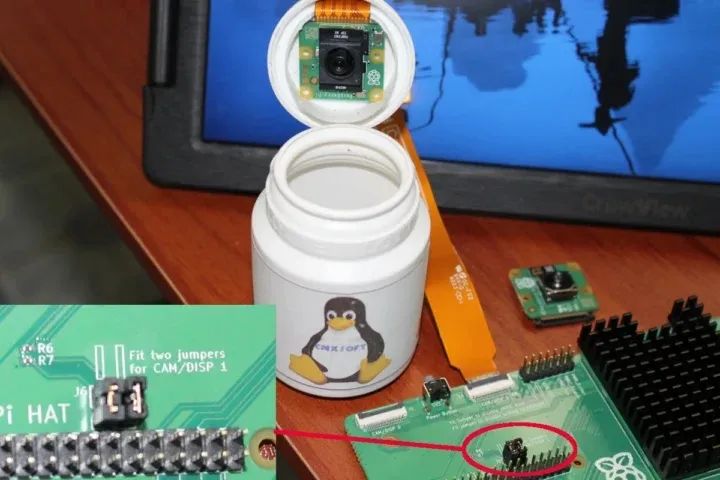
我決定使用Raspberry Pi AI相機進行這次測試。我只有一根Raspberry Pi Zero相機線,因此無法同時測試兩個相機。AI相機在計算模塊文檔中沒有列出,但我們在GitHub上可以找到所需的overlay:
# Automatically load overlays for detected cameras#camera_auto_detect=1dtoverlay=imx708,cam0dtoverlay=imx500-pi5,cam1
我還安裝了imx500包以防萬一,并重啟了系統:
sudo apt install imx500-allsudo reboot
但相機沒有被檢測到,所以我嘗試將Raspberry Pi Camera Module 3連接到CAM/DISP 1,并將config.txt文件更改如下:
# Automatically load overlays for detected cameras#camera_auto_detect=1#dtoverlay=imx708,cam0dtoverlay=imx708,cam1
與之前一樣:
pi@raspberrypi:~ $ rpicam-hello --listNo cameras available!
最后,我只使用imx500-pi5設備樹overlay在CAM/DISP 0上測試了Raspberry Pi AI相機,并且可以檢測到它。
pi@raspberrypi:~ $ rpicam-hello --listAvailable cameras-----------------0 : imx500 [4056x3040 10-bit RGGB] (/base/axi/pcie@120000/rp1/i2c@88000/imx500@1a)Modes: 'SRGGB10_CSI2P' : 2028x1520 [30.02 fps - (0, 0)/4056x3040 crop]4056x3040 [10.00 fps - (0, 0)/4056x3040 crop]
所以我無法使用CAM/DISP 1連接器。要么是我遺漏了什么,要么是這個第二個連接器只有在CM5 IO板上連接了兩個相機時才會工作,單個相機連接時不會工作。所以,以防萬一,我將Raspberry Pi Touch Display 2連接到CAM/DISP 0,將AI相機連接到CAM/DISP 1,并進行了以下配置:
# Automatically load overlays for detected cameras#camera_auto_detect=1#dtoverlay=imx708,cam0dtoverlay=vc4-kms-dsi-ili9881-7inch,dsi0dtoverlay=imx500-pi5,cam1
# Automatically load overlays for detected DSI displays#display_auto_detect=1
顯示器工作正常,但AI相機在第二個連接器上仍然無法工作,盡管imx500傳感器在內核日志中顯示…
pi@raspberrypi:~ $ dmesg | grep csi[ 0.958143] platform 1f00128000.csi: Fixed dependency cycle(s) with /axi/pcie@120000/rp1/i2c@88000/imx500@1a[ 0.964771] platform 1f00128000.csi: bcm2712_iommu_probe_device: MMU 1000005280.iommu[ 0.964774] platform 1f00128000.csi: bcm2712_iommu_device_group: MMU 1000005280.iommu[ 0.964778] platform 1f00128000.csi: Adding to iommu group 2[ 0.964795] platform 1f00128000.csi: bcm2712_iommu_attach_dev: MMU 1000005280.iommu[ 2.484827] rp1-cfe 1f00128000.csi: bcm2712_iommu_of_xlate: MMU 1000005280.iommu[ 2.485163] rp1-cfe 1f00128000.csi: DW dphy Host HW v1.20[ 2.485175] rp1-cfe 1f00128000.csi: PiSP FE HW v0.1[ 2.487088] rp1-cfe 1f00128000.csi: found subdevice /axi/pcie@120000/rp1/i2c@88000/imx500@1api@raspberrypi:~ $ rpicam-hello --listNo cameras available!
我現在先放棄了……
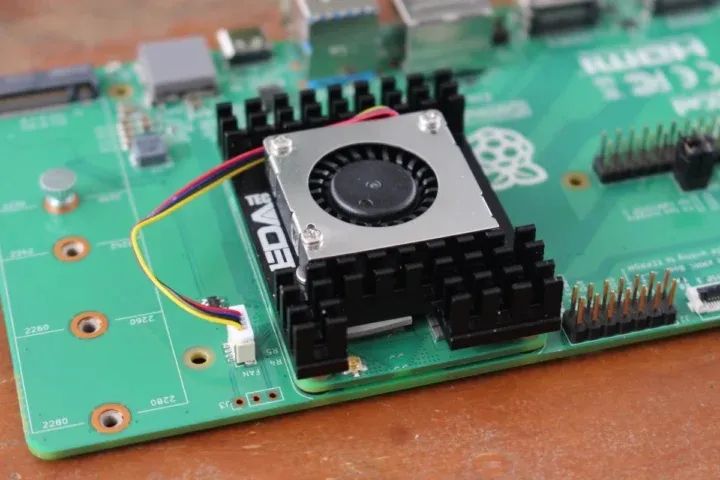
Raspberry Pi散熱器和CM5主動散熱器安裝
讓我們回到正題,為Raspberry Pi CM5安裝散熱器。
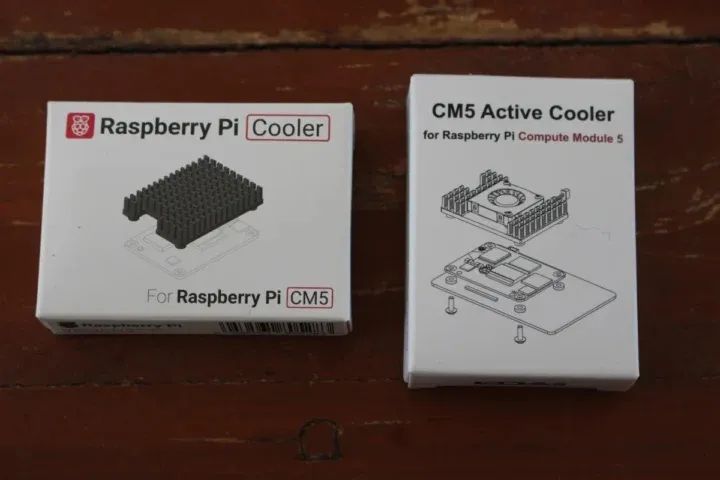
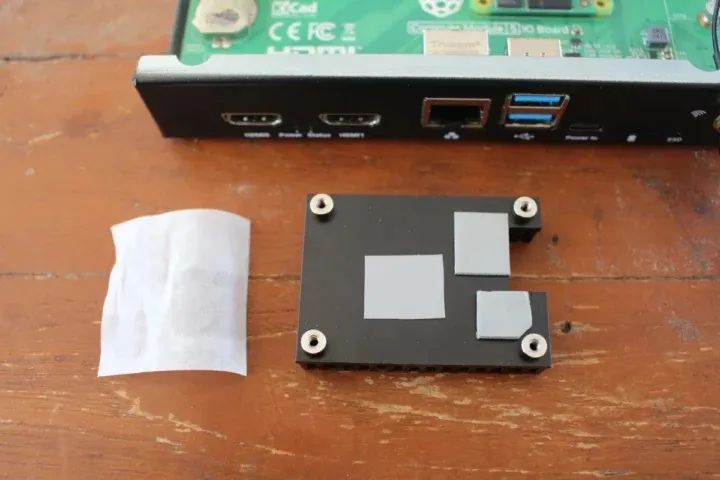
無論是官方的Raspberry Pi散熱器還是上海晶珩的CM5主動散熱器,它們都采用了類似的包裝,并且基本配備了相同的附件,即一些螺絲、厚墊片和三個貼合在散熱器底部的導熱墊。
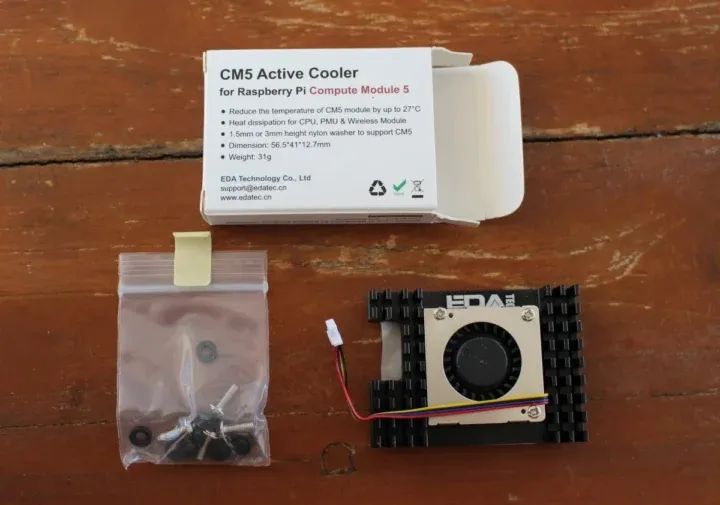
上海晶珩散熱器只是額外增加了一個散熱風扇。讓我們先從官方散熱器開始。首先,我需要撕掉保護導熱墊的薄膜……
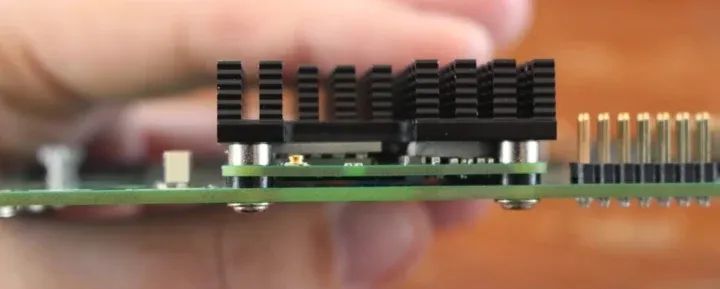
然后再將其放置在CM5模塊上,并確保其方向不會干擾CPU模塊上的內置天線。
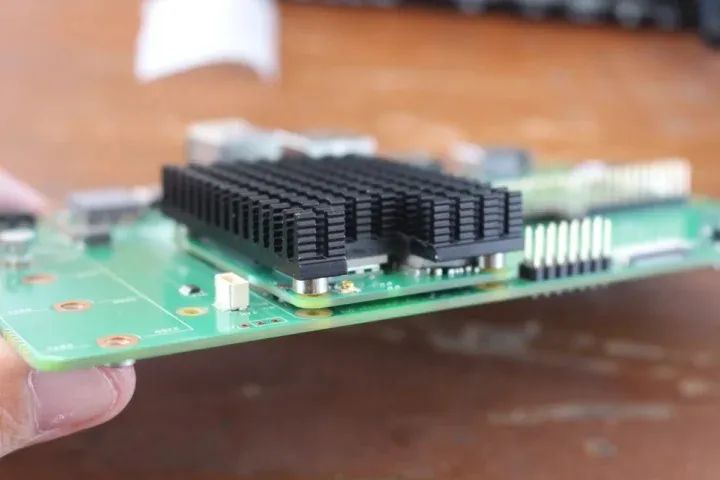
接著,我在IO板和CM5模塊之間放置了四個墊片,并用四個螺絲將所有東西固定好。
安裝上海晶珩主動散熱器的步驟完全相同,只不過我們還需要連接風扇的電線。
使用 Raspberry Pi CM5 的散熱器進行基準測試和CPU溫度監測
讓我們在無風扇配置下,使用Pi散熱器,同時運行sbc-bench.sh基準測試腳本,并用rpi-monitor監測CPU溫度。
pi@raspberrypi:~ $ sudo ./sbc-bench.sh -rStarting to examine hardware/software for review purposes...
sbc-bench v0.9.68
Installing needed tools: distro packages already installed, mhz, cpufetch,cpuminer.Done.Checking cpufreq OPP. Done.Executing tinymembench. Done.Executing RAM latency tester. Done.Executing OpenSSL benchmark. Done.Executing 7-zip benchmark. Done.Throttling test: heating up the device, 5 more minutes to wait. Done.Checking cpufreq OPP again. Done (11 minutes elapsed).
Results validation:
* Measured clockspeed not lower than advertised max CPU clockspeed* No swapping* Background activity (%system) OK* No throttling
Full results uploaded to https://0x0.st/XCd-.txt
# Raspberry Pi Compute Module 5 Rev 1.0
Tested with sbc-bench v0.9.68 on Sat, 21 Dec 2024 1420 +0700. Fullinfo:[https://0x0.st/XCd-.txt](http://0x0.st/XCd-.txt)
### General information:
Information courtesy of cpufetch:
SoC: Broadcom BCM2712Technology: 16nmMicroarchitecture: Cortex-A76Max Frequency: 2.400 GHzCores: 4 coresFeatures: NEON,SHA1,SHA2,AES,CRC32
BCM2712, Kernel: aarch64, Userland: arm64
CPU sysfs topology (clusters, cpufreq members, clockspeeds)cpufreq min maxCPU cluster policy speed speed core type0 0 0 1500 2400 Cortex-A76 / r4p11 0 0 1500 2400 Cortex-A76 / r4p12 0 0 1500 2400 Cortex-A76 / r4p13 0 0 1500 2400 Cortex-A76 / r4p1
4041 KB available RAM
### Governors/policies (performance vs. idle consumption):
Original governor settings:
cpufreq-policy0: performance / 2400 MHz (conservative ondemand userspacepowersaveperformanceschedutil/15001600 1700 1800 1900 2000 2100 22002300 2400)
Tuned governor settings:
cpufreq-policy0: performance / 2400 MHz
Status of performance related policies found below /sys:
/sys/module/pcie_aspm/parameters/policy: default [performance] powersavepowersupersave
### Clockspeeds (idle vs. heated up):
Before at 52.9°C:
cpu0 (Cortex-A76): OPP: 2400, ThreadX: 2400, Measured: 2399
After at 79.3°C:
cpu0 (Cortex-A76): OPP: 2400, ThreadX: 2400, Measured: 2399
### Performance baseline
* memcpy: 5607.4 MB/s, memchr: 14150.3 MB/s, memset: 12426.6 MB/s* 16M latency: 117.8 118.8 118.3 118.0 119.6 119.6 141.0 135.3* 128M latency: 133.8 132.8 134.0 144.3 133.9 132.6 133.3 134.4* 7-zip MIPS (3 consecutive runs): 11145, 10906, 11012 (11020 avg), single-threaded:3203* `aes-256-cbc 540078.51k 1003701.74k 1256093.44k 1332879.02k 1365472.60k1367829.16k`* `aes-256-cbc 540615.20k 1003659.80k 1255990.53k 1332837.72k 1365235.03k1368178.69k`
### PCIe and storage devices:
* Raspberry RP1 PCIe 2.0 South Bridge: Speed 5GT/s, Width x4, driver inuse:rp1,* 29.1GB "Samsung BJTD4R" HS400 Enhanced strobe eMMC 5.1 card as /dev/mmcblk0:date07/2024,manfid/oemid:0x000015/0x0100,hw/fwrev: 0x0/0x0300000000000000
### Swap configuration:
* /var/swap on /dev/mmcblk0p2: 512.0M (0K used) on MMC storage
### Software versions:
* Debian GNU/Linux 12 (bookworm)* Build scripts: http://archive.raspberrypi.com/debian/ bookworm main* Compiler: /usr/bin/gcc (Debian 12.2.0-14) 12.2.0 / aarch64-linux-gnu* OpenSSL 3.0.15, built on 3 Sep 2024 (Library: OpenSSL 3.0.15 3 Sep 2024)* ThreadX: 26826259 / 2024/09/23 1456
### Kernel info:
* `/proc/cmdline: reboot=w coherent_pool=1M 8250.nr_uarts=1 pci=pcie_bus_safecgroup_disable=memorynuma_policy=interleavesmsc95xx.macaddr=2C678D:E8vc_mem.mem_base=0x3fc00000vc_mem.mem_size=0x40000000console=ttyAMA10,115200console=tty1root=PARTUUID=4825a0d7-02rootfstype=ext4fsck.repair=yesrootwaitquietsplashplymouth.ignore-serial-consolescfg80211.ieee80211_regdom=TH`* Vulnerability Spec store bypass: Mitigation; Speculative Store Bypassdisabledviaprctl* Vulnerability Spectre v1: Mitigation; __user pointer sanitization* Vulnerability Spectre v2: Mitigation; CSV2, BHB* Kernel 6.6.62+rpt-rpi-2712 / CONFIG_HZ=250
All known settings adjusted for performance. Device now ready for benchmarking.Once finished stop with [ctrl]-[c] to get info about throttling, frequencycapand too high background activity all potentially invalidating benchmarkscores.All changes with storage and PCIe devices as well as suspicious dmesgcontentswill be reported too.
Time fake/real load %cpu %sys %usr %nice %io %irq Temp VCore PMIC DC(V)1421: 2400/2400MHz 3.51 2% 0% 2% 0% 0% 0% 73.8°C 0.8945V 2.9W 5.13V^C
Cleaning up. Done.Checking cpufreq OPP again. Done.
Clockspeeds now at 72.7°C:
cpu0 (Cortex-A76): OPP: 2400, ThreadX: 2400, Measured: 2399
Results validation:
* Measured clockspeed not lower than advertised max CPU clockspeed* No swapping* Background activity (%system) OK* No throttling
測試期間的環境溫度約為26°C,未發現降頻現象。然而,在使用CPUminer進行運算時,CPU的負載溫度仍然相當高,達到了79.3°C。而在使用7-zip進行多核壓縮時,CPU溫度從未超過68.8°C。
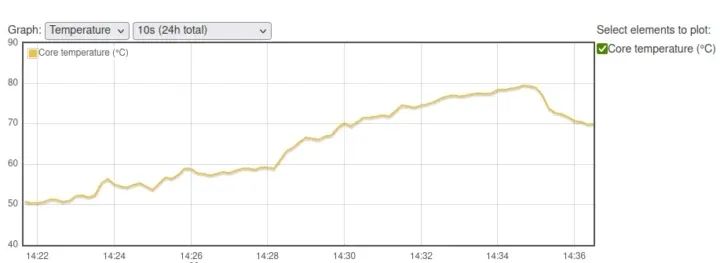
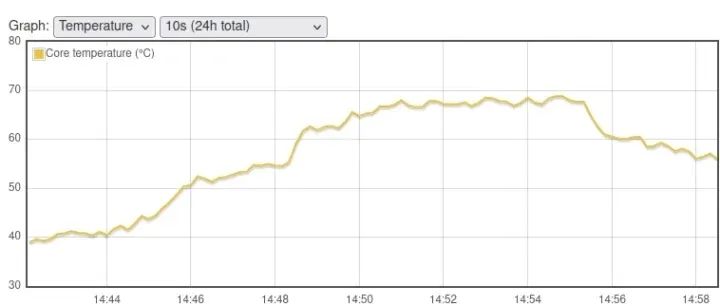
看看它與帶有內置風扇但沒有散熱片的Raspberry Pi CM5 IO外殼(環境溫度:32°C)相比如何。
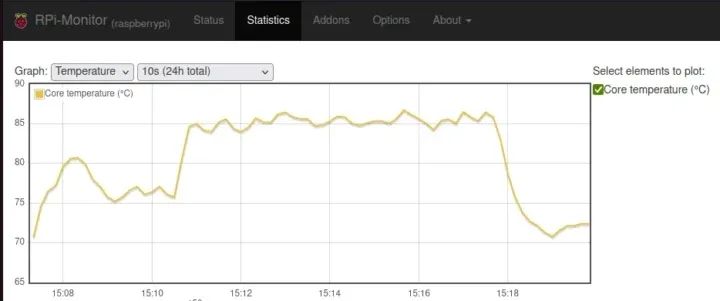
對于大多數人來說,Raspberry Pi CM5散熱器應該是一個合適的冷卻系統,但如果你打算在高溫(35°C以上)環境下或熱量積聚的機箱內運行設備,它可能就不夠了。
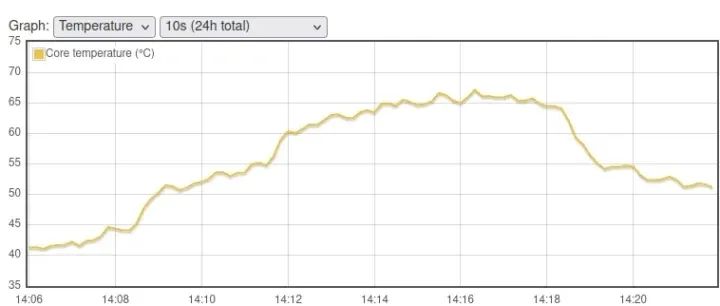
順便提一下,我讓CM5套件運行了一整夜,下面的圖表顯示了環境溫度對CPU空閑溫度的影響。
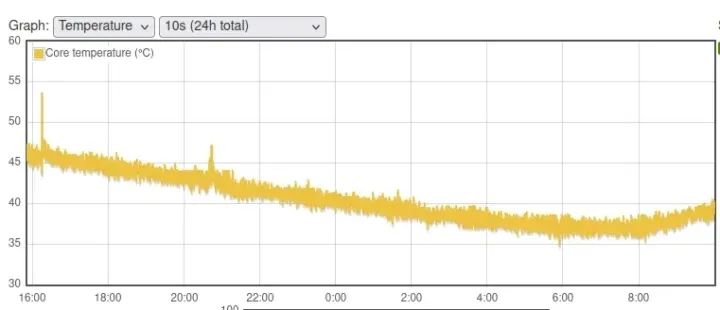
從16:00時的46°C降到6:00時的38°C,同時室內溫度從27°C下降到19°C(根據天氣預報估計)。
使用上海晶珩 CM5主動散熱器 進行基準測試和CPU溫度監測
現在,讓我們使用主動散熱器來運行基準測試:
pi@raspberrypi:~ $ sudo ./sbc-bench.sh -rStarting to examine hardware/software for review purposes...
sbc-bench v0.9.68
Installing needed tools: distro packages already installed. Done.Checking cpufreq OPP. Done.Executing tinymembench. Done.Executing RAM latency tester. Done.Executing OpenSSL benchmark. Done.Executing 7-zip benchmark. Done.Throttling test: heating up the device, 5 more minutes to wait. Done.Checking cpufreq OPP again. Done (11 minutes elapsed).
Results validation:
* Measured clockspeed not lower than advertised max CPU clockspeed* No swapping* Background activity (%system) OK* No throttling
Full results uploaded to https://0x0.st/8rH_.txt
# Raspberry Pi Compute Module 5 Rev 1.0
Tested with sbc-bench v0.9.68 on Sun, 22 Dec 2024 1435 +0700. Fullinfo:[https://0x0.st/8rH_.txt](http://0x0.st/8rH_.txt)
### General information:
Information courtesy of cpufetch:
SoC: Broadcom BCM2712Technology: 16nmMicroarchitecture: Cortex-A76Max Frequency: 2.400 GHzCores: 4 coresFeatures: NEON,SHA1,SHA2,AES,CRC32
BCM2712, Kernel: aarch64, Userland: arm64
CPU sysfs topology (clusters, cpufreq members, clockspeeds)cpufreq min maxCPU cluster policy speed speed core type0 0 0 1500 2400 Cortex-A76 / r4p11 0 0 1500 2400 Cortex-A76 / r4p12 0 0 1500 2400 Cortex-A76 / r4p13 0 0 1500 2400 Cortex-A76 / r4p1
4040 KB available RAM
### Governors/policies (performance vs. idle consumption):
Original governor settings:
cpufreq-policy0: ondemand / 2400 MHz (conservative ondemand userspacepowersaveperformanceschedutil/15001600 1700 1800 1900 2000 2100 22002300 2400)
Tuned governor settings:
cpufreq-policy0: performance / 2400 MHz
Status of performance related policies found below /sys:
/sys/module/pcie_aspm/parameters/policy: default [performance] powersavepowersupersave
### Clockspeeds (idle vs. heated up):
Before at 43.0°C:
cpu0 (Cortex-A76): OPP: 2400, ThreadX: 2400, Measured: 2398
After at 65.5°C:
cpu0 (Cortex-A76): OPP: 2400, ThreadX: 2400, Measured: 2399
### Performance baseline
* memcpy: 5707.8 MB/s, memchr: 14187.6 MB/s, memset: 12935.3 MB/s* 16M latency: 118.9 117.1 119.8 117.9 120.3 118.9 141.0 136.2* 128M latency: 133.6 132.5 133.7 142.7 134.3 132.3 133.1 134.4* 7-zip MIPS (3 consecutive runs): 11154, 11152, 11174 (11160 avg), single-threaded:3209* `aes-256-cbc 540286.17k 1003793.09k 1255994.45k 1332805.63k 1365428.91k1367692.63k`* `aes-256-cbc 540545.85k 1003955.39k 1256114.35k 1332834.30k 1364443.14k1367905.62k`
### PCIe and storage devices:
* Raspberry RP1 PCIe 2.0 South Bridge: Speed 5GT/s, Width x4, driver inuse:rp1,* 29.1GB "Samsung BJTD4R" HS400 Enhanced strobe eMMC 5.1 card as /dev/mmcblk0:date07/2024,manfid/oemid:0x000015/0x0100,hw/fwrev: 0x0/0x0300000000000000
### Swap configuration:
* /var/swap on /dev/mmcblk0p2: 512.0M (0K used) on MMC storage
### Software versions:
* Debian GNU/Linux 12 (bookworm)* Build scripts: http://archive.raspberrypi.com/debian/ bookworm main* Compiler: /usr/bin/gcc (Debian 12.2.0-14) 12.2.0 / aarch64-linux-gnu* OpenSSL 3.0.15, built on 3 Sep 2024 (Library: OpenSSL 3.0.15 3 Sep 2024)* ThreadX: 26826259 / 2024/09/23 1456
### Kernel info:
* `/proc/cmdline: reboot=w coherent_pool=1M 8250.nr_uarts=1 pci=pcie_bus_safecgroup_disable=memorynuma_policy=interleavesmsc95xx.macaddr=2C678D:E8vc_mem.mem_base=0x3fc00000vc_mem.mem_size=0x40000000console=ttyAMA10,115200console=tty1root=PARTUUID=4825a0d7-02rootfstype=ext4fsck.repair=yesrootwaitquietsplashplymouth.ignore-serial-consolescfg80211.ieee80211_regdom=TH`* Vulnerability Spec store bypass: Mitigation; Speculative Store Bypassdisabledviaprctl* Vulnerability Spectre v1: Mitigation; __user pointer sanitization* Vulnerability Spectre v2: Mitigation; CSV2, BHB* Kernel 6.6.62+rpt-rpi-2712 / CONFIG_HZ=250
All known settings adjusted for performance. Device now ready for benchmarking.Once finished stop with [ctrl]-[c] to get info about throttling, frequencycapand too high background activity all potentially invalidating benchmarkscores.All changes with storage and PCIe devices as well as suspicious dmesgcontentswill be reported too.
Time fake/real load %cpu %sys %usr %nice %io %irq Temp VCore PMIC DC(V)1436: 2400/2400MHz 3.78 39% 0% 39% 0% 0% 0% 60.6°C 0.8942V 2.6W 5.13V^C
Cleaning up. Done.Checking cpufreq OPP again. Done.
Clockspeeds now at 58.4°C:
cpu0 (Cortex-A76): OPP: 2400, ThreadX: 2400, Measured: 2399
Results validation:
* Measured clockspeed not lower than advertised max CPU clockspeed* No swapping* Background activity (%system) OK* No throttling* ondemand cpufreq governor used by distro but io_is_busy not set to 1onallcores-
環境溫度約為25°C。沒有發生降頻現象,CPU溫度在使用CPUminer時最高達到67.2°C,而在使用7-zip時最高為63.9°C。
它看起來很不錯,但有一個問題是,當我關閉系統時,風扇會以全速運轉,而且墻上的電源插座會顯示有2.3瓦的功耗……
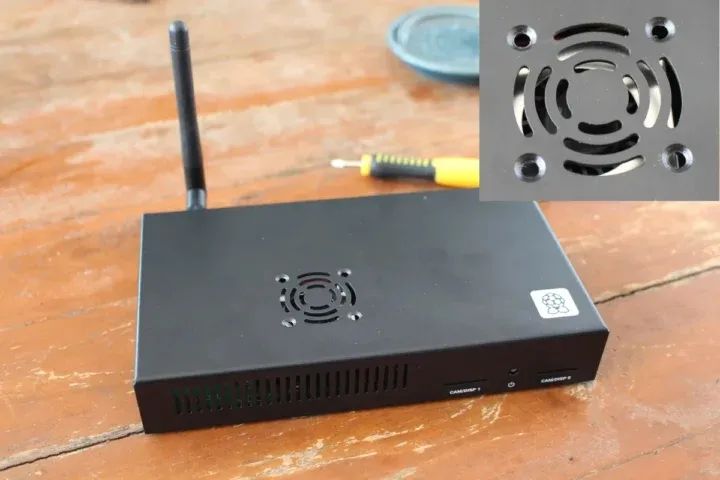
最后的測試是將CM5主動散熱器安裝在IO外殼內。在用四個螺絲將主板固定在底部后,我連接了外部WiFi天線。我還拆除了外殼頂部的風扇。
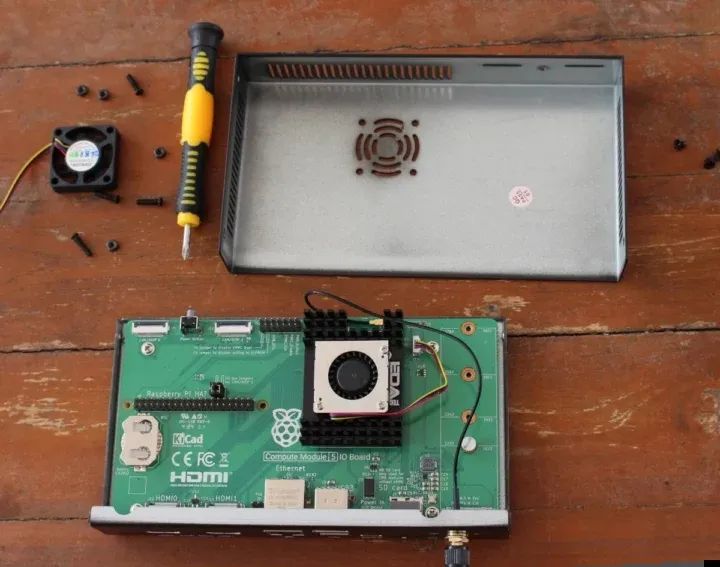
我們最終得到了一個帶有外殼的完整系統。風扇并沒有完全居中,但對于獲取冷卻所需的進氣口來說已經足夠了。
是時候運行sbc-bench.sh的文件測試了:
pi@raspberrypi:~ $ sudo ./sbc-bench.sh -rStarting to examine hardware/software for review purposes...
sbc-bench v0.9.68
Installing needed tools: distro packages already installed. Done.Checking cpufreq OPP. Done.Executing tinymembench. Done.Executing RAM latency tester. Done.Executing OpenSSL benchmark. Done.Executing 7-zip benchmark. Done.Throttling test: heating up the device, 5 more minutes to wait. Done.Checking cpufreq OPP again. Done (11 minutes elapsed).
Results validation:
* Measured clockspeed not lower than advertised max CPU clockspeed* No swapping* Background activity (%system) OK* No throttling
Full results uploaded to https://0x0.st/8rHy.txt
# Raspberry Pi Compute Module 5 Rev 1.0
Tested with sbc-bench v0.9.68 on Sun, 22 Dec 2024 1429 +0700. Fullinfo:[https://0x0.st/8rHy.txt](http://0x0.st/8rHy.txt)
### General information:
Information courtesy of cpufetch:
SoC: Broadcom BCM2712Technology: 16nmMicroarchitecture: Cortex-A76Max Frequency: 2.400 GHzCores: 4 coresFeatures: NEON,SHA1,SHA2,AES,CRC32
BCM2712, Kernel: aarch64, Userland: arm64
CPU sysfs topology (clusters, cpufreq members, clockspeeds)cpufreq min maxCPU cluster policy speed speed core type0 0 0 1500 2400 Cortex-A76 / r4p11 0 0 1500 2400 Cortex-A76 / r4p12 0 0 1500 2400 Cortex-A76 / r4p13 0 0 1500 2400 Cortex-A76 / r4p1
4044 KB available RAM
### Governors/policies (performance vs. idle consumption):
Original governor settings:
cpufreq-policy0: ondemand / 2400 MHz (conservative ondemand userspacepowersaveperformanceschedutil/15001600 1700 1800 1900 2000 2100 22002300 2400)
Tuned governor settings:
cpufreq-policy0: performance / 2400 MHz
Status of performance related policies found below /sys:
/sys/module/pcie_aspm/parameters/policy: default [performance] powersavepowersupersave
### Clockspeeds (idle vs. heated up):
Before at 44.1°C:
cpu0 (Cortex-A76): OPP: 2400, ThreadX: 2400, Measured: 2399
After at 68.8°C:
cpu0 (Cortex-A76): OPP: 2400, ThreadX: 2400, Measured: 2399
### Performance baseline
* memcpy: 5704.2 MB/s, memchr: 14175.1 MB/s, memset: 12902.3 MB/s* 16M latency: 117.0 116.9 120.3 123.1 120.1 118.7 140.4 133.6* 128M latency: 133.6 132.6 133.9 143.8 133.9 132.2 132.9 134.0* 7-zip MIPS (3 consecutive runs): 11056, 10937, 11060 (11020 avg), single-threaded:3201* `aes-256-cbc 540240.68k 1003708.86k 1256076.37k 1332945.24k 1365475.33k1367780.01k`* `aes-256-cbc 540632.86k 1003822.31k 1256136.02k 1332974.93k 1365194.07k1368216.92k`
### PCIe and storage devices:
* Raspberry RP1 PCIe 2.0 South Bridge: Speed 5GT/s, Width x4, driver inuse:rp1,* 29.1GB "Samsung BJTD4R" HS400 Enhanced strobe eMMC 5.1 card as /dev/mmcblk0:date07/2024,manfid/oemid:0x000015/0x0100,hw/fwrev: 0x0/0x0300000000000000
### Swap configuration:
* /var/swap on /dev/mmcblk0p2: 512.0M (0K used) on MMC storage
### Software versions:
* Debian GNU/Linux 12 (bookworm)* Build scripts: http://archive.raspberrypi.com/debian/ bookworm main* Compiler: /usr/bin/gcc (Debian 12.2.0-14) 12.2.0 / aarch64-linux-gnu* OpenSSL 3.0.15, built on 3 Sep 2024 (Library: OpenSSL 3.0.15 3 Sep 2024)* ThreadX: 26826259 / 2024/09/23 1456
### Kernel info:
* `/proc/cmdline: reboot=w coherent_pool=1M 8250.nr_uarts=1 pci=pcie_bus_safecgroup_disable=memorynuma_policy=interleavesmsc95xx.macaddr=2C678D:E8vc_mem.mem_base=0x3fc00000vc_mem.mem_size=0x40000000console=ttyAMA10,115200console=tty1root=PARTUUID=4825a0d7-02rootfstype=ext4fsck.repair=yesrootwaitquietsplashplymouth.ignore-serial-consolescfg80211.ieee80211_regdom=TH`* Vulnerability Spec store bypass: Mitigation; Speculative Store Bypassdisabledviaprctl* Vulnerability Spectre v1: Mitigation; __user pointer sanitization* Vulnerability Spectre v2: Mitigation; CSV2, BHB* Kernel 6.6.62+rpt-rpi-2712 / CONFIG_HZ=250
All known settings adjusted for performance. Device now ready for benchmarking.Once finished stop with [ctrl]-[c] to get info about throttling, frequencycapand too high background activity all potentially invalidating benchmarkscores.All changes with storage and PCIe devices as well as suspicious dmesgcontentswill be reported too.
Time fake/real load %cpu %sys %usr %nice %io %irq Temp VCore PMIC DC(V)1429: 2400/2400MHz 3.60 49% 0% 49% 0% 0% 0% 63.4°C 0.8948V 2.8W 5.13V1429: 2400/2400MHz 1.32 0% 0% 0% 0% 0% 0% 60.0°C 0.8948V 2.3W 5.13V1429: 2400/2400MHz 0.48 0% 0% 0% 0% 0% 0% 59.5°C 0.8953V 2.7W 5.13V^C
Cleaning up. Done.Checking cpufreq OPP again. Done.
Clockspeeds now at 60.0°C:
cpu0 (Cortex-A76): OPP: 2400, ThreadX: 2400, Measured: 2399
Results validation:
* Measured clockspeed not lower than advertised max CPU clockspeed* No swapping* Background activity (%system) OK* No throttling* ondemand cpufreq governor used by distro but io_is_busy not set to 1onallcores-
環境溫度仍然保持在25°C左右。CPU溫度在使用CPUminer時上升到68.3°C,而在使用7-zip時上升到65.5°C,只比主板不在外殼內時高了幾度。
Raspberry Pi CM5 散熱方案比較
讓我們來比較一下我們為Raspberry Pi CM5測試過的四種散熱方案。
| IO外殼帶風扇 | 樹莓派散熱器 | 上海晶珩主動散熱器 | IO外殼內上海晶珩主動散熱器 | |
| 7-zip 基準測試(MIPS) | 9300 | 11020 | 11160 | 11020 |
| CPU 最高溫度(7-zip) | 85.9°C | 68.8°C | 63.9°C | 65.5°C |
| CPU 最高溫度(CPUminer) | 86.5°C | 79.3°C | 67.2°C | 68.3°C |
| CPU降頻 | Yes | No | No | No |
| 關機功耗 | 2.5W | 1.6W | 2.3W | 2.3W |
| 空閑功耗 | 2.3W | 2.3W | 2.4W | 2.4W |
只有IO外殼帶風扇(沒有散熱片)的方案出現了CPU降頻,而在環境溫度為25-26°C時,無論是Raspberry Pi CM5散熱器還是上海晶珩 CM5主動散熱器都沒有出現降頻。對于大多數人來說,被動散熱就足夠了,但如果你的系統設計在高溫(35°C以上)環境下運行,或者你希望超頻你的CM5,那么主動散熱器可能會帶來一些好處。
在CM5 IO板關閉時關閉風扇
你還會注意到,主動冷卻系統的關機功耗高得驚人,這是因為系統關閉時風扇會以全速旋轉。Raspberry Pi 最初解釋說,“將EEPROM的‘POWER_OFF_ON_HALT=0’設置應該可以固定風扇,但會犧牲一些功耗”。我正準備嘗試,但在閱讀了該線程的更多內容后,發現這并不起作用。Raspberry Pi于12月19日發布了一個修復程序。新的pieeprom固件尚未通過apt提供,因此我們需要從Github下載并按照以下步驟進行安裝:
wget https://github.com/timg236/rpi-eeprom/raw/927596fc312b6c2ddcf33f7b7608938241403586/firmware-2712/latest/pieeprom-2024-12-19.binsudo rpi-eeprom-update -d -f ./pieeprom-2024-12-19.bin
以下是該命令的輸出結果:
*** CREATED UPDATE ./pieeprom-2024-12-19.bin ***
CURRENT: Sun Dec 15 1250 AM UTC 2024 (1734221810)UPDATE: Thu Dec 19 1113 AM UTC 2024 (1734609433)BOOTFS: /boot/firmware'/tmp/tmp.4SKLxJWPj1' -> '/boot/firmware/pieeprom.upd'
UPDATING bootloader. This could take up to a minute. Please wait
*** Do not disconnect the power until the update is complete ***
If a problem occurs then the Raspberry Pi Imager may be used to createa bootloader rescue SD card image which restores the default bootloaderimage.
flashrom -p linux_spi:dev=/dev/spidev10.0,spispeed=16000 -w /boot/firmware/pieeprom.updVerifying updateVERIFY: SUCCESSUPDATE SUCCESSFUL
我本來也打算更改EEPROM配置,但沒必要了,因為POWER_OFF_ON_HALT已經被設置為零:
pi@raspberrypi:~ $ sudo rpi-eeprom-config[all]BOOT_UART=1POWER_OFF_ON_HALT=0
# Default BOOT_ORDER for provisioning# SD -> NVMe -> USB -> NetworkBOOT_ORDER=0xf2461
這不起作用。雖然使用了新的固件版本,但事實證明,這是因為我用來刷寫固件的命令使用了固件中的配置……
pi@raspberrypi:~ $ sudo rpi-eeprom-updateBOOTLOADER: up to dateCURRENT: Thu Dec 19 1113 AM UTC 2024 (1734609433)LATEST: Sun Dec 15 1250 AM UTC 2024 (1734221810)RELEASE: latest (/lib/firmware/raspberrypi/bootloader-2712/latest)Use raspi-config to change the release.pi@raspberrypi:~ $ sudo rpi-eeprom-config[all]BOOT_UART=1BOOT_ORDER=0xf461NET_INSTALL_AT_POWER_ON=1
因此,我不得不使用以下命令行更改配置,并添加‘POWER_OFF_ON_HALT=0’:
sudo rpi-eeprom-config --edit
我們還需要再重啟一次。讓我們最后一次檢查引導加載程序版本和配置文件:
pi@raspberrypi:~ $ sudo rpi-eeprom-config[all]BOOT_UART=1BOOT_ORDER=0xf461NET_INSTALL_AT_POWER_ON=1POWER_OFF_ON_HALT=0pi@raspberrypi:~ $ sudo rpi-eeprom-updateBOOTLOADER: up to dateCURRENT: Sun Dec 15 1250 AM UTC 2024 (1734221810)LATEST: Sun Dec 15 1250 AM UTC 2024 (1734221810)RELEASE: latest (/lib/firmware/raspberrypi/bootloader-2712/latest)Use raspi-config to change the release.
這是怎么回事?看起來固件又恢復到了舊版本。這通常是因為新的引導加載程序有問題,所以它正在使用恢復映像,但這里看起來是隨機的……所以我再次刷寫了映像(不使用其配置),并重啟了設備。這次一切都恢復正常了,所以我們現在可以準備關機了:
pi@raspberrypi:~ $ sudo rpi-eeprom-updateBOOTLOADER: up to dateCURRENT: Thu Dec 19 1113 AM UTC 2024 (1734609433)LATEST: Sun Dec 15 1250 AM UTC 2024 (1734221810)RELEASE: latest (/lib/firmware/raspberrypi/bootloader-2712/latest)Use raspi-config to change the release.pi@raspberrypi:~ $ sudo rpi-eeprom-config[all]BOOT_UART=1BOOT_ORDER=0xf461NET_INSTALL_AT_POWER_ON=1POWER_OFF_ON_HALT=0pi@raspberrypi:~ $ sudo shutdown now
風扇確實關閉了,系統關閉時的功耗為1.6瓦。如果你想進一步降低關機時的功耗,你需要將WAKE_ON_GPIO設置為0,就像我在Raspberry Pi 5 2GB上所做的那樣。一些HAT可能與此更改不兼容……
我要感謝Raspberry Pi提供了Raspberry Pi CM5開發套件以供評測,還要感謝上海晶珩提供了CM5主動散熱器,為我們提供了更好的散熱解決方案。
-
測試
+關注
關注
8文章
5524瀏覽量
127662 -
Raspberry Pi
+關注
關注
2文章
613瀏覽量
22547 -
樹莓派
+關注
關注
118文章
1882瀏覽量
106257
發布評論請先 登錄
相關推薦
Banana Pi BPI-CM4 評測(計算模塊 4),更快性能,旨在替換樹莓派CM4
樹莓派5,Raspberry Pi 5 評測
樹莓派CM4_UART擴展板之溫升測試(全鋁外殼搭配渦輪風扇)
香蕉派 BPI-CM4計算機模組,采用Amlogic A311D芯片方案,兼容樹莓派 CM4模組

等待已久,新品上市 | RevPi Connect 4系列:基于樹莓派CM4計算模塊的全新工業樹莓派
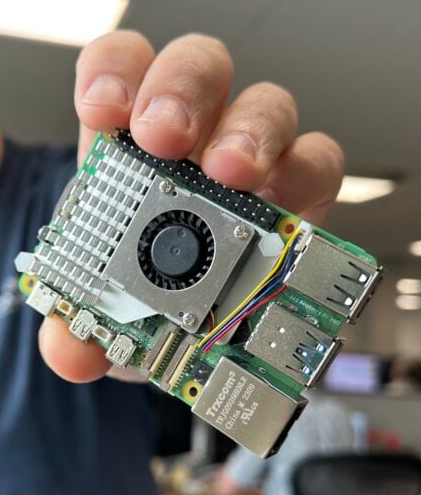
加熱和冷卻樹莓派5(Raspberry Pi5)這是真嘞?
開發者自制載板令樹莓派 5“變身”CM5 計算模塊
ArmSoM CM5 RK3576計算模組——樹莓派CM4的理想替代品

超頻必備!樹莓派 CM5 主動散熱器評測!

假如你有一塊樹莓派CM5,你會用它來干什么?來看看這些異想天開的樹莓派項目!
樹莓派CM5 的基準測試:性能飆升,直擊你的需求核心!
性能與效率的較量:樹莓派CM5和CM4的溫度對比測試!


 工商網監
工商網監
評論