 緩存之美:Guava Cache 相比于 Caffeine 差在哪里?

本文將結合 Guava Cache 的源碼來分析它的實現原理,并闡述它相比于 Caffeine Cache 在性能上的劣勢。為了讓大家對 Guava Cache 理解起來更容易,我們還是在開篇介紹它的原理:
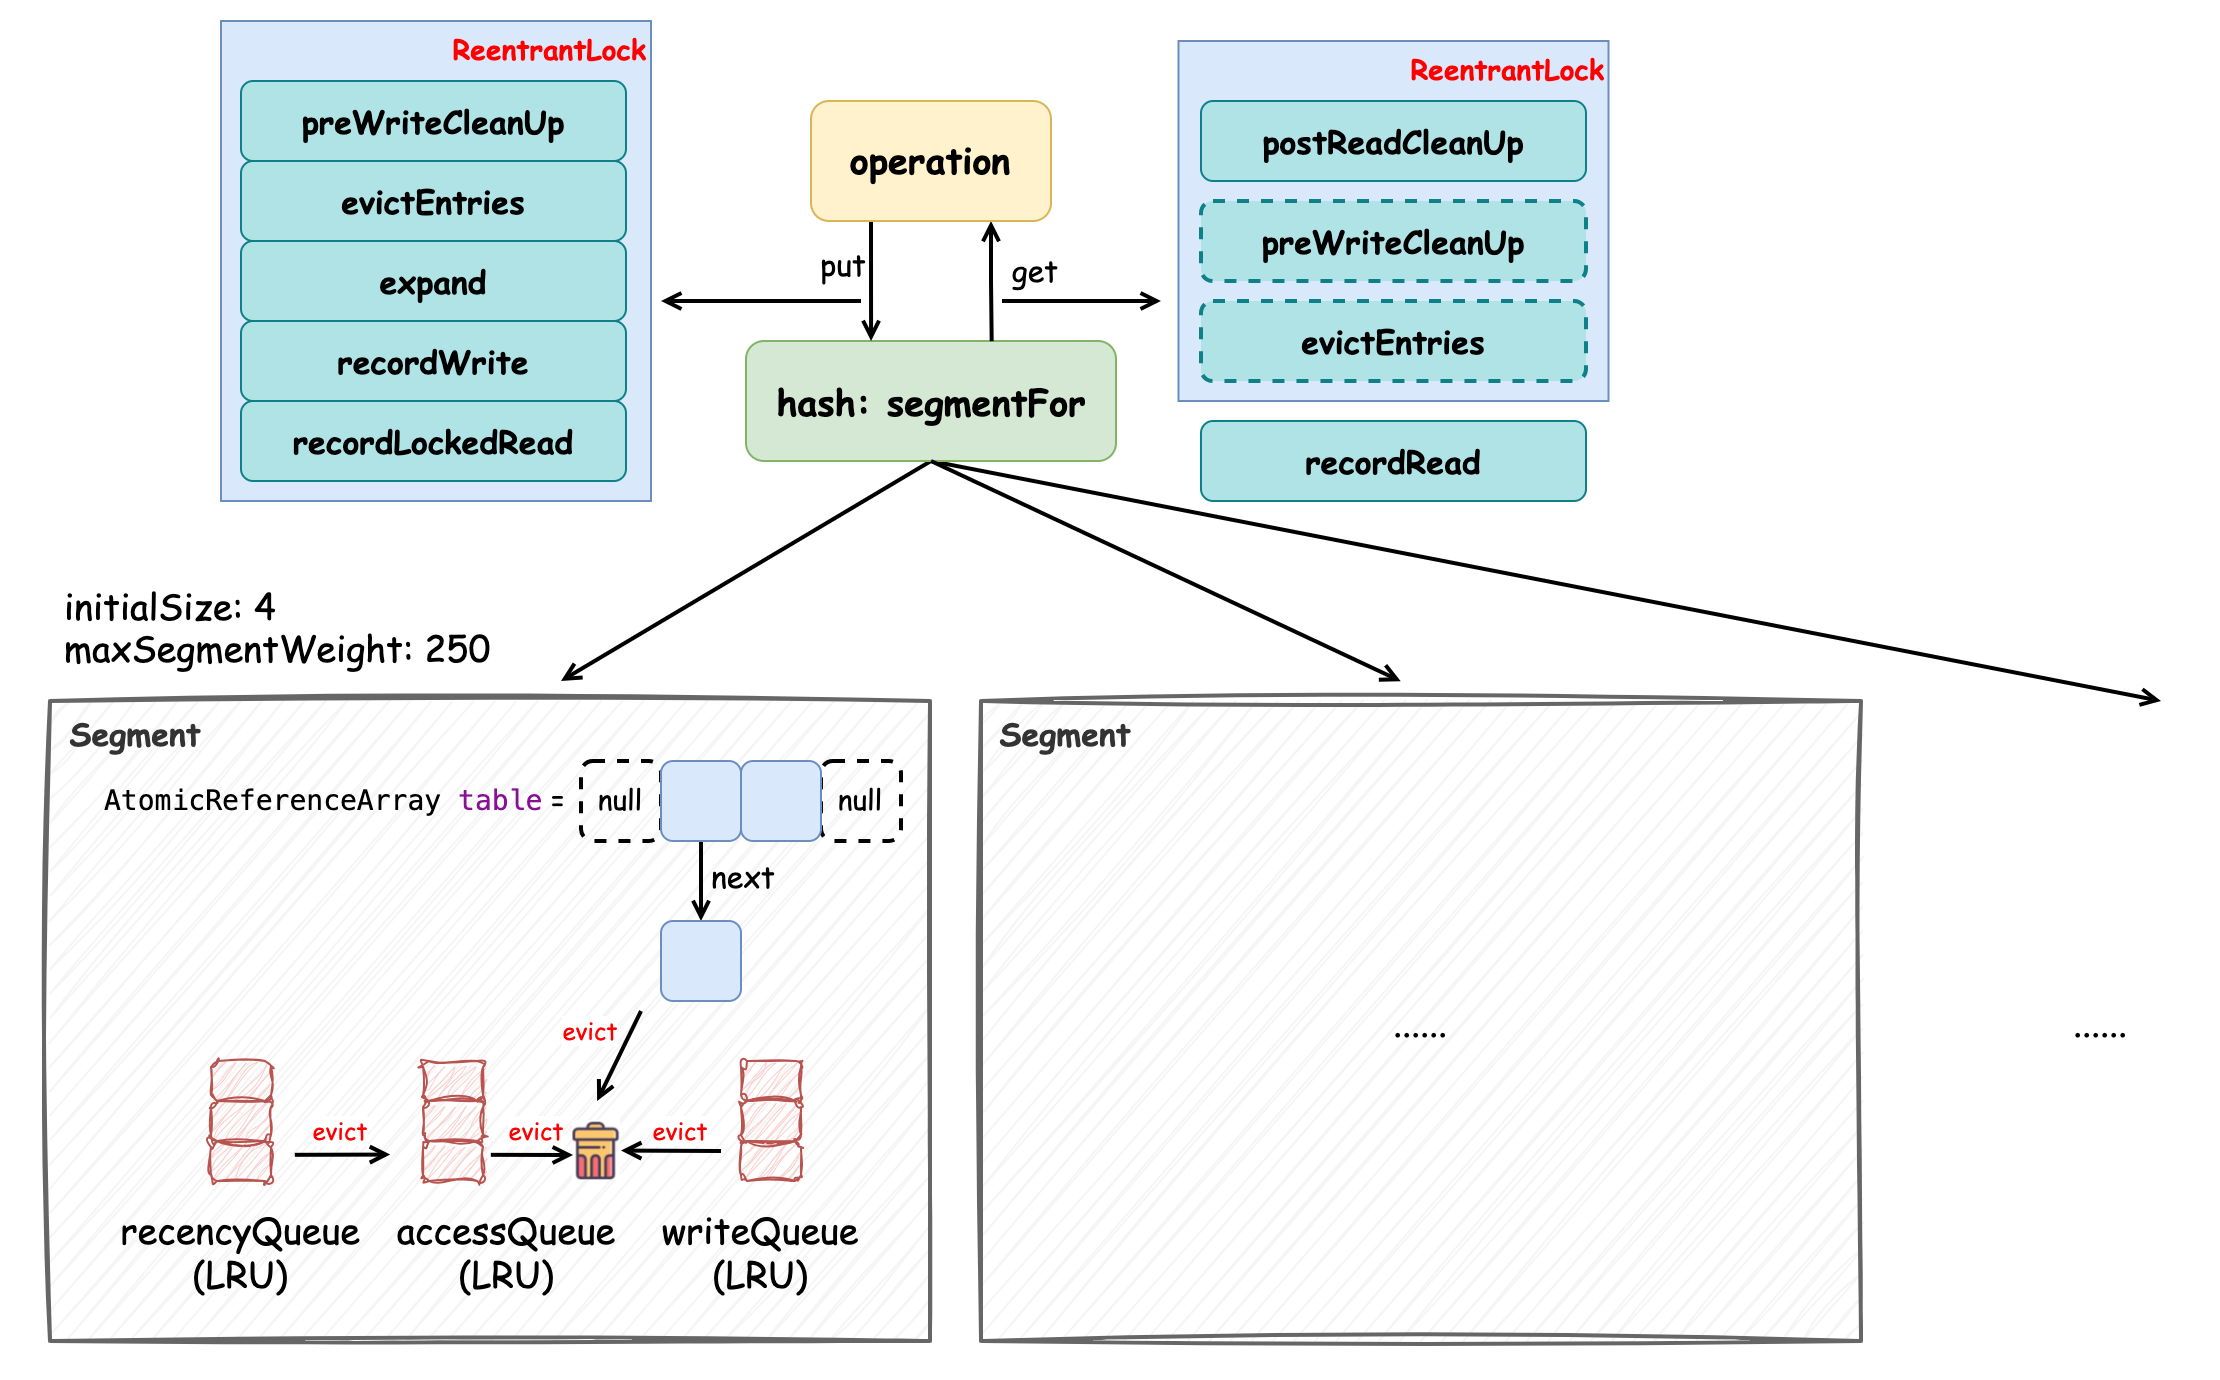
Guava Cache 通過分段(Segment)鎖(ReentrantLock)機制、volatile 變量和多種緩存策略實現了性能相對 Caffeine 性能較差的緩存,它的數據結構如上圖所示。它會將緩存分成多個段(Segment)去管理,單個段內寫操作加鎖互斥,如果要創建大小為 1000 的緩存,那么實際上會分配 4 個段,每個段的最大容量為 250。讀寫操作在執行時都會經 segmentFor 方法“路由”到某一個段。數據結構的實現都在 Segment 中,它對元素的管理采用的是 AtomicReferenceArray 數組,在初始化時是較小的容量,并隨著元素的增多觸發擴容機制。我們稱數組中每個索引的位置為“桶”,每個桶中保存了元素的引用,這些元素是通過單向鏈表維護的,每當有新元素添加時,采用的是“頭插法”。此外,在 Segment 中還維護了三個基于 LRU 算法 的隊列,處于尾部的元素最“新”,分別是 accessQueue、writeQueue 和 recencyQueue,它們分別用于記錄被訪問的元素、被寫入的元素和“最近”被訪問的元素。accessQueue 的主要作用是在對超過最大容量(超過訪問后過期時間)的元素進行驅逐時,優先將最近被訪問的越少的元素驅逐(頭節點開始遍歷);writeQueue 的主要作用是對寫后過期的元素進行驅逐時,優先將最近最少被訪問的元素驅逐,因為越早被添加的元素越早過期,當發現某元素未過期時,后續隊列中的元素是不需要判斷的;recencyQueue 的作用是記錄被訪問過的元素,它們最終都會被移動到 accessQueue 中,并根據訪問順序添加到其尾節點中。
對元素生命周期的管理主要是在 put 方法中完成的,put 相關的操作都需要加鎖,如圖中左上方所示,這些方法均與緩存元素的管理相關。Guava Cache 為了在不觸發寫操作而有大量讀操作時也能正常觸發對緩存元素的管理,添加了一個 readCount 變量,每次讀請求都會使其累加,直到該變量超過規定閾值,也會觸發緩存元素的驅逐(postReadCleanUp),保證數據的一致性,如圖中右上方所示。
接下來我們通過創建最大大小為 1000,并配置有訪問后和寫后過期時間的 LoadingCache 來分析 Guava Cache 的實現原理,主要關注它的構造方法,put 方法和 get 方法:
public class TestGuavaCache {

    @Test
    public void test() {
        LoadingCache cache = CacheBuilder.newBuilder()
                .maximumSize(1000)
                .expireAfterWrite(10, TimeUnit.SECONDS)
                .expireAfterAccess(10, TimeUnit.SECONDS)
                .build(
                        new CacheLoader() {
                            @Override
                            public String load(String key) {
                                return String.valueOf(key.hashCode());
                            }
                        }
                );

        cache.put("key1", "value1");

        try {
            System.out.println(cache.get("key"));
        } catch (ExecutionException e) {
            throw new RuntimeException(e);
        }
    }
}
constructor
首先我們來看一下它的構造方法,它會將創建緩存時指定的參數記錄下來,比如訪問后過期時間(expireAfterAccessNanos),寫后過期時間(expireAfterWriteNanos)等等,除此之外還包括 Segment 分段對象的創建,定義分段的數量和每個分段的大小,并將這些 Segment 對象保存在一個數組中,以創建最大元素數量為 1000 的緩存為例,它會創建 4 個分段,每個分段分配 250 個元素。源碼如下所示,均為賦值操作,可關注 Segment 相關邏輯:
class LocalCache extends AbstractMap implements ConcurrentMap {

    static final int MAX_SEGMENTS = 1  keyEquivalence;
    final Equivalence valueEquivalence;

    final long maxWeight;
    final Weigher weigher;

    final long expireAfterAccessNanos;
    final long expireAfterWriteNanos;
    final long refreshNanos;

    final RemovalListener removalListener;
    final Queue> removalNotificationQueue;

    final Ticker ticker;
    final EntryFactory entryFactory;
    final StatsCounter globalStatsCounter;
    @CheckForNull final CacheLoader defaultLoader;

    final int segmentMask;
    final int segmentShift;
    final Segment[] segments;

    LocalCache(CacheBuilder builder, @CheckForNull CacheLoader loader) {
        // 并發級別,不指定默認為 4
        concurrencyLevel = min(builder.getConcurrencyLevel(), MAX_SEGMENTS);

        // key 和 value 的引用強度,默認為強引用
        keyStrength = builder.getKeyStrength();
        valueStrength = builder.getValueStrength();

        // 鍵值比較器,默認為強引用比較器
        keyEquivalence = builder.getKeyEquivalence();
        valueEquivalence = builder.getValueEquivalence();

        // maxWeight 最大權重,指定了為 1000
        maxWeight = builder.getMaximumWeight();
        // weigher 沒有指定,默認為 1,表示每個元素的權重為 1
        weigher = builder.getWeigher();
        // 訪問后和寫后過期時間,默認為 0,表示不設置過期時間
        expireAfterAccessNanos = builder.getExpireAfterAccessNanos();
        expireAfterWriteNanos = builder.getExpireAfterWriteNanos();
        // 刷新時間,默認為 0,表示不刷新
        refreshNanos = builder.getRefreshNanos();

        // 元素驅逐監聽器
        removalListener = builder.getRemovalListener();
        removalNotificationQueue =
                (removalListener == NullListener.INSTANCE) ? LocalCache.discardingQueue() : new ConcurrentLinkedQueue();

        // 定義 Ticker 可以模擬時間流動來驗證邏輯
        ticker = builder.getTicker(recordsTime());
        entryFactory = EntryFactory.getFactory(keyStrength, usesAccessEntries(), usesWriteEntries());
        globalStatsCounter = builder.getStatsCounterSupplier().get();
        defaultLoader = loader;

        // 初始化大小,默認為 16
        int initialCapacity = min(builder.getInitialCapacity(), MAXIMUM_CAPACITY);
        if (evictsBySize() && !customWeigher()) {
            initialCapacity = (int) min(initialCapacity, maxWeight);
        }

        // 基于大小的驅逐策略是針對每個段而不是全局進行驅逐的,因此段數過多會導致隨機的驅逐行為
        // 計算分段數量和分段位移(shift)的邏輯
        int segmentShift = 0;
        int segmentCount = 1;
        // 保證分段數量不低于并發級別 且 段數*20不超過最大權重,保證每個段的元素數量至少為 10
        while (segmentCount < concurrencyLevel && (!evictsBySize() || segmentCount * 20L <= maxWeight)) {
            // 分段位移+1
            ++segmentShift;
            // 分段數量為 2的n次冪
            segmentCount [] newSegmentArray(int ssize) {
        return (Segment[]) new Segment[ssize];
    }
}
我們接著看下創建 Segment 的方法 LocalCache#createSegment,它直接調用了 Segment 的構造方法:
class LocalCache extends AbstractMap implements ConcurrentMap {
    // ...

    Segment createSegment(int initialCapacity, long maxSegmentWeight, StatsCounter statsCounter) {
        return new Segment(this, initialCapacity, maxSegmentWeight, statsCounter);
    }
}
Segment 是 LocalCache 內的靜態內部類,它在緩存中起到了將數據分段管理的作用。它繼承了 ReentrantLock,主要為了簡化鎖定的操作:
static class Segment extends ReentrantLock {
    // ...
}
在該類中有一段 JavaDoc 值得讀一下:
Segments 內部維護了緩存本身(final LocalCache map),所以它能一直保持數據一致性,也因此可以在不加鎖的情況下進行讀操作。被緩存的鍵值對對象(構成單向鏈表)中的 next 字段被 final 修飾,所有的添加操作都只能在每個桶的前面進行(頭插法),這也就使得檢查變更比較容易,并且遍歷速度也比較快。當節點需要更改時,會創建新節點來替換它們(深拷貝)。這對于哈希表來說效果很好,因為桶列表往往很短(平均長度小于二)。
讀操作可以在不加鎖的情況下進行,但依賴于被 volatile 關鍵字修飾的變量,因為這個關鍵字能確保“可見性”。對大多數操作來說,可以將記錄元素數量的字段 count 來作為確保可見性的變量。它帶來了很多便利,在很多讀操作中都需要參考這個字段:
未加鎖的讀操作必須首先讀取 count 字段,如果它是 0,則不應讀任何元素
加鎖的寫操作在任何桶發生結構性更改后都需要修改 count 字段值,這些寫操作不能在任何情況下導致并發讀操作發生讀取數據不一致的情況,這樣的保證使得 Map 中的讀操作更容易。比如,沒有操作可以揭示 Map 中添加了新的元素但是 count 字段沒有被更新的情況,因此相對于讀取沒有原子性要求。
作為提示,所有被 volatile 修飾的字段都很關鍵,它們的讀取和寫入都會用注釋標記。
 * Segments maintain a table of entry lists that are ALWAYS kept in a consistent state, so can
 * be read without locking. Next fields of nodes are immutable (final). All list additions are
 * performed at the front of each bin. This makes it easy to check changes, and also fast to
 * traverse. When nodes would otherwise be changed, new nodes are created to replace them. This
 * works well for hash tables since the bin lists tend to be short. (The average length is less
 * than two.)
 *
 * Read operations can thus proceed without locking, but rely on selected uses of volatiles to
 * ensure that completed write operations performed by other threads are noticed. For most
 * purposes, the "count" field, tracking the number of elements, serves as that volatile
 * variable ensuring visibility. This is convenient because this field needs to be read in many
 * read operations anyway:
 *
 * - All (unsynchronized) read operations must first read the "count" field, and should not look
 * at table entries if it is 0.
 *
 * - All (synchronized) write operations should write to the "count" field after structurally
 * changing any bin. The operations must not take any action that could even momentarily cause a
 * concurrent read operation to see inconsistent data. This is made easier by the nature of the
 * read operations in Map. For example, no operation can reveal that the table has grown but the
 * threshold has not yet been updated, so there are no atomicity requirements for this with
 * respect to reads.
 *
 * As a guide, all critical volatile reads and writes to the count field are marked in code
 * comments.
通過它的 JavaDoc 我們可以了解到它通過寫操作對數據一致性的保證和被 volatile 修飾的字段來實現無鎖的讀操作,不過其中鍵值對中被 final 修飾的 next 字段究竟是怎么回事就需要在后文中去探究了。下面我們根據它的構造方法看一下該類中比較重要的字段信息:
static class Segment extends ReentrantLock {

    // 在某一段(Segment)中元素的數量
    volatile int count;

    // 總的權重值
    @GuardedBy("this")
    long totalWeight;

    // 修改次數
    int modCount;

    // 繼上一次寫操作后讀操作的數量
    final AtomicInteger readCount = new AtomicInteger();

    @Weak final LocalCache map;

    final long maxSegmentWeight;

    final StatsCounter statsCounter;

    int threshold;

    @CheckForNull volatile AtomicReferenceArray> table;

    final Queue> recencyQueue;

    @GuardedBy("this")
    final Queue> writeQueue;

    @GuardedBy("this")
    final Queue> accessQueue;

    Segment(LocalCache map, int initialCapacity, long maxSegmentWeight, StatsCounter statsCounter) {
        // LocalCache 對象的引用
        this.map = map;
        // 最大分段權重,我們的例子中它的值是 250
        this.maxSegmentWeight = maxSegmentWeight;
        this.statsCounter = checkNotNull(statsCounter);
        // 根據初始化容量創建支持原子操作的 AtomicReferenceArray 對象
        initTable(newEntryArray(initialCapacity));

        // 管理弱引用和虛引用的 Key,Value 隊列
        keyReferenceQueue = map.usesKeyReferences() ? new ReferenceQueue() : null;
        valueReferenceQueue = map.usesValueReferences() ? new ReferenceQueue() : null;

        // 用于記錄“最近”元素被訪問的順序
        recencyQueue = map.usesAccessQueue() ? new ConcurrentLinkedQueue() : LocalCache.discardingQueue();

        // 用于記錄元素的寫入順序,元素被寫入時會被添加到尾部
        writeQueue = map.usesWriteQueue() ? new WriteQueue() : LocalCache.discardingQueue();

        // 記錄元素的訪問順序,元素被訪問后會被添加到尾部
        accessQueue = map.usesAccessQueue() ? new AccessQueue() : LocalCache.discardingQueue();
    }

    AtomicReferenceArray> newEntryArray(int size) {
        return new AtomicReferenceArray(size);
    }

    void initTable(AtomicReferenceArray> newTable) {
        // 默認負載因子為 0.75
        this.threshold = newTable.length() * 3 / 4;
        if (!map.customWeigher() && this.threshold == maxSegmentWeight) {
            // 在執行驅逐操作前防止不必要的擴張操作,將閾值+1
            this.threshold++;
        }
        this.table = newTable;
    }

    // ...
}
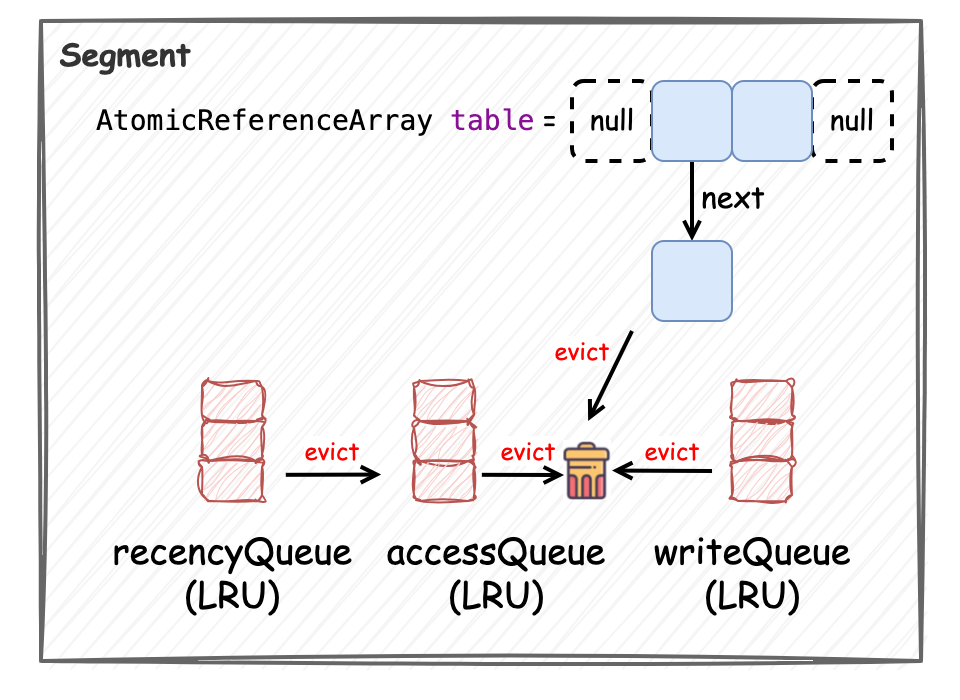
根據上述代碼和注釋信息,每個 Segment 的數據結構由 AtomicReferenceArray(本質上是 Object[] 數組)和三個基于LRU算法的隊列組成,AtomicReferenceArray 初始化時為一個較小容量(4)的數組,在緩存的操作過程中會根據元素添加的情況觸發擴容,在這里我們已經能看到 Guava Cache 數據結構的全貌了,如下所示:
在接下來的兩個小節中,我們將深入討論 put 和 get 方法的實現,分析這些數據結構是如何為這些操作提供支持的。
put
在深入 put 方法前,我們需要先了解下創建鍵值對元素的邏輯。在調用 LocalCache 的構造方法時,其中 entryFactory 字段我們沒具體講解,在這里詳細描述下,因為它與鍵值對元素的創建有關。EntryFactory 是一個枚舉類,它其中定義了如 STRONG_ACCESS_WRITE 和 WEAK_ACCESS_WRITE 等一系列枚舉,并根據創建緩存時指定的 Key 引用類型和元素管理策略來決定具體是哪個枚舉,如其中的 EntryFactory#getFactory 方法所示:
enum EntryFactory {
    STRONG {
        // ...
    },
    STRONG_ACCESS {
        // ...
    },
    STRONG_WRITE {
        // ...
    },
    STRONG_ACCESS_WRITE {
        // ...
    },
    // ...
    WEAK_ACCESS_WRITE {
        // ...
    };

    static final int ACCESS_MASK = 1;
    static final int WRITE_MASK = 2;
    static final int WEAK_MASK = 4;

    static final EntryFactory[] factories = {
            STRONG,
            STRONG_ACCESS,
            STRONG_WRITE,
            STRONG_ACCESS_WRITE,
            WEAK,
            WEAK_ACCESS,
            WEAK_WRITE,
            WEAK_ACCESS_WRITE,
    };

    static EntryFactory getFactory(Strength keyStrength, boolean usesAccessQueue, boolean usesWriteQueue) {
        int flags = ((keyStrength == Strength.WEAK) ? WEAK_MASK : 0)
                        | (usesAccessQueue ? ACCESS_MASK : 0)
                        | (usesWriteQueue ? WRITE_MASK : 0);
        return factories[flags];
    }
}
當不指定 Key 的引用類型時為強引用,結合指定的訪問后和寫后過期策略,會匹配到 STRONG_ACCESS_WRITE 枚舉,根據它的命名也能理解它表示 Key 為強引用且配置了訪問后和寫后過期策略。下面主要關注下它的邏輯:
enum EntryFactory {
    STRONG_ACCESS_WRITE {
        @Override
         ReferenceEntry newEntry(
                Segment segment, K key, int hash, @CheckForNull ReferenceEntry next) {
            return new StrongAccessWriteEntry(key, hash, next);
        }

        // ...
    }
}
其中 EntryFactory#newEntry 為創建鍵值對元素的方法,創建的鍵值對類型為 StrongAccessWriteEntry,我們看下它的具體實現:
class LocalCache extends AbstractMap implements ConcurrentMap {

    static class StrongEntry extends AbstractReferenceEntry {

        final K key;
        final int hash;
        @CheckForNull final ReferenceEntry next;
        volatile ValueReference valueReference = unset();

        StrongEntry(K key, int hash, @CheckForNull ReferenceEntry next) {
            this.key = key;
            this.hash = hash;
            this.next = next;
        }

        // ...
    }

    static final class StrongAccessWriteEntry extends StrongEntry {

        volatile long accessTime = Long.MAX_VALUE;
        volatile long writeTime = Long.MAX_VALUE;

        @Weak ReferenceEntry nextAccess = nullEntry();
        @Weak ReferenceEntry previousAccess = nullEntry();

        @Weak ReferenceEntry nextWrite = nullEntry();
        @Weak ReferenceEntry previousWrite = nullEntry();

        StrongAccessWriteEntry(K key, int hash, @CheckForNull ReferenceEntry next) {
            super(key, hash, next);
        }
    }
}
StrongAccessWriteEntry 與它的父類 StrongEntry 均為定義在 LocalCache 內的靜態內部類,構造方法需要指定 Key, hash, next 三個變量,這三個變量均定義在 StrongEntry 中,注意第三個變量 ReferenceEntry next,它被父類中 StrongEntry#next 字段引用,并且該字段被 final 修飾,這與前文 JavaDoc 中所描述的內容相對應:
鍵值對對象中的 next 字段被 final 修飾,所有的添加操作都只能在每個桶的前面進行(頭插法),這也就使得檢查變更比較容易,并且遍歷速度也比較快。
所以實際上在添加新的鍵值對元素時,針對每個桶中元素操作采用的是“頭插法”,這些元素是通過 next 指針引用的 單向鏈表。現在了解了元素的類型和創建邏輯,我們再來看下 put 方法的實現。
Guava Cache 是不允許添加 null 鍵和 null 值的,如果添加了 null 鍵或 null 值,會拋出 NullPointerException 異常。注意其中的注解 @GuardedBy 表示某方法或字段被調用或訪問時需要持有哪個同步鎖,在 Caffeine 中也有類似的應用:
class LocalCache extends AbstractMap implements ConcurrentMap {

    // ...

    final Segment[] segments;

    final int segmentShift;

    final int segmentMask;

    @GuardedBy("this")
    long totalWeight;

    @CheckForNull
    @CanIgnoreReturnValue
    @Override
    public V put(K key, V value) {
        checkNotNull(key);
        checkNotNull(value);
        // 計算 hash 值,過程中調用了 rehash 擾動函數使 hash 更均勻
        int hash = hash(key);
        // 根據 hash 值路由到具體的 Segment 段,再調用 Segment 的 put 方法
        return segmentFor(hash).put(key, hash, value, false);
    }

    Segment segmentFor(int hash) {
        // 位移并位與運算,segmentMask 為段數組長度減一,保證計算結果在有效范圍內
        return segments[(hash >>> segmentShift) & segmentMask];
    }
}
可以發現在執行 put 操作前,會根據鍵的哈希值來將其路由(segmentFor)到具體的 Segment 段,再調用 Segment 的 put 方法,而具體的 put 方法邏輯是在 Segment 中實現的。我們接著看 Segment#put 方法的實現(為了保證可讀性,其中標注了數字的方法會在接下來小節中具體分析):
static class Segment extends ReentrantLock {

    final AtomicInteger readCount = new AtomicInteger();

    @GuardedBy("this")
    final Queue> accessQueue;
    final Queue> recencyQueue;
    @GuardedBy("this")
    final Queue> writeQueue;

    // guava cache 本身
    @Weak
    final LocalCache map;

    // Segment 中保存元素的數組
    @CheckForNull
    volatile AtomicReferenceArray> table;

    // 計數器
    final StatsCounter statsCounter;

    // 該段中的元素數量
    volatile int count;

    // 總的權重,不配置也表示元素數量,每個元素的權重為 1
    @GuardedBy("this")
    long totalWeight;

    // capacity * 0.75
    int threshold;

    // 更新次數,用于確保在批量讀取的情況下,保證數據一致性,如果多次讀取時 modCount 不一致則需要重試
    int modCount;

    @CanIgnoreReturnValue
    @CheckForNull
    V put(K key, int hash, V value, boolean onlyIfAbsent) {
        // 先加鎖 ReentrantLock#lock 實現
        lock();
        try {
            long now = map.ticker.read();
            // 1. 寫前置的清理操作,包括處理過期元素等
            preWriteCleanup(now);

            int newCount = this.count + 1;
            // 如果超過閾值,則擴容
            if (newCount > this.threshold) {
                // 2. 擴容操作
                expand();
                newCount = this.count + 1;
            }

            // 根據元素的 hash 值找到對應的桶索引 index,并拿到頭節點 first
            AtomicReferenceArray> table = this.table;
            int index = hash & (table.length() - 1);
            ReferenceEntry first = table.get(index);

            // 嘗試遍歷鏈表尋找被新添加的元素是否已經存在
            for (ReferenceEntry e = first; e != null; e = e.getNext()) {
                K entryKey = e.getKey();
                // 如果新 put 的元素在緩存中已經存在
                if (e.getHash() == hash && entryKey != null && map.keyEquivalence.equivalent(key, entryKey)) {
                    ValueReference valueReference = e.getValueReference();
                    V entryValue = valueReference.get();

                    // 通過元素的 value 是否為 null 的情況來判斷
                    if (entryValue == null) {
                        ++modCount;
                        // StrongValueReference 類型默認 active 為 true 表示 value 值是有效的
                        if (valueReference.isActive()) {
                            // 但是此時元素的 value 值為空,說明該 value 值已經被垃圾回收了,所以需要將該元素 value 被垃圾回收的通知加入到通知隊列中
                            // 并在總權重中將該元素的權重減去
                            enqueueNotification(key, hash, entryValue, valueReference.getWeight(), RemovalCause.COLLECTED);
                            // 更新為新的 value
                            setValue(e, key, value, now);
                            // 元素總數不變更
                            newCount = this.count;
                        } else {
                            // 賦值新的 Value 并需要將元素數 +1
                            setValue(e, key, value, now);
                            newCount = this.count + 1;
                        }
                        // 變更 count 值(可見性)
                        this.count = newCount;
                        // 3. 驅逐元素
                        evictEntries(e);
                        return null;
                    } else if (onlyIfAbsent) {
                        // 如果 onlyIfAbsent 為 true,那么已存在元素的 value 是不會被覆蓋的,只需要記錄讀操作即可
                        recordLockedRead(e, now);
                        return entryValue;
                    } else {
                        // 這種情況是 value 不為空,需要將舊值替換成新值
                        // 變更修改次數
                        ++modCount;
                        // 同樣是先將該元素的權重減去,并將元素 value 被替換的通知加入到通知隊列中
                        enqueueNotification(key, hash, entryValue, valueReference.getWeight(), RemovalCause.REPLACED);
                        setValue(e, key, value, now);
                        // 3. 驅逐元素
                        evictEntries(e);
                        return entryValue;
                    }
                }
            }

            // put 的元素是一個新元素
            ++modCount;
            // 創建一個新元素,并指定 next 節點為 first 頭節點
            ReferenceEntry newEntry = newEntry(key, hash, first);
            setValue(newEntry, key, value, now);
            // 將該元素封裝到數組中
            table.set(index, newEntry);
            // 更新 count 值
            newCount = this.count + 1;
            this.count = newCount;
            // 3. 驅逐元素
            evictEntries(newEntry);
            return null;
        } finally {
            // 執行完操作,解鎖
            unlock();
            // 4. 寫后操作,主要是處理通知,在后文中介紹
            postWriteCleanup();
        }
    }

    @GuardedBy("this")
    void setValue(ReferenceEntry entry, K key, V value, long now) {
        ValueReference previous = entry.getValueReference();
        // 計算元素權重,如果沒有執行權重計算函數默認為 1
        int weight = map.weigher.weigh(key, value);
        checkState(weight >= 0, "Weights must be non-negative");

        // 更新元素的 value 值
        ValueReference valueReference = map.valueStrength.referenceValue(this, entry, value, weight);
        entry.setValueReference(valueReference);
        // 處理寫操作
        recordWrite(entry, weight, now);
        // StrongValueReference 該方法為空實現
        previous.notifyNewValue(value);
    }

    @GuardedBy("this")
    void recordWrite(ReferenceEntry entry, int weight, long now) {
        // 將元素的最近被訪問隊列 recencyQueue 清空,并使用尾插法將它們都放到訪問隊列 accessQueue 的尾節點
        drainRecencyQueue();
        // 變更總權重
        totalWeight += weight;

        // 如果配置了訪問后或寫后過期則更新元素的訪問后或寫后時間
        if (map.recordsAccess()) {
            entry.setAccessTime(now);
        }
        if (map.recordsWrite()) {
            entry.setWriteTime(now);
        }
        // 添加到訪問隊列和寫隊列中
        accessQueue.add(entry);
        writeQueue.add(entry);
    }

    @GuardedBy("this")
    void recordLockedRead(ReferenceEntry entry, long now) {
        // 配置了訪問后過期時間則更新該元素的訪問時間
        if (map.recordsAccess()) {
            entry.setAccessTime(now);
        }
        // 將該元素添加到訪問隊列中
        accessQueue.add(entry);
    }
}
上述源碼中,我們能夠發現 Guava Cache 是在 Segment 的級別加鎖 的,通過這樣的方式來減少競爭,其中 preWriteCleanup 方法負責處理元素的過期;evictEntries 方法負責驅逐保證緩存不超過最大的容量,根據 LRU 算法將最近最少訪問的元素移除;expand 方法負責 Segment 的擴容;setValue, recordWrite 和 recordLockedRead 方法負責處理元素的更新并記錄訪問情況(更新 accessQueue 和 writeQueue 隊列)。它對元素的管理相對簡單也比較容易理解,接下來我們分步驟看下其中方法的實現。
preWriteCleanup
首先我們重點看下 preWriteCleanup 方法,該方法負責處理元素的過期,而元素過期的判斷也非常簡單,它會在每個元素中記錄它們最新的訪問或寫入時間,將當前時間與這些時間作差后與配置的訪問或寫入過期時間作比較,如果超過了配置的時間則表示元素過期,并將它們進行驅逐。除此之外還有兩個小細節需要留意,隊列中維護元素的變動采用的是 LRU 算法,并規定元素越靠近尾部表示它越“新”,另一點是 readCount 會在寫后標記為 0,這個變量的作用是保證在沒發生寫操作的情況下,而讀次數超過一定閾值也會執行 cleanUp 的方法,這個在后文的 get 方法邏輯中還會提到。源碼如下所示:
static class Segment extends ReentrantLock {

    final AtomicInteger readCount = new AtomicInteger();

    @GuardedBy("this")
    final Queue> accessQueue;
    final Queue> recencyQueue;
    @GuardedBy("this")
    final Queue> writeQueue;

    // guava cache 本身
    @Weak final LocalCache map;

    // Segment 中保存元素的數組
    @CheckForNull volatile AtomicReferenceArray> table;

    // 計數器
    final StatsCounter statsCounter;

    // 該段中的元素數量
    volatile int count;

    // 總的權重,不配置也表示元素數量,每個元素的權重為 1
    @GuardedBy("this")
    long totalWeight;

    @GuardedBy("this")
    void preWriteCleanup(long now) {
        // 執行加鎖的清理操作,包括處理引用隊列和過期元素
        runLockedCleanup(now);
    }

    void runLockedCleanup(long now) {
        // 仍然是 ReentrantLock#tryLock 實現
        if (tryLock()) {
            try {
                // 處理引用隊列(本文不對指定 Key 或 Value 為 weekReference 的情況進行分析)
                drainReferenceQueues();
                // 處理元素過期
                expireEntries(now);
                // 寫后讀次數清零
                readCount.set(0);
            } finally {
                unlock();
            }
        }
    }

    @GuardedBy("this")
    void expireEntries(long now) {
        // 處理最近訪問隊列 recencyQueue 和訪問隊列 accessQueue
        drainRecencyQueue();

        ReferenceEntry e;
        // 從頭節點開始遍歷寫隊列 writeQueue,將過期的元素移除
        while ((e = writeQueue.peek()) != null && map.isExpired(e, now)) {
            if (!removeEntry(e, e.getHash(), RemovalCause.EXPIRED)) {
                throw new AssertionError();
            }
        }
        while ((e = accessQueue.peek()) != null && map.isExpired(e, now)) {
            if (!removeEntry(e, e.getHash(), RemovalCause.EXPIRED)) {
                throw new AssertionError();
            }
        }
    }

    // 將元素的最近被訪問隊列 recencyQueue 清空,并使用尾插法將它們都放到訪問隊列 accessQueue 的尾節點
    @GuardedBy("this")
    void drainRecencyQueue() {
        ReferenceEntry e;
        // 遍歷元素最近被訪問隊列 recencyQueue
        while ((e = recencyQueue.poll()) != null) {
            // 如果該元素在訪問隊列 accessQueue 中
            if (accessQueue.contains(e)) {
                // 則將其放到尾節點
                accessQueue.add(e);
            }
            // 源碼中對這里的 IF 判斷,標注了如下內容來解釋如此判斷的原因:
            // 盡管元素已經在緩存中刪除,但它仍可能在 recencyQueue 隊列中。
            // 這種情況可能出現在開發者操作元素刪除或清空段中所有元素的同時執行讀操作
        }
    }

    @VisibleForTesting
    @GuardedBy("this")
    @CanIgnoreReturnValue
    boolean removeEntry(ReferenceEntry entry, int hash, RemovalCause cause) {
        int newCount = this.count - 1;
        AtomicReferenceArray> table = this.table;
        // 位與運算找到對應的桶,獲取頭節點
        int index = hash & (table.length() - 1);
        ReferenceEntry first = table.get(index);

        for (ReferenceEntry e = first; e != null; e = e.getNext()) {
            // 找到了對應的元素則操作移除
            if (e == entry) {
                ++modCount;
                // 在鏈表chain中移除元素,注意 e 表示待移除的元素
                ReferenceEntry newFirst = removeValueFromChain(first, e, e.getKey(), hash,
                        e.getValueReference().get(), e.getValueReference(), cause);
                // 注意這里又重新計算了 newCount,防止在方法執行前的 newCount 快照值發生變更
                newCount = this.count - 1;
                // 桶的位置更新為新的鏈表頭節點
                table.set(index, newFirst);
                // count 被 volatile 修飾,可見性寫操作
                this.count = newCount;
                return true;
            }
        }

        return false;
    }


    /**
     * 將元素從隊列中移除
     *
     * @param first 隊列的頭節點
     * @param entry 待移除元素
     * @param key   待移除元素的 key
     * @param hash  待移除元素的 hash 值
     * @param value 待移除元素的 value 值
     * @param valueReference 帶移除元素的 value 引用對象
     * @param cause 被移除的原因
     * @return 返回鏈表頭節點
     */
    @GuardedBy("this")
    @CheckForNull
    ReferenceEntry removeValueFromChain(ReferenceEntry first, ReferenceEntry entry,
                                              @CheckForNull K key, int hash, V value, ValueReference valueReference,
                                              RemovalCause cause) {
        // 入隊元素被移除的通知等操作
        enqueueNotification(key, hash, value, valueReference.getWeight(), cause);
        // 在寫隊列和訪問隊列中移除元素
        writeQueue.remove(entry);
        accessQueue.remove(entry);

        if (valueReference.isLoading()) {
            valueReference.notifyNewValue(null);
            return first;
        } else {
            // 將元素在鏈表中移除
            return removeEntryFromChain(first, entry);
        }
    }

    @GuardedBy("this")
    @CheckForNull
    ReferenceEntry removeEntryFromChain(ReferenceEntry first, ReferenceEntry entry) {
        // 初始化計數跟蹤數量變化
        int newCount = count;
        // 被移除元素的 next 元素,作為新的頭節點
        ReferenceEntry newFirst = entry.getNext();
        // 遍歷從 原頭節點 first 到 被移除元素 entry 之間的所有元素
        for (ReferenceEntry e = first; e != entry; e = e.getNext()) {
            // 創建一個新的節點,該節點是節點 e 的副本,并把新節點的 next 指針指向 newFirst 節點
            ReferenceEntry next = copyEntry(e, newFirst);
            // 如果 next 不為空,變更 newFirst 的引用,指向剛剛創建的節點
            // 如果原鏈表為 a -> b -> c -> d 移除 c 后鏈表為 b -> a -> d
            if (next != null) {
                newFirst = next;
            } else {
                // 如果 next 為空,表示發生了垃圾回收,將該被回收的元素的移除
                removeCollectedEntry(e);
                // 計數減一
                newCount--;
            }
        }
        // 更新計數
        this.count = newCount;
        // 返回新的頭節點
        return newFirst;
    }

    @GuardedBy("this")
    void removeCollectedEntry(ReferenceEntry entry) {
        // 入隊元素被移除的通知等操作
        enqueueNotification(entry.getKey(), entry.getHash(), entry.getValueReference().get(),
                entry.getValueReference().getWeight(), RemovalCause.COLLECTED);
        writeQueue.remove(entry);
        accessQueue.remove(entry);
    }

    @GuardedBy("this")
    void enqueueNotification(@CheckForNull K key, int hash, @CheckForNull V value, int weight, RemovalCause cause) {
        // 將當前元素的權重在總權重中減去
        totalWeight -= weight;
        // 如果元素被驅逐,則在計數器中記錄
        if (cause.wasEvicted()) {
            statsCounter.recordEviction();
        }
        // 如果配置了驅逐通知,則將該元素被驅逐的原因等信息放入隊列
        if (map.removalNotificationQueue != DISCARDING_QUEUE) {
            RemovalNotification notification = RemovalNotification.create(key, value, cause);
            map.removalNotificationQueue.offer(notification);
        }
    }
}

class LocalCache extends AbstractMap implements ConcurrentMap {
    // 判斷元素是否過期,它的邏輯非常簡單,如果配置了對應的過期模式,如訪問后過期或寫后過期
    // 會根據當前時間與元素的訪問時間或寫入時間進行比較,如果超過配置的過期時間,則返回 true,否則返回 false
    boolean isExpired(ReferenceEntry entry, long now) {
        checkNotNull(entry);
        if (expiresAfterAccess() && (now - entry.getAccessTime() >= expireAfterAccessNanos)) {
            return true;
        }
        if (expiresAfterWrite() && (now - entry.getWriteTime() >= expireAfterWriteNanos)) {
            return true;
        }
        return false;
    }
}
expand
接下來是擴容方法,因為在初始化時,Segment 對象的 table 數組并沒有被創建為最大的分段的大小,而是采取了較小的值 4 作為初始大小,所以隨著元素的增加,會觸發數組的擴容以滿足元素的存儲,它的負載因子默認為 0.75,每次擴容的大小為原有長度的 2 倍。其中對原有數組中元素的遷移蠻有意思,它會將能夠哈希到同一個桶的元素直接賦值到新的數組,而不能被哈希到同一個桶的元素則創建它們的深拷貝,一個個放入新的數組中,如下:
static class Segment extends ReentrantLock {

    static final int MAXIMUM_CAPACITY = 1 > table;

    // 該段中的元素數量
    volatile int count;

    // 總的權重,不配置也表示元素數量,每個元素的權重為 1
    @GuardedBy("this")
    long totalWeight;

    // capacity * 0.75
    int threshold;

    @GuardedBy("this")
    void expand() {
        AtomicReferenceArray> oldTable = table;
        int oldCapacity = oldTable.length();
        // 如果容量已經達到最大值,則直接返回
        if (oldCapacity >= MAXIMUM_CAPACITY) {
            return;
        }

        int newCount = count;
        // 創建一個原來兩倍容量的 AtomicReferenceArray
        AtomicReferenceArray> newTable = newEntryArray(oldCapacity  head = oldTable.get(oldIndex);

            if (head != null) {
                // 獲取頭節點的 next 節點
                ReferenceEntry next = head.getNext();
                // 計算頭節點在新數組中的索引
                int headIndex = head.getHash() & newMask;

                // 頭節點的 next 節點為空,那么證明該桶位置只有一個元素,直接將頭節點放在新數組的索引處
                if (next == null) {
                    newTable.set(headIndex, head);
                } else {
                    // 遍歷從 next 開始的節點,找到所有能 hash 到同一個桶的一批節點,然后將這些節點封裝在新數組的對應索引處
                    ReferenceEntry tail = head;
                    int tailIndex = headIndex;
                    for (ReferenceEntry e = next; e != null; e = e.getNext()) {
                        int newIndex = e.getHash() & newMask;
                        if (newIndex != tailIndex) {
                            tailIndex = newIndex;
                            tail = e;
                        }
                    }
                    newTable.set(tailIndex, tail);

                    // 將這些剩余的不能 hash 到同一個桶的節點,依次遍歷,將它們放入新數組中
                    for (ReferenceEntry e = head; e != tail; e = e.getNext()) {
                        int newIndex = e.getHash() & newMask;
                        ReferenceEntry newNext = newTable.get(newIndex);
                        // 注意這里創建節點是深拷貝,并且采用的是頭插法
                        ReferenceEntry newFirst = copyEntry(e, newNext);
                        if (newFirst != null) {
                            newTable.set(newIndex, newFirst);
                        } else {
                            // 如果 next 為空,表示發生了垃圾回收,將該被回收的元素的移除
                            removeCollectedEntry(e);
                            newCount--;
                        }
                    }
                }
            }
        }

        // 操作完成后更新 table 和 count
        table = newTable;
        this.count = newCount;
    }

}
evictEntries
元素的驅逐方法 evictEntries 主要負責維護緩存不超過最大容量限制,實現原理也非常簡單,它會根據 accessQueue 隊列,將最近最少訪問的元素優先移除:
static class Segment extends ReentrantLock {

    @Weak final LocalCache map;

    final long maxSegmentWeight;

    @GuardedBy("this")
    long totalWeight;

    @GuardedBy("this")
    final Queue> accessQueue;

    @GuardedBy("this")
    void evictEntries(ReferenceEntry newest) {
        if (!map.evictsBySize()) {
            return;
        }

        // 這個方法我們在前文中介紹過
        // 將元素的最近被訪問隊列 recencyQueue 清空,并使用尾插法將它們都放到訪問隊列 accessQueue 的尾節點
        drainRecencyQueue();

        // 如果新加入的元素權重超過了最大權重,那么直接將該元素驅逐
        if (newest.getValueReference().getWeight() > maxSegmentWeight) {
            if (!removeEntry(newest, newest.getHash(), RemovalCause.SIZE)) {
                throw new AssertionError();
            }
        }

        // 如果當前權重超過最大權重,那么不斷地驅逐元素直到滿足條件
        while (totalWeight > maxSegmentWeight) {
            // 在 accessQueue 中從頭節點遍歷元素,依次移除最近沒有被訪問的元素
            ReferenceEntry e = getNextEvictable();
            if (!removeEntry(e, e.getHash(), RemovalCause.SIZE)) {
                throw new AssertionError();
            }
        }
    }

    @GuardedBy("this")
    ReferenceEntry getNextEvictable() {
        for (ReferenceEntry e : accessQueue) {
            int weight = e.getValueReference().getWeight();
            if (weight > 0) {
                return e;
            }
        }
        throw new AssertionError();
    }
}
postWriteCleanup
寫后清理操作需要關注的內容并不多,它主要處理監聽器相關的邏輯,因為在我們的例子中并沒有創建監聽器所以就不在詳細分析了。
static class Segment extends ReentrantLock {

    @Weak final LocalCache map;

    void postWriteCleanup() {
        runUnlockedCleanup();
    }

    void runUnlockedCleanup() {
        // locked cleanup may generate notifications we can send unlocked
        if (!isHeldByCurrentThread()) {
            map.processPendingNotifications();
        }
    }
}

class LocalCache extends AbstractMap implements ConcurrentMap {

    final Queue> removalNotificationQueue;

    final RemovalListener removalListener;

    void processPendingNotifications() {
        RemovalNotification notification;
        while ((notification = removalNotificationQueue.poll()) != null) {
            try {
                removalListener.onRemoval(notification);
            } catch (Throwable e) {
                logger.log(Level.WARNING, "Exception thrown by removal listener", e);
            }
        }
    }
}
get
接下來我們要深入 get 方法的分析了,同樣地它也會被路由(segmentFor)到具體的 Segment:
static class LocalManualCache implements Cache, Serializable {
    final LocalCache localCache;

    // ...
}

static class LocalLoadingCache extends LocalManualCache
        implements LoadingCache {

    @Override
    public V get(K key) throws ExecutionException {
        return localCache.getOrLoad(key);
    }
}
class LocalCache extends AbstractMap implements ConcurrentMap {

    @CheckForNull final CacheLoader defaultLoader;

    V getOrLoad(K key) throws ExecutionException {
        return get(key, defaultLoader);
    }

    @CanIgnoreReturnValue
    V get(K key, CacheLoader loader) throws ExecutionException {
        int hash = hash(checkNotNull(key));
        return segmentFor(hash).get(key, hash, loader);
    }
}
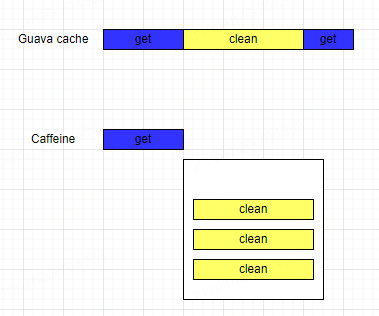
它的核心邏輯也在 Segment 中,注意讀操作是不加鎖的,它相比與 put 方法要簡單,其中要注意的是 recordRead 方法,它會將被訪問的元素添加到 recencyQueue 最近訪問隊列中,用于記錄最近被訪問元素的順序,后續執行維護(cleanUp)相關的邏輯時,會將該隊列中的元素全部移動到 accessQueue 隊列中,用于根據元素的訪問順序來判斷元素是否被驅逐。除此之外,因為元素的驅逐大多都是在 put 方法中完成的,為了在不發生寫操作的情況下也能正常管理元素的生命中期,在 get 方法中也有相關的實現,比如 postReadCleanup 方法,它通過 readCount 的計數和 DRAIN_THRESHOLD 的閾值來判斷是否需要驅逐元素,當計數超過閾值時則調用 cleanUp 方法進行驅逐,當然這并不會強制執行(因為它執行的是 ReentrantLock#tryLock 方法),嘗試獲取鎖來執行,即使沒有獲取到鎖,那么證明有寫操作在執行,元素的驅逐操作也不需要再多關心了。源碼如下所示:
static class Segment extends ReentrantLock {

    static final int DRAIN_THRESHOLD = 0x3F;

    volatile int count;

    @Weak final LocalCache map;

    final Queue> recencyQueue;

    final StatsCounter statsCounter;

    final AtomicInteger readCount = new AtomicInteger();

    @CanIgnoreReturnValue
    V get(K key, int hash, CacheLoader loader) throws ExecutionException {
        checkNotNull(key);
        checkNotNull(loader);
        try {
            if (count != 0) {
                ReferenceEntry e = getEntry(key, hash);
                // 獲取到對應元素
                if (e != null) {
                    long now = map.ticker.read();
                    // 獲取到對應的 value
                    V value = getLiveValue(e, now);
                    // value 不為空
                    if (value != null) {
                        // 記錄讀操作,會將元素添加到最近訪問隊列 recencyQueue 的尾節點
                        recordRead(e, now);
                        // 命中計數 +1
                        statsCounter.recordHits(1);
                        // 如果配置了元素刷新則執行相關刷新邏輯
                        return scheduleRefresh(e, key, hash, value, now, loader);
                    }
                    // value 為空
                    ValueReference valueReference = e.getValueReference();
                    // 如果 value 正在 loading 則等待
                    if (valueReference.isLoading()) {
                        return waitForLoadingValue(e, key, valueReference);
                    }
                }
            }

            // 如果元素數量為 0,則執行該方法
            return lockedGetOrLoad(key, hash, loader);
        } catch (ExecutionException ee) {
            Throwable cause = ee.getCause();
            if (cause instanceof Error) {
                throw new ExecutionError((Error) cause);
            } else if (cause instanceof RuntimeException) {
                throw new UncheckedExecutionException(cause);
            }
            throw ee;
        } finally {
            postReadCleanup();
        }
    }

    @CheckForNull
    ReferenceEntry getEntry(Object key, int hash) {
        // 獲取到 table 數組中對應桶的頭節點
        for (ReferenceEntry e = getFirst(hash); e != null; e = e.getNext()) {
            // 元素 hash 值不相等繼續遍歷尋找
            if (e.getHash() != hash) {
                continue;
            }

            // 找到對應的元素后,如果 key 為空,則處理引用隊列
            K entryKey = e.getKey();
            if (entryKey == null) {
                tryDrainReferenceQueues();
                continue;
            }

            // 如果 key 值相等,則返回該元素
            if (map.keyEquivalence.equivalent(key, entryKey)) {
                return e;
            }
        }

        // 否則返回 null
        return null;
    }

    V getLiveValue(ReferenceEntry entry, long now) {
        // key 和 value 為空的情況,處理引用隊列
        if (entry.getKey() == null) {
            tryDrainReferenceQueues();
            return null;
        }
        V value = entry.getValueReference().get();
        if (value == null) {
            tryDrainReferenceQueues();
            return null;
        }

        // 如果元素過期了
        if (map.isExpired(entry, now)) {
            // 嘗試加鎖執行元素過期驅逐操作
            tryExpireEntries(now);
            return null;
        }
        return value;
    }

    void recordRead(ReferenceEntry entry, long now) {
        // 如果配置了訪問后過期,則更新元素訪問時間
        if (map.recordsAccess()) {
            entry.setAccessTime(now);
        }
        // 將元素添加到最近訪問隊列中
        recencyQueue.add(entry);
    }

    V waitForLoadingValue(ReferenceEntry e, K key, ValueReference valueReference) throws ExecutionException {
        if (!valueReference.isLoading()) {
            throw new AssertionError();
        }

        checkState(!Thread.holdsLock(e), "Recursive load of: %s", key);
        try {
            // 等待元素加載完成
            V value = valueReference.waitForValue();
            if (value == null) {
                throw new InvalidCacheLoadException("CacheLoader returned null for key " + key + ".");
            }
            // 執行記錄讀操作
            long now = map.ticker.read();
            recordRead(e, now);
            return value;
        } finally {
            // 未命中統計數+1
            statsCounter.recordMisses(1);
        }
    }

    // 通常在寫入過程中進行清理。如果在足夠數量的讀取后沒有觀察到清理,請嘗試從讀取線程進行清理。
    void postReadCleanup() {
        // readCount 自增,如果達到閾值則執行清理操作,清理操作與寫入操作中的邏輯一致
        if ((readCount.incrementAndGet() & DRAIN_THRESHOLD) == 0) {
            cleanUp();
        }
    }

    void cleanUp() {
        long now = map.ticker.read();
        runLockedCleanup(now);
        runUnlockedCleanup();
    }
}
lockedGetOrLoad
lockedGetOrLoad 是 LoadingCache 的核心邏輯,在某個 key 在緩存中不存在且配置了 loader 函數時會被執行,本質上這也是觸發了一次寫操作,將不存在的元素通過 loader 方法獲取到具體值并加載到緩存中,所以在這里也會觸發到元素生命周期管理的方法,如 preWriteCleanup,不過該方法總體上的實現與 put 方法類似,并沒有特別復雜的地方。
static class Segment extends ReentrantLock {

    volatile int count;

    @Weak final LocalCache map;

    @CheckForNull volatile AtomicReferenceArray> table;

    @GuardedBy("this")
    final Queue> writeQueue;
    @GuardedBy("this")
    final Queue> accessQueue;

    final StatsCounter statsCounter;

    int modCount;

    // 加鎖讀或加載元素值
    V lockedGetOrLoad(K key, int hash, CacheLoader loader) throws ExecutionException {
        ReferenceEntry e;
        ValueReference valueReference = null;
        LoadingValueReference loadingValueReference = null;
        boolean createNewEntry = true;

        // 加鎖
        lock();
        try {
            long now = map.ticker.read();
            // 寫前整理操作,已經在上文中介紹過
            preWriteCleanup(now);

            int newCount = this.count - 1;
            // 找到該元素對應桶的頭節點
            AtomicReferenceArray> table = this.table;
            int index = hash & (table.length() - 1);
            ReferenceEntry first = table.get(index);

            // 遍歷尋找該元素
            for (e = first; e != null; e = e.getNext()) {
                K entryKey = e.getKey();
                // 如果找到了與該元素 key 值相等的元素
                if (e.getHash() == hash && entryKey != null && map.keyEquivalence.equivalent(key, entryKey)) {
                    valueReference = e.getValueReference();

                    // 判斷元素是否在加載中
                    if (valueReference.isLoading()) {
                        // 如果在加載中則不創建新的元素
                        createNewEntry = false;
                    } else {
                        // 否則執行元素的加載
                        V value = valueReference.get();
                        if (value == null) {
                            // 如果獲取到的值為空,說明元素已經被回收了,則將該事件通知放到隊列中
                            enqueueNotification(entryKey, hash, value, valueReference.getWeight(), RemovalCause.COLLECTED);
                        } else if (map.isExpired(e, now)) {
                            // 如果元素過期了,則將該事件通知放到隊列中
                            enqueueNotification(entryKey, hash, value, valueReference.getWeight(), RemovalCause.EXPIRED);
                        } else {
                            // 否則,獲取到了 value 值,執行記錄讀操作
                            recordLockedRead(e, now);
                            // 命中統計數+1
                            statsCounter.recordHits(1);
                            return value;
                        }

                        // value 無效的情況都需要將元素在寫隊列和訪問隊列中移除
                        writeQueue.remove(e);
                        accessQueue.remove(e);
                        // 可見性寫操作
                        this.count = newCount;
                    }
                    break;
                }
            }

            // 沒有找到該元素,則需要創建新元素
            if (createNewEntry) {
                // value 的類型為 LoadingValueReference
                loadingValueReference = new LoadingValueReference();

                if (e == null) {
                    e = newEntry(key, hash, first);
                    e.setValueReference(loadingValueReference);
                    table.set(index, e);
                } else {
                    e.setValueReference(loadingValueReference);
                }
            }
        } finally {
            // 解鎖和寫后通知操作
            unlock();
            postWriteCleanup();
        }

        if (createNewEntry) {
            try {
                // 同步執行元素的加載
                synchronized (e) {
                    return loadSync(key, hash, loadingValueReference, loader);
                }
            } finally {
                // 元素未命中統計數+1
                statsCounter.recordMisses(1);
            }
        } else {
            // 元素已經存在,等在加載
            return waitForLoadingValue(e, key, valueReference);
        }
    }

    V loadSync(K key, int hash, LoadingValueReference loadingValueReference, CacheLoader loader) throws ExecutionException {
        ListenableFuture loadingFuture = loadingValueReference.loadFuture(key, loader);
        return getAndRecordStats(key, hash, loadingValueReference, loadingFuture);
    }

    @CanIgnoreReturnValue
    V getAndRecordStats(K key, int hash, LoadingValueReference loadingValueReference, ListenableFuture newValue) throws ExecutionException {
        V value = null;
        try {
            // 阻塞執行 loader 函數(不允許中斷)
            value = getUninterruptibly(newValue);
            if (value == null) {
                throw new InvalidCacheLoadException("CacheLoader returned null for key " + key + ".");
            }
            // 標記元素加載完成
            statsCounter.recordLoadSuccess(loadingValueReference.elapsedNanos());
            // 保存加載的元素
            storeLoadedValue(key, hash, loadingValueReference, value);
            return value;
        } finally {
            if (value == null) {
                statsCounter.recordLoadException(loadingValueReference.elapsedNanos());
                removeLoadingValue(key, hash, loadingValueReference);
            }
        }
    }

    // 邏輯與 put 方法類似
    @CanIgnoreReturnValue
    boolean storeLoadedValue(K key, int hash, LoadingValueReference oldValueReference, V newValue) {
        // 加鎖
        lock();
        try {
            long now = map.ticker.read();
            preWriteCleanup(now);

            int newCount = this.count + 1;
            if (newCount > this.threshold) {
                expand();
                newCount = this.count + 1;
            }

            // 找到該元素對應的桶的頭節點
            AtomicReferenceArray> table = this.table;
            int index = hash & (table.length() - 1);
            ReferenceEntry first = table.get(index);

            for (ReferenceEntry e = first; e != null; e = e.getNext()) {
                K entryKey = e.getKey();
                if (e.getHash() == hash && entryKey != null && map.keyEquivalence.equivalent(key, entryKey)) {
                    ValueReference valueReference = e.getValueReference();
                    V entryValue = valueReference.get();

                    // 如果元素已經存在,則替換舊的 LoadingValueReference
                    if (oldValueReference == valueReference || (entryValue == null && valueReference != UNSET)) {
                        ++modCount;
                        if (oldValueReference.isActive()) {
                            RemovalCause cause = (entryValue == null) ? RemovalCause.COLLECTED : RemovalCause.REPLACED;
                            enqueueNotification(key, hash, entryValue, oldValueReference.getWeight(), cause);
                            newCount--;
                        }
                        setValue(e, key, newValue, now);
                        this.count = newCount;
                        evictEntries(e);
                        return true;
                    }

                    enqueueNotification(key, hash, newValue, 0, RemovalCause.REPLACED);
                    return false;
                }
            }

            ++modCount;
            // 沒有找到該 key 對應的元素則創建新的元素,此處邏輯與 put 元素的操作一致
            ReferenceEntry newEntry = newEntry(key, hash, first);
            setValue(newEntry, key, newValue, now);
            table.set(index, newEntry);
            this.count = newCount;
            evictEntries(newEntry);
            return true;
        } finally {
            unlock();
            postWriteCleanup();
        }
    }
}
與 Caffeine 的對比
Guava Cache 的源碼要比 Caffeine 簡單得多,但是 Caffeine 的實現更加優雅,可讀性也更高(詳細參閱萬文詳解 Caffeine 實現原理)。
Guava Cache 采用的是分段鎖的思想,這種思想在 JDK 1.7 的 ConcurrentHashMap 也有實現,但由于性能相對較差,在 JDK 1.8 及之后被棄用,取而代之的是使用 CAS 操作、少量 synchronized 關鍵字同步操作、及合適的 自旋重試 和 volatile 關鍵字的方案,而在 Caffeine 中,底層實現采用的便是 ConcurrentHashMap,它是在 ConcurrentHashMap 之上添加了緩存相關的管理功能,如緩存過期、緩存淘汰等(相比于 Guava Cache 功能也更豐富),在這一點上 Caffeine 就已經占盡了優勢,能夠高效支持更大規模的并發訪問,而且還能隨著 JDK 升級過程中對 ConcurrentHashMap 的優化而持續享受優化后帶來的并發效率的提升。
在 Guava Cache 中針對緩存的驅逐采用了 LRU 算法,實際上這種驅逐策略并不精準,在 Caffeine 中提供了基于 TinyLFU 算法 的驅逐策略,這種算法在對緩存驅逐的準確性上更高,能更好的提供緩存命中率和保證緩存的性能。
除此之外,Caffeine 提供了更復雜的緩存過期管理機制:TimeWheel,這一點在 Guava Cache 中是沒有的(本地緩存 Caffeine 中的時間輪(TimeWheel)是什么?)。另外,在對內存性能的優化上,Caffeine 針對常訪問的字段避免了緩存偽共享問題(高性能緩存設計:如何解決緩存偽共享問題),這些在 Guava Cache 中也是沒有任何體現的。
總而言之,Caffeine 是更加現代化的本地緩存,可以說它全面優于 Guava Cache,在技術選型上,可以優先考慮。不過,Guava Cache 也并不是一無是處,在對性能要求不高的場景下且不想引入額外的依賴(Caffeine),Guava Cache 也是一個不錯的選擇,因為 Guava 作為常用的 Java 庫,通常都會在依賴中存在。
巨人的肩膀
Github - Guava
審核編輯 黃宇
-
Cache
+關注
關注
0文章
130瀏覽量
29014 -
源碼
+關注
關注
8文章
671瀏覽量
30270
發布評論請先 登錄
高性能緩存設計:如何解決緩存偽共享問題
MCU緩存設計
人工智能的下一站在哪里
Linux服務器卡頓救星之一招釋放Cache內存
HTTP緩存頭的使用 本地緩存與遠程緩存的區別
什么是緩存(Cache)及其作用
緩存之美——如何選擇合適的本地緩存?

Cache和內存有什么區別

什么是CPU緩存?它有哪些作用?
Cortex R52內核Cache的具體操作(2)

CortexR52內核Cache的具體操作


 工商網監
工商網監
評論