Bootstrap是Twitter推出的一個由動態CSS語言Less寫成的開源CSS/HTML框架(同時提供Sass 移植版代碼)。Bootstrap提供了全面的基本及組件樣式并自帶了13個jQuery插件(模態對話框、標簽頁、滾動條、彈出框等),可滿足常用開發需要,而且還根據需要定制。另外,Bootstrap提供了優雅的HTML和CSS規范,使用者也可以參考學習。
今天談一下bootstrap,這個讓我愛不釋手的東西,慣例,我們先要去它的官網http://v3.bootcss.com進行下載:
點擊紅線邊框處即可跳轉到下載頁面,有三個東西可以給我們選擇,由于我們現在處于初級使用階段,或者說我們直接用在生成環境下,我們下載第一個就好:

下載成功后可以得到一個.zip的文件,解壓后我們可以得到一個包含css、fonts和js的文件夾,ok,準備工作我們就做好了。
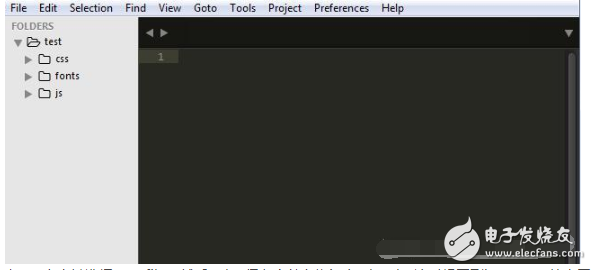
現在要怎么用呢,一頭霧水吧,我們新建一個文件夾,命名為test,將剛剛三個文件夾復制到test文件夾中,現在用sublime打開剛剛的文件夾,點擊file-open folder,選擇test文件夾點擊確定即可,如下:
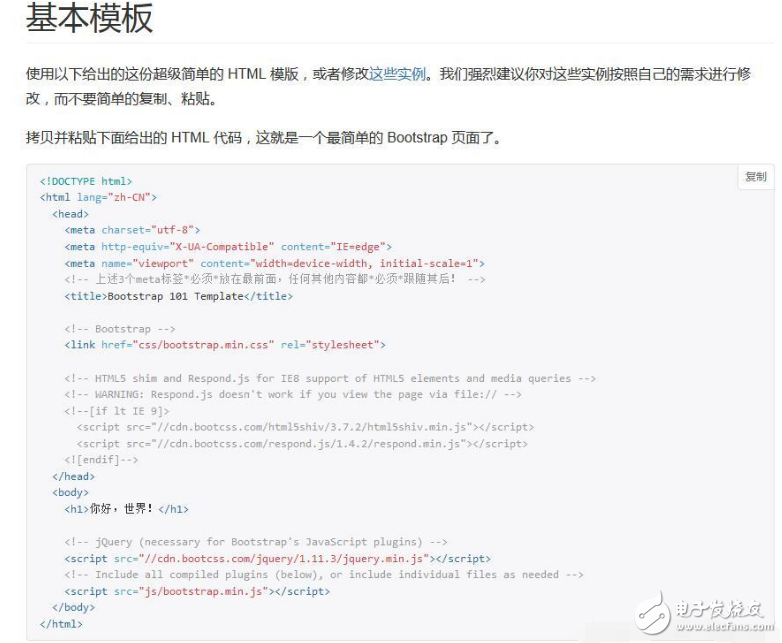
在test上右鍵選擇new file,然后ctrl+s保存文件名為index.html,這時候回到bootstrap的官網,導航欄選擇“起步”,向下拖動或在右側選擇“基本模板”,將下列代碼進行復制,粘貼到index.html中,如下:
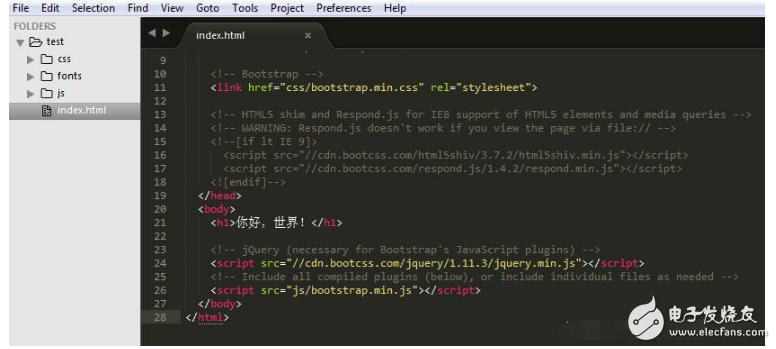
粘貼到sublime中,這是一個html5格式的html文件:
這時候我們點擊index.html,瀏覽器打開后就可以在屏幕上看到一個Diao炸天的“Hello world”了。
到這里,其實你已經用bootstrap完成了第一個頁面設計了。下面來具體說下bootstrap的具體使用方法,bootstrap其實是把網頁等分為了12分,所以記住12這個數字是很重要的,可能這里你會比較模糊,下面我們來看下官方文檔是怎么說的,我們先來了解一下“柵格參數”:
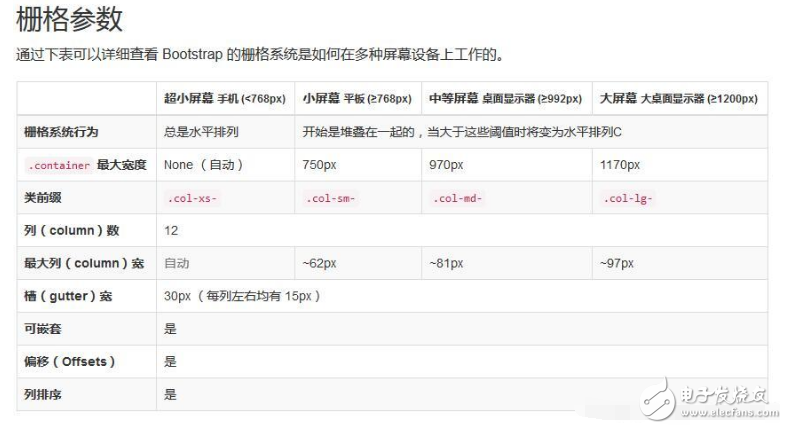
bootstrap把根據屏幕大小把屏幕分為了4個層級,小于768像素的為超小屏幕,大于等于768像素的為小屏幕,大于等于992像素的為中等屏幕,大于等于1200像素的則為大屏幕,相應的類前綴見圖或查看官方文檔,根據柵格參數,我們看下下面這幅圖:

我們可以發現,每行的數字全部相加,最終都等于剛剛我讓大家記住的12,可能大家還是不清楚,我們下面用一個例子來會說明:
如果我現在需要在頁面上左右分別顯示兩個面板,面板上面顯示相應的表格數據,且左側列表占總寬度的3分之2,右側的面板僅占3分之1,OK,下面我們來看看怎么做。
我們剛剛已經創建好了一個基本的頁面布局,頁面上顯示了“你好,世界!”,現在我們在這個框架上面接著寫:
在body中,我們刪除剛剛的“你好,世界!”,新建兩個div,如下:
[html] view plain copy print?
《div class=“col-md-8”》《/div》
《div class=“col-md-4”》《/div》
由于左側占用3分之2,12的3分之2為8,所以上面一個div設置為8,剩下的一個設為4,好了,第一步完成了。
下面進行第二步,分別在8和4里面建立兩個面板,在bootstrap官網找到面板,復制代碼如下:
[html] view plain copy print?
《div class=“panel panel-default”》
《div class=“panel-body”》
Basic panel example
《/div》
《/div》
將這段代碼分別粘貼到兩個div下,最終代碼如下:
[html] view plain copy print?
《pre name=“code” class=“html”》 《div class=“col-md-8”》
《div class=“panel panel-default”》
《div class=“panel-body”》
Basic panel example
《/div》
《/div》
《/div》
《div class=“col-md-4”》
《div class=“panel panel-default”》
《div class=“panel-body”》
Basic panel example
《/div》
《/div》
《/div》
這時候頁面顯示效果如下:
我們可以看到左側的panel占據了頁面的3分之2,右側的僅為3分之1,第二步也完成了。
第三步,我們來創建表格,在bootstrap官網找到表格的代碼:
[html] view plain copy print?
《table class=“table”》
《caption》Optional table caption.《/caption》
《thead》
《tr》
《th》#《/th》
《th》First Name《/th》
《th》Last Name《/th》
《th》Username《/th》
《/tr》
《/thead》
《tbody》
《tr》
《th scope=“row”》1《/th》
《td》Mark《/td》
《td》Otto《/td》
《td》@mdo《/td》
《/tr》
《tr》
《th scope=“row”》2《/th》
《td》Jacob《/td》
《td》Thornton《/td》
《td》@fat《/td》
《/tr》
《tr》
《th scope=“row”》3《/th》
《td》Larry《/td》
《td》the Bird《/td》
《td》@twitter《/td》
《/tr》
《/tbody》
《/table》
同樣的,將這段代碼粘貼到剛剛的兩個panel中,代碼如下:
[html] view plain copy print?
《div class=“col-md-8”》
《div class=“panel panel-default”》
《div class=“panel-body”》
《table class=“table”》
《caption》Optional table caption.《/caption》
《thead》
《tr》
《th》#《/th》
《th》First Name《/th》
《th》Last Name《/th》
《th》Username《/th》
《/tr》
《/thead》
《tbody》
《tr》
《th scope=“row”》1《/th》
《td》Mark《/td》
《td》Otto《/td》
《td》@mdo《/td》
《/tr》
《tr》
《th scope=“row”》2《/th》
《td》Jacob《/td》
《td》Thornton《/td》
《td》@fat《/td》
《/tr》
《tr》
《th scope=“row”》3《/th》
《td》Larry《/td》
《td》the Bird《/td》
《td》@twitter《/td》
《/tr》
《/tbody》
《/table》
《/div》
《/div》
《/div》
《div class=“col-md-4”》
《div class=“panel panel-default”》
《div class=“panel-body”》
《table class=“table”》
《caption》Optional table caption.《/caption》
《thead》
《tr》
《th》#《/th》
《th》First Name《/th》
《th》Last Name《/th》
《th》Username《/th》
《/tr》
《/thead》
《tbody》
《tr》
《th scope=“row”》1《/th》
《td》Mark《/td》
《td》Otto《/td》
《td》@mdo《/td》
《/tr》
《tr》
《th scope=“row”》2《/th》
《td》Jacob《/td》
《td》Thornton《/td》
《td》@fat《/td》
《/tr》
《tr》
《th scope=“row”》3《/th》
《td》Larry《/td》
《td》the Bird《/td》
《td》@twitter《/td》
《/tr》
《/tbody》
《/table》
《/div》
《/div》
《/div》
此時頁面效果如下:

好了,最終效果就是這樣,其實整個過程我都在粘貼復制,完全一個代碼都沒有寫,這樣做的好處是,我們開發起來很簡單,而且兼容ie8以上、Firefox、Google等主流瀏覽器,基本方法就是這樣,其余的一些效果不一一敘述,由于功能太多,方法都差不多,各位coder自己嘗試一下吧!
 電子發燒友App








評論