") ELF 1技術(shù)貼|如何在開發(fā)板上生成二維碼圖像
ELF 1技術(shù)貼|如何在開發(fā)板上生成二維碼圖像

在開發(fā)應(yīng)用程序時(shí),常常需要生成二維碼以便于用戶通過掃描快速訪問信息。為了實(shí)現(xiàn)這一功能開發(fā)者通常選用 QRencode 專為生成二維碼圖像設(shè)計(jì)的開源庫。然而,要在特定平臺上使用 QRencode,需要將其進(jìn)行交叉編譯,以確保能夠在目標(biāo)平臺上正確運(yùn)行。
深入來看,QRencode庫的正常運(yùn)作依賴于兩個(gè)核心支撐庫:Zlib與LibPNG。其中,Zlib作為開放源代碼的壓縮與解壓縮庫,為數(shù)據(jù)處理提供了強(qiáng)大支持;而LibPNG則用于PNG圖像格式的解析與操作,是圖像處理的關(guān)鍵環(huán)節(jié)。因此,在正式啟動QRencode庫的交叉編譯流程之前,需先行完成對這兩個(gè)基礎(chǔ)庫——Zlib與LibPNG的交叉編譯工作。
本篇文章將以ELF 1開發(fā)板為實(shí)例,逐步闡述如何將這三大庫——Zlib、LibPNG以及QRencode——成功移植并部署至ELF 1平臺上,解鎖在該平臺上的二維碼生成能力。
一、下載源碼
在瀏覽器復(fù)制以下鏈接跳轉(zhuǎn)后即可下載源碼
Zlib-1.3.1.tar.gz(https://zlib.net/)
LibPNG-1.6.43.tar.xz(https://www.linuxfromscratch.org/blfs/view/svn/general/libpng.html)
QRencode-4.1.1.tar.gz(https://fukuchi.org/works/qrencode/)
二、交叉編譯Zlib
1、將zlib-1.3.1.tar.gz 源碼拷貝到Ubuntu環(huán)境中并進(jìn)行解壓
elf@ubuntu:~/work/qrencode$ tar xvf zlib-1.3.1.tar.gz
2、進(jìn)入Zlib源碼目錄內(nèi),創(chuàng)建一個(gè)zlib_INSTALL文件夾以用來放置編譯出來的文件
elf@ubuntu:~/work/qrencode$ cd zlib-1.3.1 elf@ubuntu:~/work/qrencode/zlib-1.3.1$ mkdir zlib_INSTALL
3、設(shè)置環(huán)境變量
elf@ubuntu:~/work/qrencode/zlib-1.3.1$ . /opt/fsl-imx-x11/4.1.15-2.0.0/environment-setup-cortexa7hf-neon-poky-linux-gnueabi
4、生成Makefile,make 進(jìn)行編譯
elf@ubuntu:~/work/qrencode/zlib-1.3.1$./configure --prefix=$(pwd)/zlib_INSTALL elf@ubuntu:~/work/qrencode/zlib-1.3.1$ make
5、編譯完成,執(zhí)行make install將庫和例程等文件安裝到目標(biāo)文件下
elf@ubuntu:~/work/qrencode/zlib-1.3.1$ make install elf@ubuntu:~/work/qrencode/zlib-1.3.1$ ls zlib_INSTALL/ include lib share
三、交叉編譯LibPNG
1、將libpng-1.6.43.tar.xz源碼拷貝到Ubuntu環(huán)境中并進(jìn)行解壓
elf@ubuntu:~/work/qrencode$ tar xvf libpng-1.6.43.tar.xz
2、進(jìn)入LibPNG源碼目錄內(nèi),創(chuàng)建一個(gè)libpng_INSTALL文件夾以用來放置編譯出來的文件:
elf@ubuntu:~/work/qrencode$ cd libpng-1.6.43 elf@ubuntu:~/work/qrencode/libpng-1.6.43$ mkdir libpng_INSTALL
3、設(shè)置環(huán)境變量
elf@ubuntu:~/work/qrencode/libpng-1.6.43$ . /opt/fsl-imx-x11/4.1.15-2.0.0/environment-setup-cortexa7hf-neon-poky-linux-gnueabi
4、生成Makefile,make 進(jìn)行編譯
elf@ubuntu:~/work/qrencode/libpng-1.6.43$./configure --prefix=$(pwd)/libpng_INSTALL --host=arm elf@ubuntu:~/work/qrencode/libpng-1.6.43$ make
5、編譯完成,執(zhí)行make install將庫和例程等文件安裝到目標(biāo)文件下
elf@ubuntu:~/work/qrencode/libpng-1.6.43$ make install elf@ubuntu:~/work/qrencode/libpng-1.6.43$ ls libpng_INSTALL/ bin include lib share
四、交叉編譯QRencode
1、將qrencode-4.1.1.tar.gz 源碼拷貝到Ubuntu環(huán)境中并進(jìn)行解壓
elf@ubuntu:~/work/qrencode$ tar xvf qrencode-4.1.1.tar.gz
2、進(jìn)入QRencode源碼目錄內(nèi),創(chuàng)建一個(gè)qrencode_INSTALL文件夾以用來放置編譯出來的文件
elf@ubuntu:~/work/qrencode$ cd qrencode-4.1.1 elf@ubuntu:~/work/qrencode/qrencode-4.1.1$ mkdir qrencode_INSTALL
3、設(shè)置環(huán)境變量
elf@ubuntu:~/work/qrencode/qrencode-4.1.1$ . /opt/fsl-imx-x11/4.1.15-2.0.0/environment-setup-cortexa7hf-neon-poky-linux-gnueabi elf@ubuntu:~/work/qrencode/qrencode-4.1.1$ export png_CFLAGS="-I/home/elf/work/qrencode/libpng-1.6.43/include/libpng16 -I/home/elf/work/qrencode/libpng-1.6.43/include -I/home/elf/work/qrencode/zlib-1.3.1/include" elf@ubuntu:~/work/qrencode/qrencode-4.1.1$ export png_LIBS="-L/home/elf/work/qrencode/libpng-1.6.43/lib -lpng16 -L/home/elf/work/qrencode/libpng-1.6.43/include -I/home/elf/work/qrencode/zlib-1.3.1/lib -lz -lm"
4、生成Makefile,make 進(jìn)行編譯
elf@ubuntu:~/work/qrencode/qrencode-4.1.1$ ./configure --enable-static --disable-shared --prefix=$(pwd)/qrencode-4.1.1_INSTALL --host=arm elf@ubuntu:~/work/qrencode/qrencode-4.1.1$ make
5、編譯完成,執(zhí)行make install將庫和例程等文件安裝到目標(biāo)文件下
elf@ubuntu:~/work/qrencode/qrencode-4.1.1$ make install elf@ubuntu:~/work/qrencode/qrencode-4.1.1$ ls qrencode_INSTALL/ bin include lib share
將以上編譯生成的所有文件拷貝到開發(fā)板/目錄下 ,即可完成部署。
五、測試
root@ELF1:~# qrencode -s 25 -o test.png Hello-ElfBoard
-s:指定圖片大小
-o:輸出二維碼圖片名稱
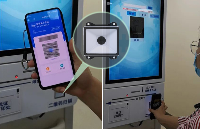
可以打開微信進(jìn)行掃一掃,掃描結(jié)果如下圖所示:

至此,就完成了QRencode庫在開發(fā)板上的移植,即可實(shí)現(xiàn)在開發(fā)板上生成二維碼圖像。誠摯希望上述指南能為各位小伙伴在嵌入式開發(fā)實(shí)戰(zhàn)中提供幫助,助力大家邁向新高度!
-
單片機(jī)
+關(guān)注
關(guān)注
6067文章
44992瀏覽量
650613 -
嵌入式
+關(guān)注
關(guān)注
5152文章
19675瀏覽量
317672 -
開發(fā)板
+關(guān)注
關(guān)注
25文章
5682瀏覽量
104841
發(fā)布評論請先 登錄
基于RK3576開發(fā)板的二維碼生成
【學(xué)習(xí)打卡】OpenHarmony應(yīng)用開發(fā)之二維碼生成器
嵌入式學(xué)習(xí)-飛凌ElfBoard ELF 1板卡 - 在開發(fā)板上生成二維碼圖像
I.MX6ULL-飛凌 ElfBoard ELF1板卡 - 在開發(fā)板上生成二維碼圖像
二維碼識別
二維碼軟件中制作Dot Code二維碼的步驟
HarmonyOS教程—基于AI的碼生成能力,實(shí)現(xiàn)二維碼生成與掃碼功能
如何在STM32F407開發(fā)板上控制LV3096二維碼掃碼模塊呢
二維碼技術(shù)的編譯規(guī)則分析

二維碼在智能門禁中的應(yīng)用,二維碼門禁如何保證安全性
鴻蒙系統(tǒng)生成二維碼技術(shù)

二維碼掃碼讀頭有什么功能?如何選擇二維碼讀頭?


 工商網(wǎng)監(jiān)
評論