 nginx+lua+redis實現灰度發布

作者:馬仁喜
前言:授人以魚不如授人以漁.先學會用,在學原理,在學創造,可能一輩子用不到這種能力,但是不能不具備這種能力。這篇文章主要是沉淀使用nginx+lua+redis實現灰度,當我們具備了這種能力,隨時可以基于這種能力和思想調整實現方案:比如nginx+lua+(其他數據源)、nginx+(其他腳本語言)
一、灰度方案:
常見的灰度實現方案:
1.請求路由:通過請求中的標識(如用戶ID、設備ID、請求頭等)來決定是否將請求路由到灰度環境。可以使用反向代理(如Nginx、Envoy)或API網關(如Kong、Apigee)來實現路由規則。
2.權重控制:將流量按照一定的權重比例分配到不同的環境中。可以通過負載均衡器(如HAProxy、Kubernetes Ingress)或代理服務器(如Nginx、Envoy)來實現權重控制。
3.特性開關:通過在代碼中嵌入特性開關(Feature Flag)來控制功能的開啟與關閉。可以使用配置文件、數據庫、鍵值存儲或特性管理平臺(如LaunchDarkly、Unleash)來管理特性開關。
4.分階段發布:將功能的發布分為多個階段,從內部測試到灰度環境再到全量發布。可以使用部署工具(如Jenkins、GitLab CI/CD)或云平臺(如AWS、Azure)來支持分階段發布。
5.A/B測試:將流量分為多個不同版本的應用程序,比較它們的性能和用戶反饋。可以使用A/B測試平臺(如Optimizely、Google Optimize)來管理和監控A/B測試。
6.金絲雀發布:將新版本的應用程序逐步引入生產環境,僅將少量流量導向新版本,并根據其性能和穩定性逐步增加流量。可以使用部署工具、容器編排平臺或云平臺來實現金絲雀發布。
?
常用的灰度發布方案:
1.基于用戶ID的灰度發布:基于用戶ID來劃分灰度用戶或百分比灰度,例如根據用戶ID的哈希值或隨機數來決定用戶是否路由到灰度環境。
2.基于IP地址的灰度發布:根據用戶的IP地址來劃分灰度用戶,例如將某一范圍的IP地址指定為灰度用戶,將請求從這些IP地址路由到灰度環境。
3.Cookie/Session的灰度發布:通過在用戶的Cookie或會話中設置特定的標識來劃分灰度用戶。例如,將特定的Cookie或會話變量設置為灰度標識,將具有該標識的請求路由到灰度環境。
4.請求頭的灰度發布:基于請求頭中的特定標識來劃分灰度用戶。例如,根據請求頭中的自定義標識或特定的HTTP Header來路由請求到灰度環境。
5.權重或百分比的灰度發布:將請求隨機分配給不同的環境,可以通過給不同環境設置不同的權重或百分比來控制流量的分配。
6.A/B測試:將流量分為多個不同版本的應用程序,在實驗期間比較它們的性能和用戶反饋,最終選擇最佳版本進行全量發布。
?
二、nginx+lua+redis實現灰度
理論:
1、安裝并配置 Nginx 和 Redis。確保 Nginx 啟用 Lua 模塊,并可以訪問 Redis。
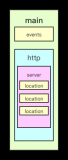
2、在 Nginx 配置中定義灰度規則。您可以使用 Lua 腳本來判斷用戶是否應該被路由到灰度環境。示例配置如下:
server {
    listen 80;
    server_name example.com;
    location / {
        access_by_lua_block {
            local redis = require "resty.redis"
            local red = redis:new()
            -- 連接到 Redis
            local ok, err = red:connect("redis_host", redis_port)
            if not ok then
                ngx.log(ngx.ERR, "failed to connect to Redis: ", err)
                ngx.exit(500)
            end
            -- 使用 Redis 根據用戶 ID 判斷是否路由到灰度環境
            local user_id = ngx.req.get_headers()["X-User-ID"]
            local is_gray = red:get("gray:" .. user_id)
            if is_gray == "1" then
                ngx.var.upstream = "gray_backend"
            end
        }
        proxy_pass http://backend;
    }
    location /gray {
        # 灰度環境的配置
        proxy_pass http://gray_backend;
    }
    location /admin {
        # 管理后臺的配置
        proxy_pass http://admin_backend;
    }
}
在上面的示例中,我們連接到 Redis,并根據請求中的用戶 ID 判斷是否將請求路由到灰度環境。ngx.var.upstream 變量用于動態設置上游地址,從而實現灰度環境的路由。
3、在 Redis 中設置灰度用戶。您可以在 Redis 中維護一個鍵值對,其中鍵是用戶 ID,值表示是否是灰度用戶(例如,1 表示是灰度用戶,0 表示不是)。您可以使用 Redis 的 SET 和 GET 命令來操作這些值。
-- 設置用戶為灰度用戶
local ok, err = red:set("gray:" .. user_id, 1)
if not ok then
    ngx.log(ngx.ERR, "failed to set gray status for user: ", err)
    ngx.exit(500)
end

-- 設置用戶為非灰度用戶
local ok, err = red:set("gray:" .. user_id, 0)
if not ok then
    ngx.log(ngx.ERR, "failed to set gray status for user: ", err)
    ngx.exit(500)
end
通過在 Redis 中設置用戶的灰度狀態,您可以動態地控制用戶是否應該被路由到灰度環境。
4、根據需要,配置其他路徑或功能的灰度規則。您可以根據需要在 Nginx 配置中添加其他路徑或功能的灰度規則,以實現更復雜的灰度發布策略。
實踐:
這里主要使用OpenResty
nginx+lua 實現灰度----主要使用OpenResty
OpenResty(又稱:ngx_openresty) 是一個基于 NGINX 的可伸縮的 Web 平臺,OpenResty 是一個強大的 Web 應用服務器,Web 開發人員可以使用 Lua 腳本語言調動 Nginx 支持的各種 C 以及 Lua 模塊
openresty的api文檔: https://www.kancloud.cn/qq13867685/openresty-api-cn/159190
1、根據post請求url參數匹配進行路由
nginx配置如下:
#user  nobody;
worker_processes  1;
#error_log  logs/error.log;
#error_log  logs/error.log  notice;
#error_log  logs/error.log  info;
#pid        logs/nginx.pid;
events {
    worker_connections  1024;
}
http {
    include       mime.types;
    default_type  application/octet-stream;
    #log_format  main '$time_local 客戶端地址:$remote_addr–$remote_port 請求的URI和HTTP協議:$request 請求地址:$http_host HTTP請求狀態:$status upstream狀態:$upstream_status 負載地址:$upstream_addr url跳轉來源:$http_referer $body_bytes_sent $http_user_agent $request_uri';
    log_format  logFormat '$group $time_local 客戶端:$remote_addr–$remote_port 請求的URI和HTTP協議:$request 請求:$http_host HTTP狀態:$status upstream狀態:$upstream_status 負載:$upstream_addr
                          url跳轉:$http_referer $body_bytes_sent $http_user_agent $request_uri 請求參數 $query_string $args $document_root $uri
                          -----$request_uri $request_filename $http_cookie';
    access_log  logs/access.log  logFormat;
    sendfile        on;
    #tcp_nopush     on;
    #keepalive_timeout  0;
    keepalive_timeout  65;
    server{
        listen       80;   #監聽端口
        server_name  域名; #監聽地址
        access_log  logs/xx.com.access.log  logFormat;
              location /hello {
                default_type 'text/plain';
                content_by_lua 'ngx.say("hello ,lua scripts")';
        }
        location /myip {
                default_type 'text/plain';
                content_by_lua '
                        clientIP = ngx.req.get_headers()["x_forwarded_for"]
                        ngx.say("Forwarded_IP:",clientIP)
                        if clientIP == nli then
                                clientIP = ngx.var.remote_addr
                                ngx.say("Remote_IP:",clientIP)
                        end
                        ';
        }
        location / {
                default_type 'text/plain';
                lua_need_request_body on;
                #content_by_lua_file /etc/nginx/lua/dep.lua;
                #content_by_lua_file D:/sortware/openresty/openresty-1.17.8.2-win64/conf/dep.lua; # 指定由lua文件處理http請求
                content_by_lua_file D:/user/Downloads/openresty-1.19.9.1-win64/conf/dep.lua; # 指定由lua文件處理http請求
        }
        location @default_version {
            proxy_pass http://default;
            proxy_set_header  Host  $http_host;
            proxy_set_header  X-Real-IP  $remote_addr;
            proxy_set_header  X-Forwarded-For $proxy_add_x_forwarded_for;
        }
        location @new_version {
            proxy_pass http://new_version;
            proxy_set_header Host $http_host;
            #proxy_redirect default;
            proxy_set_header X-Real-IP $remote_addr;
            proxy_set_header X-Forwarded-For $proxy_add_x_forwarded_for;
        }
        location @old_version {
            proxy_pass http://old_version;
            proxy_set_header Host $http_host;
            proxy_set_header X-Real-IP $remote_addr;
            proxy_set_header X-Forwarded-For $proxy_add_x_forwarded_for;
        }
    }
	#標準預發環境
	upstream default {
		 server ip:port;
	}
    #預發2
	upstream new_version {
		 server ip:port;
	}
    #預發3
	upstream old_version {
		server ip:port;
	}
}
lua腳本如下:
--get請求uri參數

function SaveTableContent(file, obj)
      local szType = type(obj);
      print(szType);
      if szType == "number" then
            file:write(obj);
      elseif szType == "string" then
            file:write(string.format("%q", obj));
      elseif szType == "table" then
            --把table的內容格式化寫入文件
            --file:write("{n");
            for i, v in pairs(obj) do
                  SaveTableContent(file, i);
                  file:write(":");
                  SaveTableContent(file, v);
                  file:write(",");
			end
            --file:write("}n");
      else
			error("can't serialize a "..szType);
      end
end

function SaveTable(obj)

      local file = io.open("D:\user\Downloads\openresty-1.19.9.1-win64\logs\parmas.txt", "a");
      assert(file);
      SaveTableContent(file,obj);
      file:close();
end

local request_method = ngx.var.request_method
local getargs = nil
local args = nil
local read_body = nil
local body_data = nil
local thirdPolicystatus = nil
if "GET" == request_method then
	args = ngx.req.get_uri_args()
elseif "POST"== request_method then
	getargs = ngx.req.get_uri_args()
	args  	  = ngx.req.get_post_args()
	read_body = ngx.req.read_body()
	body_data = ngx.req.get_body_data()
end
if getargs ~= nil then
	SaveTable(getargs);
	thirdPolicystatus= getargs["thirdPolicystatus"];
	if thirdPolicystatus ~= nil then
		SaveTable(thirdPolicystatus);
	end
end

if args ~= nil then
	SaveTable(args);
end

if read_body ~= nil then
	SaveTable(read_body);
end

if body_data ~= nil then
	SaveTable(body_data);
end

if getargs ~= nil then
	thirdPolicystatus = getargs["thirdPolicystatus"]
	if thirdPolicystatus ~= nil and thirdPolicystatus == "1" then
		SaveTable("new_version-getargs");
		ngx.exec('@new_version')
	elseif thirdPolicystatus ~= nil and thirdPolicystatus == "2" then
		SaveTable("old_version-getargs");
		ngx.exec('@old_version')
	else
		SaveTable("default_version-getargs");
		ngx.exec('@default_version')
	end
end

if args ~= nil then
	if type(args) == "table" then
		thirdPolicystatus = tostring(args["thirdPolicystatus"])
		if thirdPolicystatus ~= nil and thirdPolicystatus == 1 then
			SaveTable("new_version-args-table");
			ngx.exec('@new_version')
		elseif thirdPolicystatus ~= nil and thirdPolicystatus == 2 then
			SaveTable("old_version-args-table");
			ngx.exec('@old_version')
		else
			SaveTable("default_version-args-table");
			ngx.exec('@default_version')
		end
	elseif type(args) == "string" then
		local json = require("cjson")
		local jsonObj = json.decode(args)
			thirdPolicystatus = jsonObj['thirdPolicystatus']
		if thirdPolicystatus ~= nil and thirdPolicystatus == 1 then
			SaveTable("new_version-args-string");
			ngx.exec('@new_version')
		elseif thirdPolicystatus ~= nil and thirdPolicystatus == 2 then
			SaveTable("old_version-args-string");
			ngx.exec('@old_version')
		else
			SaveTable("default_version-args-string");
			ngx.exec('@default_version')
		end
	end
end
return
host如下:
127.0.0.1 域名
訪問地址:
域名
菜單運營數據---保單數據,默認走default集群,保單狀態承保成功走new_version集群,保單狀態終止走old_version集群
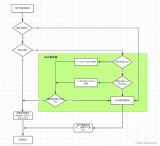
2、根據請求參數或ip等進行匹配redis緩存數據進行路由,靈活性更高。
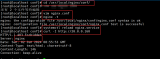
redis下載地址:https://github.com/tporadowski/redis/releases
nginx配置如下:
#user  nobody;
worker_processes  1;
#error_log  logs/error.log;
#error_log  logs/error.log  notice;
#error_log  logs/error.log  info;
#pid        logs/nginx.pid;
events {
    worker_connections  1024;
}
http {
    include       mime.types;
    default_type  application/octet-stream;
    #log_format  main '$time_local 客戶端地址:$remote_addr–$remote_port 請求的URI和HTTP協議:$request 請求地址:$http_host HTTP請求狀態:$status upstream狀態:$upstream_status 負載地址:$upstream_addr url跳轉來源:$http_referer $body_bytes_sent $http_user_agent $request_uri';
    log_format  logFormat '$group $time_local 客戶端:$remote_addr–$remote_port 請求的URI和HTTP協議:$request 請求:$http_host HTTP狀態:$status upstream狀態:$upstream_status 負載:$upstream_addr
                          url跳轉:$http_referer $body_bytes_sent $http_user_agent $request_uri 請求參數 $query_string $args $document_root $uri
                          -----$request_uri $request_filename $http_cookie';
    access_log  logs/access.log  logFormat;
    sendfile        on;
    #tcp_nopush     on;
    #keepalive_timeout  0;
    keepalive_timeout  65;
   server{
        listen       80;   #監聽端口
        server_name  域名; #監聽地址
        access_log  logs/xx.com.access.log  logFormat;
              location /redis {
                default_type 'text/plain';
                content_by_lua 'ngx.say("hello ,lua scripts redis")';
        }
        location / {
                default_type 'text/plain';
                lua_need_request_body on;
                content_by_lua_file D:/user/Downloads/openresty-1.19.9.1-win64/conf/redis.lua; # 指定由lua文件處理http請求
        }
        location @pre-prd {
            proxy_pass http://pre-prd;
            proxy_set_header Host $http_host;
            #proxy_redirect default;
            proxy_set_header X-Real-IP $remote_addr;
            proxy_set_header X-Forwarded-For $proxy_add_x_forwarded_for;
        }
        location @prd {
            proxy_pass http://prd;
            proxy_set_header Host $http_host;
            proxy_set_header X-Real-IP $remote_addr;
            proxy_set_header X-Forwarded-For $proxy_add_x_forwarded_for;
        }
    }
    #預發2演示線上
	upstream prd {
		 server ip:port;
	}
    #預發演示預發線上
	upstream pre-prd {
		 server ip:port;
	}
}
lua腳本如下:
--get請求uri參數
function SaveTableContent(file, obj)
      local szType = type(obj);
      print(szType);
      if szType == "number" then
            file:write(obj);
      elseif szType == "string" then
            file:write(string.format("%q", obj));
      elseif szType == "table" then
            --把table的內容格式化寫入文件
            --file:write("{n");
            for i, v in pairs(obj) do
                  SaveTableContent(file, i);
                  file:write(":");
                  SaveTableContent(file, v);
                  file:write(",");
			end
            --file:write("}n");
      else
			error("can't serialize a "..szType);
      end
end

function SaveTable(obj)
      --local file = io.open("D:\user\Downloads\openresty-1.19.9.1-win64\logs\parmas.txt", "a");
      local file = io.open("D:\user\Downloads\openresty-1.19.9.1-win64\logs\redis.txt", "a");
      assert(file);
      SaveTableContent(file,obj);
      file:close();
end


local request_method = ngx.var.request_method
local getargs = nil
local args = nil
local read_body = nil
local body_data = nil
local thirdPolicystatus = nil
if "GET" == request_method then
	args = ngx.req.get_uri_args()
elseif "POST"== request_method then
	getargs = ngx.req.get_uri_args()
	args  	  = ngx.req.get_post_args()
	read_body = ngx.req.read_body()
	body_data = ngx.req.get_body_data()
end

if getargs ~= nil then
	SaveTable("getargs");
	SaveTable(getargs);
	thirdPolicystatus= getargs["thirdPolicystatus"];
	if thirdPolicystatus ~= nil then
		SaveTable("thirdPolicystatus");
		SaveTable(thirdPolicystatus);
	end
end

if args ~= nil then
	SaveTable("args");
	SaveTable(args);
end

if read_body ~= nil then
	SaveTable("read_body");
	SaveTable(read_body);
end

if body_data ~= nil then
	SaveTable("body_data");
	SaveTable(body_data);
end


local redis = require "resty.redis"
local cache = redis.new()
cache:set_timeout(60000)

local ok, err = cache.connect(cache, '127.0.0.1', 6379)
if not ok then
	SaveTable("not ok");
	ngx.exec("@prd")
	return
end

local local_ip = ngx.req.get_headers()["X-Real-IP"]
if local_ip == nil then
        local_ip = ngx.req.get_headers()["x_forwarded_for"]
		SaveTable("local_ip1");
		if local_id ~= nil then
		SaveTable(local_id);
		end
end

if local_ip == nil then
	local_ip = ngx.var.remote_addr
	SaveTable("local_ip2");
	if local_id ~= nil then
	SaveTable(local_id);
	end
end

-- 在 redis 中根據客戶端 ip 獲取是否存在值
local res, err = cache:get(local_ip)
-- 如果存在則轉發到 @pre-prd
if res == "1" then
		SaveTable(res);
		SaveTable("pre-prd");
        ngx.exec("@pre-prd")
        return
else
	SaveTable("-------");
	SaveTable(local_ip);
	SaveTable(res);
	cache:set(local_ip)
end

-- 如果不存在,則轉發到 @prd
SaveTable("prd");
ngx.exec("@prd")

local ok, err = cache:close()
if not ok then
    ngx.say("failed to close:", err)
    return
end
return
使用時這里根據redis緩里緩存的ip地址進行負載路由。
?
三、相關配置與語法
1、Nginx配置文件詳解
源碼:https://trac.nginx.org/nginx/browser
官網:http://www.nginx.org/
windows 安裝包下載地址:https://nginx.org/en/download.html
nginx.conf
########### 每個指令必須有分號結束。#################
# 全局塊  比如工作進程數,定義日志路徑;
#配置用戶或者組,默認為nobody nobody。
#user  nobody;
#user administrator administrators;

#允許生成的進程數,默認為1,一般建議設成CPU核數1-2倍
worker_processes 1;
#worker_processes  8;


#指定nginx進程運行文件存放地址
#pid /nginx/pid/nginx.pid;

#制定日志路徑,級別。這個設置可以放入全局塊,http塊,server塊,級別依次為:#debug|info|notice|warn|error|crit|alert|emerg
error_log logs/error.log error;
#error_log  logs/error.log;
#error_log  logs/error.log  notice;
#error_log  logs/error.log  info;

#Events塊 設置處理輪詢事件模型,每個工作進程最大連接數及http層的keep-alive超時時間;
events {
   	#使用epoll的I/O 模型處理輪詢事件。
   	#可以不設置,nginx會根據操作系統選擇合適的模型
   	#事件驅動模型,select|poll|kqueue|epoll|resig|/dev/poll|eventport
   	#use epoll;
   	#工作進程的最大連接數量, 默認1024個
   	worker_connections  2048;

    #設置網路連接序列化,防止驚群現象發生,默認為on
    accept_mutex on;
    #設置一個進程是否同時接受多個網絡連接,默認為off
    multi_accept on;
}

# http塊 路由匹配、靜態文件服務器、反向代理、負載均衡等
http {
 	# 導入文件擴展名與文件類型映射表 mime.types
    include       mime.types;
    #默認文件類型,默認為text/plain
    default_type  application/octet-stream;
    #取消服務日志
    #access_log off;
    #日志格式及access日志路徑 自定義格式
    log_format myFormat '$time_local 客戶端地址:$remote_addr–$remote_port 請求的URI和HTTP協議:$request 請求地址:$http_host HTTP請求狀態:$status upstream狀態:$upstream_status 負載地址:$upstream_addr url跳轉來源:$http_referer $upstream_addr $body_bytes_sent $http_user_agent';
    #combined為日志格式的默認值
    access_log logs/access.log myFormat;
    #允許sendfile方式傳輸文件,默認為off,可以在http塊,server塊,location塊。
    sendfile on;
    #sendfile開啟時才開啟。
    tcp_nopush   on;
	server_names_hash_bucket_size 64;
    #每個進程每次調用傳輸數量不能大于設定的值,默認為0,即不設上限。
    sendfile_max_chunk 100k;
    #連接超時時間,默認為75s,可以在http,server,location塊。
    keepalive_timeout 65;

    #--------------------靜態文件壓縮-----------------------------#
    #Nginx可以對網站的css、js 、xml、html 文件在傳輸前進行壓縮,大幅提高頁面加載速度。經過Gzip壓縮后頁面大小可以變為原來的30%甚至更小。使用時僅需開啟Gzip壓縮功能即可。你可以在http全局塊或server塊增加這個配置。
    # 開啟gzip壓縮功能
    #gzip  on;
    gzip on;

    # 設置允許壓縮的頁面最小字節數; 這里表示如果文件小于10k,壓縮沒有意義.
    gzip_min_length 10k;

    # 設置壓縮比率,最小為1,處理速度快,傳輸速度慢;
    # 9為最大壓縮比,處理速度慢,傳輸速度快; 推薦6
    gzip_comp_level 6;

    # 設置壓縮緩沖區大小,此處設置為16個8K內存作為壓縮結果緩沖
    gzip_buffers 16 8k;

    # 設置哪些文件需要壓縮,一般文本,css和js建議壓縮。圖片視需要要鎖。
    gzip_types text/plain text/css application/json application/x-javascript text/xml application/xml application/xml+rss text/javascript;
    #--------------------靜態文件壓縮-----------------------------#
	server {
		listen       80;
		server_name  localhost;
		location / {
            root   html;
            index  index.html index.htm;
        }
        error_page   500 502 503 504  /50x.html;
        location = /50x.html {
            root   html;
        }
    }
    #http server塊
    server {
        keepalive_requests 120; #單連接請求上限次數。
        listen       8081;   #監聽端口
        server_name  域名 #監聽地址
        #ssi on;
		#autoindex on;
        charset utf-8;
        client_max_body_size 10M; # 限制用戶上傳文件大小,默認1M
        #access_log  logs/host.access.log  myFormat; #定義訪問日志,可以針對每一個server(即每一個站點)設置它們自己的訪問日志。

        # 轉發動態請求到web應用服務器
        #location ^~ /api {
            #rewrite ^/api/(.*)$ /$1 break;
            #proxy_pass https://stream;
            #break;#終止匹配
        #}
		location / {
           # 使用proxy_pass轉發請求到通過upstream定義的一組應用服務器
			proxy_pass      http://stream ;
			proxy_set_header X-Forwarded-For $proxy_add_x_forwarded_for;
			proxy_set_header Host $http_host;
			proxy_redirect off;
			proxy_set_header X-Real-IP  $remote_addr;
        }
		location  ~*^.+$ {       #請求的url過濾,正則匹配,~為區分大小寫,~*為不區分大小寫。
			proxy_pass  	http://stream ;  #請求轉向stream 定義的服務器列表
        }

        #location / {
            #autoindex on;
            #try_files $uri $uri/ /index.html?$args;
        #}

        # 規則1:通用匹配
        #location / {
			#ssi on;
			#autoindex on;                 #自動顯示目錄
            #autoindex_exact_size off;     #人性化方式顯示文件大小否則以byte顯示
            #autoindex_localtime on;       #按服務器時間顯示,否則以gmt時間顯示
            #root   /root;                 #定義服務器的默認網站根目錄位置
            #index index.html index.htm;   #定義首頁索引文件的名稱  設置默認頁
            # 使用proxy_pass轉發請求到通過upstream定義的一組應用服務器
            #proxy_pass   http://mysvr;      #負載配置
            #proxy_set_header X-Forwarded-For $proxy_add_x_forwarded_for;
            #proxy_set_header Host $http_host;
            #proxy_redirect off;
            #proxy_set_header X-Real-IP  $remote_addr;
            #deny ip;  # 拒絕的ip
            #allow ip; # 允許的ip
        #}

        # 規則2:處理以/static/開頭的url
        location ^~ /static {
            alias /usr/share/nginx/html/static; # 靜態資源路徑
        }
        #= 精確匹配 1
        #^~ 以某個字符串開頭 2
        #~ 區分大小寫的正則匹配 3
        #~* 不區分大小寫的正則匹配 4
        #!~ 區分大小寫的不匹配正則 5
        #!~* 不區分大小寫的不匹配正則 6
        #/ 通用匹配,任何請求都會匹配到 7
        #location  ~*^.+$ {       #請求的url過濾,正則匹配,~為區分大小寫,~*為不區分大小寫。
            #root path;  #根目錄
            #index vv.txt;  #設置默認頁
			#proxy_pass  http://stream;  #請求轉向stream 定義的服務器列表
            #deny 127.0.0.1;  #拒絕的ip
            #allow ip; #允許的ip
        #}
        #-----------------------------靜態文件緩存--------------------#
        #緩存可以加快下次靜態文件加載速度。我們很多與網站樣式相關的文件比如css和js文件一般不怎么變化,緩存有效器可以通過expires選項設置得長一些。
        # 使用expires選項開啟靜態文件緩存,10天有效
        location ~ ^/(images|javascript|js|css|flash|media|static)/  {
             root    /var/www/big.server.com/static_files;
            expires 10d;
        }
		#-----------------------------靜態文件緩存--------------------#
        # 錯誤頁面
		error_page   500 502 503 504  /50x.html;
        location = /50x.html {
            root   html;
        }
    }

    #-------------$符號的全局變量含義--------------#
    #$args, 請求中的參數;
    #$content_length, HTTP請求信息里的"Content-Length";
    #$content_type, 請求信息里的"Content-Type";
    #$document_root, 針對當前請求的根路徑設置值;
    #$document_uri, 與$uri相同;
    #$host, 請求信息中的"Host",如果請求中沒有Host行,則等于設置的服務器名;
    #$limit_rate, 對連接速率的限制;
    #$request_method, 請求的方法,比如"GET"、"POST"等;
    #$remote_addr, 客戶端地址;
    #$remote_port, 客戶端端口號;
    #$remote_user, 客戶端用戶名,認證用;
    #$request_filename, 當前請求的文件路徑名
    #$request_body_file,當前請求的文件
    #$request_uri, 請求的URI,帶查詢字符串;
    #$query_string, 與$args相同;
    #$scheme, 所用的協議,比如http或者是https,比如rewrite ^(.+)$
    #$scheme://example.com$1 redirect;
    #$server_protocol, 請求的協議版本,"HTTP/1.0"或"HTTP/1.1";
    #$server_addr, 服務器地址;
    #$server_name, 請求到達的服務器名;
    #$server_port, 請求到達的服務器端口號;
    #$uri, 請求的URI,可能和最初的值有不同,比如經過重定向之類的。
    #-------------$符號的全局變量含義--------------#


    #錯誤頁面
    #error_page 404 https://www.baidu.com; #錯誤頁
    #error_page 404 500 502 503 504 403 /error.shtml;

    # 負載均衡
    upstream insurance-pre {
      #weigth參數表示權值,權值越高被分配到的幾率越大
      #--------------------負載均衡方式------------------#
      #1.輪詢(默認)
      #2.權重,weight越大,承擔任務越多
      #server ip:port weight=5
      #3.ip_hash
      #ip_hash;
      #4.url_hash
      #hash $request_uri;
      #5. fair(第三方)--按后端服務器的響應時間來分配請求,響應時間短的優先分配。使用這個算法需要安裝nginx-upstream-fair這個庫。
      #fair;
      #--------------------負載均衡方式------------------#
      server ip:port   weight=5; # weight越高,權重越大
      server ip:port weight=1;
      server ip:port  weight=1;
      server ip:port backup; # 熱備
    }
	# 轉發動態請求
    #server {
        #listen 80;
        #server_name  localhost;
        #client_max_body_size 1024M;
        #location / {
            #proxy_pass http://localhost:8080;
            #proxy_set_header Host $host:$server_port;
        #}
    #}
    # http請求重定向到https請求
    #server {
        #listen 80;
        #server_name 域名;
        #return 301 https://$server_name$request_uri;
    #}
    server {
        keepalive_requests 120; #單連接請求上限次數。
        listen       80;   #監聽端口
        server_name  域名 #監聽地址
        #ssi on;
		#autoindex on;
        charset utf-8;
        client_max_body_size 10M; # 限制用戶上傳文件大小,默認1M
        #access_log  logs/host.access.log  myFormat; #定義訪問日志,可以針對每一個server(即每一個站點)設置它們自己的訪問日志。
        # 轉發動態請求到web應用服務器
        #location ^~ /api {
            #rewrite ^/api/(.*)$ /$1 break;
            #proxy_pass https://域名;
            #break;#終止匹配
        #}
		location / {
           # 使用proxy_pass轉發請求到通過upstream定義的一組應用服務器
			proxy_pass       http://tomcat_gray1;
			proxy_set_header X-Forwarded-For $proxy_add_x_forwarded_for;
			proxy_set_header Host $http_host;
			proxy_redirect off;
			proxy_set_header X-Real-IP  $remote_addr;
        }
		location  ~*^.+$ {       #請求的url過濾,正則匹配,~為區分大小寫,~*為不區分大小寫。
			proxy_pass  	http://域名;  #請求轉向域名 定義的服務器列表
        }
    }
    #標準預發環境
	upstream tomcat_gray1 {
		server ip;
		server 域名;
	}

	upstream tomcat_gray2 {
		server 域名;
	}
}
host 配置
127.0.0.1 域名
瀏覽器訪問 域名
可以通過觀察access.log發現請求接入日志。
2、lua基礎語法
教程:https://www.runoob.com/lua/if-else-statement-in-lua.html
lua的IDE編輯器:https://github.com/rjpcomputing/luaforwindows
3、nginx實現灰度
根據前端請求參數進行灰度到不同節點。
#user  nobody;
worker_processes  1;
#error_log  logs/error.log;
#error_log  logs/error.log  notice;
#error_log  logs/error.log  info;
#pid        logs/nginx.pid;
events {
    worker_connections  1024;
}
http {
    include       mime.types;
    default_type  application/octet-stream;
    #log_format  main '$time_local 客戶端地址:$remote_addr–$remote_port 請求的URI和HTTP協議:$request 請求地址:$http_host HTTP請求狀態:$status upstream狀態:$upstream_status 負載地址:$upstream_addr url跳轉來源:$http_referer $body_bytes_sent $http_user_agent $request_uri';
    log_format  logFormat '$group $time_local 客戶端:$remote_addr–$remote_port 請求的URI和HTTP協議:$request 請求:$http_host HTTP狀態:$status upstream狀態:$upstream_status 負載:$upstream_addr
                          url跳轉:$http_referer $body_bytes_sent $http_user_agent $request_uri 請求參數 $query_string $args $document_root $uri
                          -----$request_uri $request_filename $http_cookie';
    access_log  logs/access.log  logFormat;
    sendfile        on;
    #tcp_nopush     on;
    #keepalive_timeout  0;
    keepalive_timeout  65;
    #gzip  on;
    server {
        listen       80;   #監聽端口
        server_name  域名; #監聽地址
        access_log  logs/xx.com.access.log  logFormat;
        #方式二、nginx+lua實現灰度
        ## 1、將對localhost訪問由/opt/app/lua/dep.lua進行處理
        ## 2、根據邏輯處理后,決定回調如下兩個其中1個內部跳轉
        #方式三根據請求參數值匹配進行路由
        #/policy/policyInfoList?thirdPolicystatus=2
        set $group "default";
        if ($query_string ~* "thirdPolicystatus=1"){ #動態控制路由
            set $group new_version;
        }
        if ($query_string ~* "thirdPolicystatus=2"){
            set $group old_version;
        }
        location /
        {
            default_type "text/html";
            #content_by_lua_file D:/sortware/openresty/openresty-1.17.8.2-win64/conf/dep.lua; # 指定由lua文件處理http請求
            proxy_pass http://$group;
            proxy_set_header  Host       $host;
            proxy_set_header  X-Real-IP    $remote_addr;
            proxy_set_header  X-Forwarded-For $proxy_add_x_forwarded_for;
            index index.html index.htm;
        }
    }
	#標準預發環境
	upstream default {
		server ip:port;
	}
    #預發2
	upstream new_version {
		server ip:port;
	}
    #預發3
	upstream old_version {
		server ip:port;
	}
}
host如下:
127.0.0.1 域名
訪問地址:
域名
菜單運營數據---保單數據,默認走default集群,保單狀態承保成功走new_version集群,保單狀態終止走old_version集群
根據cookie內的參數進行負載
#user  nobody;
worker_processes  1;

#error_log  logs/error.log;
#error_log  logs/error.log  notice;
#error_log  logs/error.log  info;

#pid        logs/nginx.pid;


events {
    worker_connections  1024;
}


http {
    include       mime.types;
    default_type  application/octet-stream;
    #log_format  main '$time_local 客戶端地址:$remote_addr–$remote_port 請求的URI和HTTP協議:$request 請求地址:$http_host HTTP請求狀態:$status upstream狀態:$upstream_status 負載地址:$upstream_addr url跳轉來源:$http_referer $body_bytes_sent $http_user_agent $request_uri';
    log_format  logFormat '$http_cookie $group $time_local 客戶端:$remote_addr–$remote_port 請求的URI和HTTP協議:$request 請求:$http_host HTTP狀態:$status upstream狀態:$upstream_status 負載:$upstream_addr
                          url跳轉:$http_referer $body_bytes_sent $http_user_agent $request_uri 請求參數 $query_string $args $document_root $uri
                          -----$request_uri $request_filename ';
    access_log  logs/access.log  logFormat;

    sendfile        on;
    #tcp_nopush     on;

    #keepalive_timeout  0;
    keepalive_timeout  65;
    #gzip  on;
    server {
        listen       80;   #監聽端口
        server_name  域名; #監聽地址
        access_log  logs/xx.com.access.log  logFormat;
        #方式二、nginx+lua實現灰度
        ## 1、將對localhost訪問由/opt/app/lua/dep.lua進行處理
        ## 2、根據邏輯處理后,決定回調如下兩個其中1個內部跳轉
        #方式三根據請求參數值匹配進行路由
        #域名policy/policyInfoList?thirdPolicystatus=2
        set $group "default";
        if ($query_string ~* "thirdPolicystatus=1"){ #動態控制路由
            set $group new_version;
            }
        if ($query_string ~* "thirdPolicystatus=2"){
            set $group old_version;
            }
        if ($http_cookie ~* "sso.xx.com=BJ.E2C7D319112E7F6252BF010770269E235820211121073248"){
            set $group pro_version;
            }
        if ($http_cookie ~* "sso.xx.com!=BJ.E2C7D319112E7F6252BF010770269E235820211121073248"){
            set $group grey_version;
            }
        location /
        {
            default_type "text/html";
            #content_by_lua_file D:/sortware/openresty/openresty-1.17.8.2-win64/conf/dep.lua; # 指定由lua文件處理http請求
            proxy_pass http://$group;
            proxy_set_header  Host       $host;
            proxy_set_header  X-Real-IP    $remote_addr;
            proxy_set_header  X-Forwarded-For $proxy_add_x_forwarded_for;
            index index.html index.htm;
        }
    }
	#標準預發環境
	upstream default {
		server ip:port;
	}
    #預發2
	upstream new_version {
		server ip:port;
	}
    #預發3
	upstream old_version {
		server ip:port;
	}
        #預發2
	upstream pro_version {
		server ip:port;
	}
    #預發3
	upstream grey_version {
		server ip:port;
	}
}
根據cookie內容轉發到不同的集群
四、相關可操作和替換性
想法一:如果這個時候我門需要一個動態化配置控制臺則可以通過javaweb等工程進行操作redis實現實時更新redis數據從而控制灰度
想法二:切換其他數據源比如
1.MySQL/MariaDB: 使用 Lua 的 lua-mysql 或 LuaSQL 庫,您可以在 Lua 中連接和查詢 MySQL 或 MariaDB 數據庫。
2.PostgreSQL: 使用 Lua 的 lua-postgres 或 LuaSQL 庫,您可以在 Lua 中連接和查詢 PostgreSQL 數據庫。
3.MongoDB: 使用 Lua 的 mongo-lua-driver 庫,您可以在 Lua 中連接和操作 MongoDB 數據庫。
4.HTTP API: 使用 Lua 的 LuaHTTP 庫,您可以在 Lua 中發起 HTTP 請求,并與遠程的 HTTP API 進行通信。
5.Cassandra: 使用 Lua 的 lua-cassandra 庫,您可以在 Lua 中連接和查詢 Cassandra 數據庫。
想法三:切換其他腳本語言
1.JavaScript: 通過使用 Nginx 的 ngx_http_js_module,您可以在 Nginx 中使用 JavaScript。這可以讓您使用 JavaScript 腳本來實現一些灰度發布或其他功能。此外,JavaScript 也廣泛用于前端開發,因此可以在前后端一體化的項目中更容易共享代碼邏輯。
2.LuaJIT: LuaJIT 是一個通過即時編譯實現高性能的 Lua 解釋器。它提供了與標準 Lua 解釋器兼容的 API,但是比標準 Lua 解釋器更快。使用 LuaJIT,您可以獲得更高的性能,同時保持與 Lua 的兼容性。
3.Python: 如果您已經熟悉 Python,您可以使用 Python-NGINX-Module 在 Nginx 中嵌入 Python。這樣可以使用 Python 編寫 Nginx 的配置文件和處理請求的邏輯。
4.Java: 使用 nginx-jvm-clojure 或 nginx-jwt 等模塊,您可以在 Nginx 中嵌入 Java 或 Clojure。這些模塊提供了在 Nginx 上運行 Java 或 Clojure 代碼的功能,可以與其他 Java 或 Clojure 庫和框架進行集成。
想法四:切換其他web服務器或反向代理服務器
1.Apache HTTP Server: Apache 是一個廣泛使用的開源 Web 服務器和反向代理服務器,它支持多種模塊和擴展,提供了豐富的功能和配置選項。
2.Microsoft IIS: Internet Information Services (IIS) 是由 Microsoft 開發的 Web 服務器,專為 Windows 操作系統設計。它是 Windows Server 默認的 Web 服務器,提供了廣泛的功能和集成。
3.Caddy: Caddy 是一個用 Go 編寫的現代化的 Web 服務器和反向代理服務器。它具有簡單配置、自動 HTTPS、HTTP/2 支持等特性。
4.HAProxy: HAProxy 是一個高性能的負載均衡器和反向代理服務器,適用于高流量的 Web 應用程序。它具有豐富的負載均衡和代理功能。
5.Envoy: Envoy 是一個輕量級的開源代理服務器和通信總線,適用于云原生和微服務架構。它具有動態配置、負載平衡、流量管理等功能。
大家可以根據自己的想法或者興趣進行研究,本文不做過多介紹
五、其他相關優秀文章傳送門
?一種簡單從端上進行服務端上線灰度驗證方案?
?功能級灰度開量工具?
?采購域灰度環境搭建策略?
?基于istio的灰度發布架構方案實踐之路?
?【穩定性】履約平臺組上線發布三板斧(可灰度、可驗證、可回滾)?
?代碼層面的灰度?
?幾年前寫的一個灰度工具(拿來即用)?
?【行云部署】小狗漫畫-指定ip的灰度部署?
審核編輯 黃宇
-
nginx
+關注
關注
0文章
171瀏覽量
12653 -
Lua
+關注
關注
0文章
83瀏覽量
11002 -
Redis
+關注
關注
0文章
387瀏覽量
11496
發布評論請先 登錄
Redis集群部署配置詳解
Nginx配置終極指南
Nginx性能優化終極指南

Nginx緩存配置詳解
DLP9500UV是如何控制每個像素實現256個灰度等級的?
Redis實戰筆記
Redis Cluster之故障轉移

華為云 Flexus X 輕松實現 Redis 一主多從高效部署

Nginx日常運維方法Linux版

全志亮相灰度科技2024年新品發布會
nginx負載均衡配置介紹


 工商網監
工商網監
評論